Running low on storage space on your Windows computer is a common problem many users face. Instead of spending hefty amounts on expanding your storage space, there are methods to free up your existing storage space on a Windows PC.
Moreover, it is recommended that you do not use more than 70 percent of the total disk space (especially on the C/boot driver) to avoid performance issues.
If you run out of free space on your computer, there are many ways to create more room for data and improve its performance.
Windows 11 has integrated tools to help you manage your storage devices more robustly. These include Storage Sense, Cleanup Recommendations, and native compression mechanisms.
Not only that, the Windows Settings application is now more advanced than ever, using which you can gain complete insight into the components taking up your storage space.
If you are experiencing performance issues due to low disk space on your C drive, or want to fix the “low disk space” warning prompting now and then, perform the given methods to create space and get rid of the prompt.
Note: The screenshots and methods listed below are directed for Windows 11, but many are also applicable to Windows 10.
Table of contents
- Check What is Consuming Storage Space
-
How to Free Up Hard Drive Space in Windows
- Remove/Delete Temporary Files
- Perform Cleanup Recommendations
- Enable Storage Sense
- Perform Disk Cleanup
- Disable Hibernation Mode
- Shrink/Disable Pagefile
- Compress Drive using Compactor
- Enable OneDrive Files On-Demand
- Rebuild Indexing Library
- Uninstall Unused Apps
- Delete Unused Language Packs
- Delete Unused User Accounts
- Scan for Malware
- Final Thoughts
Check What is Consuming Storage Space
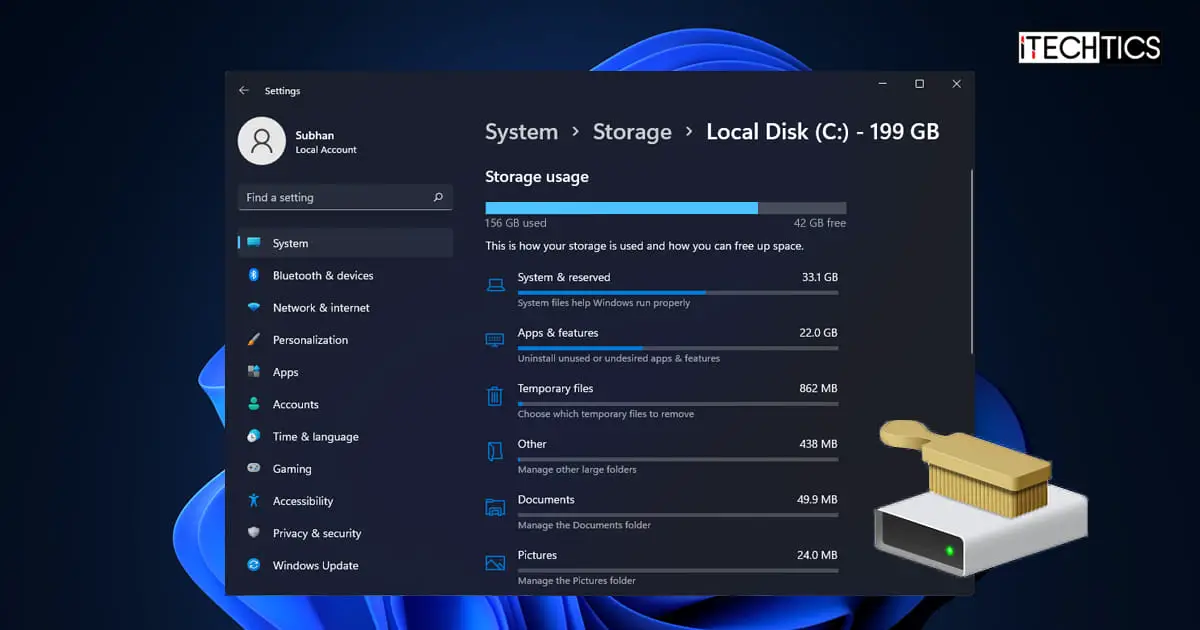
Before we begin creating room on our disk, let us check what is consuming it in the first place. Windows 11 makes this easier by providing an interface to view the different types of data taking up space on your disk.
A typical Windows 11 clean installation takes nearly 30GB of space on your disk. What is taking up the rest? Here are the steps to find out:
-
Go to the following:
Settings app >> System >> Storage
You will now see a breakdown of what is consuming your storage disk in segmented categories.
-
Click “Show more categories” under the details to see more information.

Show more storage information -
Note down what type of items are taking up the most storage space on your hard drive.

View breakdown of consumed storage space in Windows


This information gives a glimpse of what data is important and what can be removed to create significant free space on your drive. If you are using an earlier version of Windows, you can use WinDirStat disk space analyzer to check exactly what is taking up space on your drive.
How to Free Up Hard Drive Space in Windows
Remove/Delete Temporary Files
Temporary files are created when the system performs a certain task. They are supposed to be removed automatically, but occasionally are not, eventually consuming a lot of space.
Temporary files can be safely removed, without having any negative effects on the operating system. Note that these also include temporary Windows update files that are no longer needed.
You can delete these files using the Disk Cleanup tool by following these steps:
-
Navigate to the following:
Settings app >> System >> Storage >> Temporary files
-
Select the data you want to delete and click “Remove Files.”

Remove/Delete temporary files On this Settings page, you will likely see the following options to select and remove:
- Cleanup
- Recycle Bin
- Delivery Optimization Files
- Thumbnails
- Microsoft Defender Antivirus
- Temporary Internet Files
- Temporary files
- Windows error reports and feedback diagnostics
- DirectX Shader Cache
- Previous Windows installation(s)
- Temporary Windows installation files
-
When asked for confirmation, click Continue.

Confirm removal of temporary files


The selected data will now be deleted, freeing up space on your disk. If the created space is insufficient, you can continue to perform the following methods to free up more space on the drive.
Perform Cleanup Recommendations
The Settings app in Windows 11 also suggests a few actions you can take to free up additional space on the hard drive. You can manually choose whether to perform those actions or not.
To act on the cleanup recommendations, follow these steps:
-
Navigate to the following:
Settings app >> System >> Storage >> Cleanup recommendations
-
Expand each of the following categories and select the recommended files that you wish to remove:
- Temporary files
- Large or unused files
- Files synced to the cloud
- Unused apps

Select files to clean using Cleanup Recommendations -
When selected, click “Cleanup” under each of those categories to delete the selected items.

Delete items using Cleanup Recommendations -
When asked for confirmation, click Continue.

Confirm removal of items using Cleanup Recommendations


The selected data will now be removed.
Enable Storage Sense
Storage Sense is a Windows 11 feature that automatically performs cleanup tasks to keep your disk utilization to a minimum. Using this feature, you can control when some files and folders are automatically deleted when they are no longer in use.
Perform the following steps to use Storage Sense to free up disk space on your drive:
-
Navigate to the following:
Settings app >> System >> Storage >> Storage Sense
-
Select “Keep Windows running smoothly by automatically cleaning up temporary system and app files.”

Enable automatic cleanup of temporary files using Storage Sense -
Toggle the slider under “Automatic User content cleanup” into the On position.

Enable automatic user cleanup This will allow Windows to automatically delete files and folders when it detects that the space is running low, or on a specified schedule.
-
Select the settings from the drop-down menus under the respective configurations.

Configure Storage Sense Here, you can set when Storage Sense should run, and when to empty the recycle bin and the Downloads folder.
-
(Optional) Click “Run Storage Sense now” to run a scan right now and create free space on the disk.

Run Storage Sense


Perform Disk Cleanup
Disk Cleanup is a built-in feature in Windows 10 that wipes out any unnecessary data the system no longer requires, automatically. You can perform the steps below on the volume that is low on free disk space:
Note: This method will not apply to Windows 11 anymore.
-
Use File Explorer to right-click on the volume with low disk space, and click Properties.

Open system drive properties -
In the General tab, click “Disk Cleanup.”

Initiate disk cleanup -
Click “Clean up system files.”

Clean up system files -
Check all the boxes under Files to delete that you want to remove, and then click Ok.

Select items to remove using Disk Cleanup You can choose from the following categories:
- Windows Update Cleanup.
- Microsoft Defender Antivirus.
- Downloaded Program Files.
- Temporary Internet Files.
- Windows error reports and feedback diagnostics.
- DirectX Shader Cache.
- Delivery Optimization Files.
- Device driver packages.
- Language Resource Files.
- Previous Windows installation(s).
- Recycle Bin.
- Temporary files.
- Thumbnails.
-
When prompted for confirmation, click “Delete Files.”

Delete files The deletion process should now begin.
-
When completed, continue to close all the windows.

Disable Hibernation Mode
The hibernation mode in Windows puts the computer in deep sleep while maintaining all of your open data in a file called “hiberfil.sys.” This hidden file is stored in the system drive and can significantly grow in size. Disabling the hibernation mode automatically removes the file, freeing up space.
The image below shows the size of the hiberfil.sys file on our PC:

Disabling this feature would automatically create almost 16 GB of free disk space on our boot drive. To disable hibernation, follow these steps:
-
Launch an elevated Command Prompt.
-
Run the following cmdlet:
powercfg -h off
Disable hibernation using Command Prompt
Shrink/Disable Pagefile
The Pagefile is another hidden system file whose purpose is to compensate for any shortages of RAM. Occasionally, the data in your system’s memory takes refuge in the Pagefile, which is on your storage drive (C drive), and subsequently takes up significant space.
Although we do not suggest that you disable Pagefile entirely, since it is an important feature that contributes to the normal functionality of the operating system, it can still be done if absolutely necessary.
You can determine the optimal Pagefile size and then use the guide below to set it up or disable it entirely.
Here are the steps to disable or shrink the pagefile size:
-
Navigate to the following:
Settings >> System >> About
-
Click “Advanced System Settings” in the Related Links section.

Open advanced system settings -
Switch to the Advanced tab and then click “Settings” under Performance.

Open performance settings -
Switch to the Advanced tab, and then click “Change” under Virtual memory.

Change virtual memory settings -
Unselect “Automatically manage paging file size for all drives.” Then select “Custom size” and then enter the minimum and maximum values for the Pagefile size. Click Set and OK when done.
Alternatively, select the “No paging file” radio button to disable the feature entirely.

Optimize Pagefile size or disable it -
Restart the computer for the changes to take effect.

When the computer reboots, you will notice that the free space on the system drive has increased the same as the Pagefile size has been reduced.
Compress Drive using Compactor
Although Windows allows the option to compress the data inside a drive using native methods, we do not suggest you use it. Rather, we suggest that you compress “selective” data using Compactor.
Compactor is an easy-to-use Graphical User Interface (GUI) based application that uses the existing Windows compact.exe command-line tool to compress the data selected. Since it is based on an existing Microsoft command, it is completely safe to use.
Why prefer Compactor over the native compression options? The biggest disadvantage of using the system compression option is that it compresses all the contents of the drive. This is not recommended for the system drive. It will make the system slow because the system will have to decompress the files before opening them.
Using the Compactor utility is pretty simple. However, the creator of the utility takes no responsibility for your data. Hence, we would recommend you create a restore point if things go sideways.
You can also use our top selection of disk imaging and backup software so you never lose your data or operating system again.
Perform the following steps to compress your data and free up some storage space:
-
Download the Compactor application on the target computer.
-
Extract the contents of the downloaded file.
-
Run the application and click Settings.

Open Compactor settings -
Select the file extensions you want to compress and the compression mechanism. Click “Save” when done, then return to the Compact tab.

Set compression settings using Compact -
Click “Choose a folder.”

Choose a folder -
Browse through the dialog box and select the folder you wish to compress.
You may also select an entire partition by clicking on it, and then click “Select Folder.”
The application will now display the compression summary if you perform it.
-
Click “Compress” to begin compression.

Begin compression using Compact This step may take a few minutes depending on the type of compression and folder size.


You will be prompted when the compression is complete. You may now notice that the files and folders occupy less space on the disk than before, as in the comparison below:

Enable OneDrive Files On-Demand
OneDrive has a “Files On-Demand” feature that does not save a file synced to OneDrive locally, but rather fetches it from the cloud over the internet when it is opened. Of course, it requires an active internet connection to be able to get the desired file.
Enabling this feature will save disk space since the files only exist at a remote cloud location. Here’s how to enable it:
-
Click on the OneDrive icon from the Quick Access menu in the taskbar.

Access OneDrive from Quick Access menu -
Click on the gear icon in the top-right corner of the flyout, and then click Settings.

Open OneDrive settings -
Switch to the Settings tab and select “Save space and download files as you use them” under Files On-Demand. Then click Ok.

Enable files on-demand from OneDrive
You can now move your files and folders to the OneDrive folder using Windows Explorer, freeing up space on your local PC.
Rebuild Indexing Library
Indexing is the process of storing file data, such as its content, metadata, dates associated, etc. so that the operating system can perform a “lookup” when the user performs a search. Over time, this stored data can become large in quantity, even though some of the indexed content may no longer exist.
You can thus try to free up some space by rebuilding the indexing library or removing indexed files and folders from the list.
Click on the respective link to learn how to do it.
Uninstall Unused Apps
You can also create some free space on your storage drive by removing any apps or app data that is no longer in use. Here is how:
-
Navigate to the following:
Settings app >> Apps >> Installed apps
-
Here, sort the apps by size.

Sort applications by size -
Click on the ellipses (3 dots) in front of the application you wish to remove, and then click Uninstall.

Uninstall an unused app -
Click “Uninstall” again.

Confirm app uninstallation


The application will now be removed from your computer, freeing up space.
You can repeat these steps to remove even more unused applications from your PC.
Alternatively, you can also uninstall apps and programs from the Programs & Features applet by typing in “appwiz.cpl” in the Run Command box.
Delete Unused Language Packs
Language packs in Windows can also consume a significant amount of storage space on your PC. If one or more languages are no longer in use, you can remove them using the following steps to free up storage space:
-
Navigate to the following:
Settings app >> Time & language >> Language & region
-
Under Preferred languages, click on the ellipses (3 dots) in front of the language that you wish to delete, and then click Remove.
Note: The language to be removed should not be the current display language.

Remove a language pack

The language pack will now be deleted from your computer, creating additional free space.
Delete Unused User Accounts
If your PC has local user accounts that are no longer in use, you can simply delete them. This will remove any files and folders those accounts contain that are no longer needed.
Follow these steps to delete unused user accounts:
-
Go to the following:
Settings app >> Accounts >> Other users
-
Click the account you want to delete and then click Remove.

Remove an unused user account -
When asked for confirmation, click “Delete account and data.”

Delete user account and its data

Repeat these steps and remove all the user accounts and their data that are no longer needed.
Scan for Malware
It may be possible that a potential virus is creating hoax files to slow down your computer. Therefore, it is recommended that you perform a deep system scan and get rid of any trojan horses or malware. Here is a list of the top antivirus software to use to perform the scan.
In case you are proceeding to purchase antivirus software, here are the 17 aspects you should always consider.
You can also use the built-in Windows Defender in Windows to scan your computer for malware. If you want to, open the Windows Security page in the Settings app, and then click Virus & Threat Protection. Next, click the Quick Scan button to perform a scan. Alternatively, you can also click Scan options below it to select a deep scan of your OS.

Final Thoughts
Performing some or all of the methods above will definitely create some free space on your computer.
The Windows operating system provides several native ways to free up and manage your storage space. This is why we suggest you avoid using third-party tools on this particular OS to create some storage space.
Not that third-party tools can cause problems, because some of them are trusted and efficient, but that there is no need to use an external tool to perform the same tasks you can achieve using Windows native tools.
That said, our methods given in this post will automatically clear the recycle bin and other temporary files. Therefore, we have not given a standalone method for doing so.
This article is a part of our ongoing “Disk cleanup and optimization” series. Also see the following relevant articles:
- 13 tips on how to free up disk space on Windows 11/10
- Free up space on Windows using Compactor
- Enable and Disable reserved storage in Windows
- Clean up WinSxS folder to save space in Windows
- Fix File Explorer showing wrong disk space in drive properties
- Fix Extend Volume option grayed out in Windows 11/10
- How to cleanup the SoftwareDistribution folder
- Uninstall/remove old drivers from Windows
- Fix and disable Low Disk Space warning in Windows


