Key Points
- To uninstall Microsoft Edge on Windows 10 or 11, run the command “vivetool.exe /enable /id:44353396” with ViveTool, grant the Administrators group ownership and full control of the file “IntegratedServicesRegionPolicySet.json” at “C:\Windows\System32”, edit the file to set “enabled” by default and add the country code, then uninstall Microsoft Edge from Settings > Apps > Installed apps.
Microsoft Edge is the proprietary web browser for Windows 10 and 11 operating systems. It comes preinstalled with other Universal Windows Platform (UWP) apps, however, it cannot be removed from the OS like the others. If you try to uninstall the browser, the option will be grayed out.
Microsoft Edge is integrated into the operating system and is a crucial component of it. Other Windows features are dependent upon this browser to perform their tasks. If the browser is removed, certain features, like opening an article in the Widgets board, will redirect you to download Edge from the Microsoft Store, instead of opening the link in your new default browser.
That said, Microsoft was recently forced to make Windows compliant with the Digital Markets Art (DMA) for the European Union (EU), which included disabling Copilot and making certain apps removable (including Edge), amongst other adjustments. These adjustments are only for EU users, but this means that the remaining features will become Edge-independent as well.
While you can use other browsers alongside Edge, some might want to remove it completely. With the recent Windows updates, that is now possible.
You can now uninstall Edge on both Windows 10 and Windows 11. For Windows 10, you should be on build 19045.3757 or higher, and for Windows 11, the build should be either 22631.2787 (22H2) or 22621.2787 (23H2), or higher.
To check your OS build, run the command “winver” in the Run Command box.
This guide gives a detailed step-by-step on how to remove Microsoft Edge from your PC.
Uninstall/Remove Microsoft Edge from Windows
Previously, you could uninstall Microsoft Edge from the Command Prompt. However, that method no longer works. Follow the steps below to uninstall Microsoft Edge:
-
Make sure that your OS is on the following builds or above:
- Windows 10: 19045.3757
- Windows 11: 22631.2787 or 22621.2787
-
Download ViveTool from the GitHub page.

Download ViVeTool -
Right-click the downloaded package and click “Extract all.”

Extract ViveTool -
Open the extracted folder using File Explorer and copy its complete path.

Copy path to extracted ViveTool folder -
Press the Windows key + R to open the Run Command box.
-
Type in “cmd” and press CTRL + Shift + Enter on the keyboard at the same time to launch an elevated Command Prompt.
-
Within the Command Prompt, use the “CD” command to change the working directory to the extracted ViveTool folder. Replace “[Path]” with the copied path to the folder:
cd /d [Path]
Change directory to the ViveTool folder -
Run the following command to enable the option to uninstall Edge:
vivetool /enable /id:44353396
Enable feature with ViveTool -
Restart the computer.
-
After the restart, navigate to the following path using File Explorer:
C:\Windows\system32
-
Look for the file “IntegratedServicesRegionPolicySet.json,” right-click it, and then click Properties.

Open properties for IntegratedServicesRegionPolicySet.json file -
Switch to the Security tab and click Advanced.

Open advanced security settings -
Click Change.

Change owner for IntegratedServicesRegionPolicySetjson -
Write the “Administrators” object name and click “Check Names.” This will select the local Administrators group.

Select the Administrators group as the owner -
Click OK.
-
On the Advanced security settings window, click Apply and OK. If prompted with a warning dialog box, click OK there too.

Apply the changes -
Back on the Properties window, click Edit.

Edit security permissions for IntegratedServicesRegionPolicySet.json -
Select the Administrators group.
-
Check the “Full Control” box under the Allow column.
-
Click Apply and OK. If prompted for a confirmation, click Yes.

Give the Administrators group full control -
Click OK again.
-
Now search for the Notepad in the Start menu, and click “Run as administrator.”

Run Notepad as an administrator -
In Notepad, click File from the title bar menu and then click Open.

Open a file with Notepad -
From the Open dialog box, navigate to the following path:
C:\Windows\System32
-
Change the File type to “All files.”
-
Select the file “IntegratedServicesRegionPolicySet.json” and click Open.

Open the IntegratedServicesRegionPolicySet.json file in Notepad -
While keeping the Notepad file open, press the Windows key + R to open the Run Command box.
-
Type in “regedit” and press Enter to open the Registry Editor.
-
Navigate to the following path from the left pane:
Computer\HKEY_USERS\.DEFAULT\Control Panel\International\Geo
-
Note down the value for the “Name” string in the right pane.

Note value for the Name string -
Return to Notepad and change “disabled” to “enabled” in the “defaultState” field.

Change the default state to Enabled -
In the “region” section, in the square brackets in front of “enabled“, add the value noted for “Name” in the Registry Editor inside the inverted commas followed by a comma, as in this image:

Add region value -
Click File and then click Save.

Save changes to the IntegratedServicesRegionPolicySet.json file -
Restart the computer again.
-
Press the Windows key + i to open the Settings app.
-
Click Apps.
-
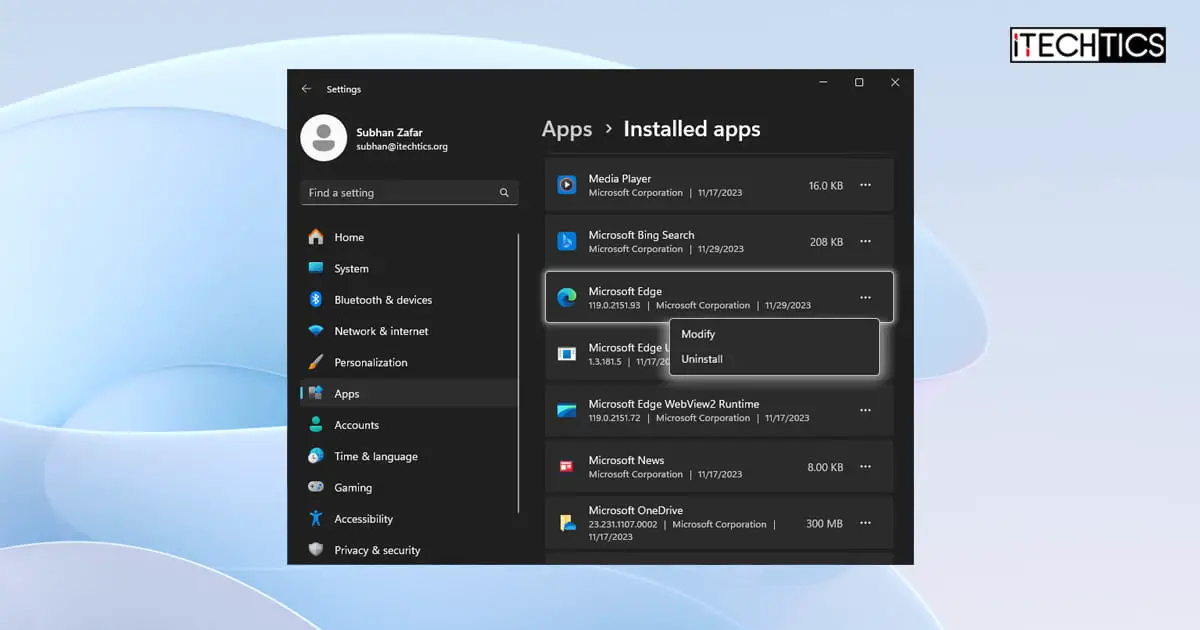
Go to “Installed apps.”

Open the Install apps settings page -
Click on the 3 dots in front of “Microsoft Edge” and then click Uninstall.

Uninstall Microsoft Edge from Settings -
Confirm Edge uninstallation.

Confirm Edge uninstallation -
If asked for a confirmation again, click Uninstall again.

Reconfirm Edge removal


After performing these steps, Microsoft Edge will be removed from your computer.
Updating your operating system through Windows Update won’t reinstall Edge again. However, in case you need the browser again, you can install it from the Microsoft Store, download it from the website, or run the following command in Command Prompt:
winget install --id XPFFTQ037JWMHSTakeaway
Microsoft is gradually working toward making the Windows operating system more flexible, especially since the EU has stepped on its toes to promote equal business opportunities with the DMA. This will eventually make Windows more flexible for all users (hopefully).
Right now, it is only Microsoft Edge that can be removed. Soon, other applications, which were uninstallable and sometimes considered bloatware, will also become removable.


