If you are running out of space in a specific drive/volume on your Windows computer, you will normally find the Extend Volume option in the Disk Management Console grayed out, and there is nothing you can do to free up space but delete your data.
Don’t panic yet. We have several solutions to fix your grayed-out problem, so that you can extend your volume, so more data can be kept within the same drive.
This is usually important when your system/boot drive (Normally C drive) is filling up rapidly and you do not have any room left to install new apps and programs.
Table of contents
Why Extend Volume is Grayed Out
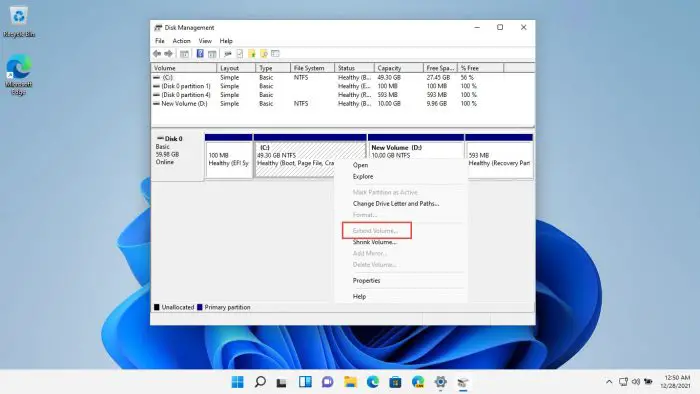
If you right-click on the volume partition in the Disk Management Console and find the Extend Volume option is grayed out and cannot be selected, it can be due to any one of the following reasons:
- Partition is in FAT/FAT32 format.
- There is no contiguous unallocated space to the right of the partition on the same, basic disk.
- There is no unallocated space on any other dynamic disk.
Windows is unable to shrink or extend partitions in FAT format. Therefore, a FAT partition may need to be deleted or reformatted if you wish to extend it.
Furthermore, if you have a basic hard drive, there needs to be contiguous unallocated space to the right of the volume that you want to extend. Even unallocated space before (to the left) the volume will not suffice to extend the volume.
Another thing to note is that an MBR partition may not expand beyond 2 TBs.
This could be the reason why the Extend Volume option is greyed out on your Management Console.
Fix Extend Volume Greyed Out
There are several methods to extend the volume on your PC, even when the option is grayed out. The Disk Management Console offers various controls to the user for better manageability.
That said, the Settings application in Windows 11 also offers to change the size of a volume, but is insufficient and confusing, which is why we shall not be discussing that method in this post (Those options are not available in Windows 10).
Convert FAT to NTFS
If you see a partition is formatted in FAT or FAT32, it can simply not be expended. In such a case, the whole partition must be reformatted in NTFS.
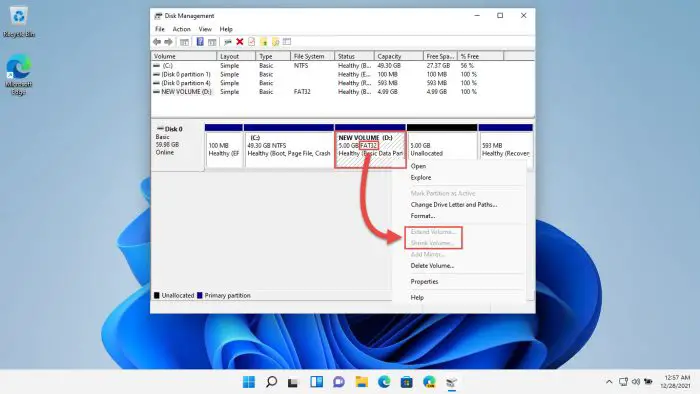
Make sure your data on the partition is backed up before following the steps below to format it to NTFS:
- Right-click on the partition in the Disk Management Console and click Format from the context menu.
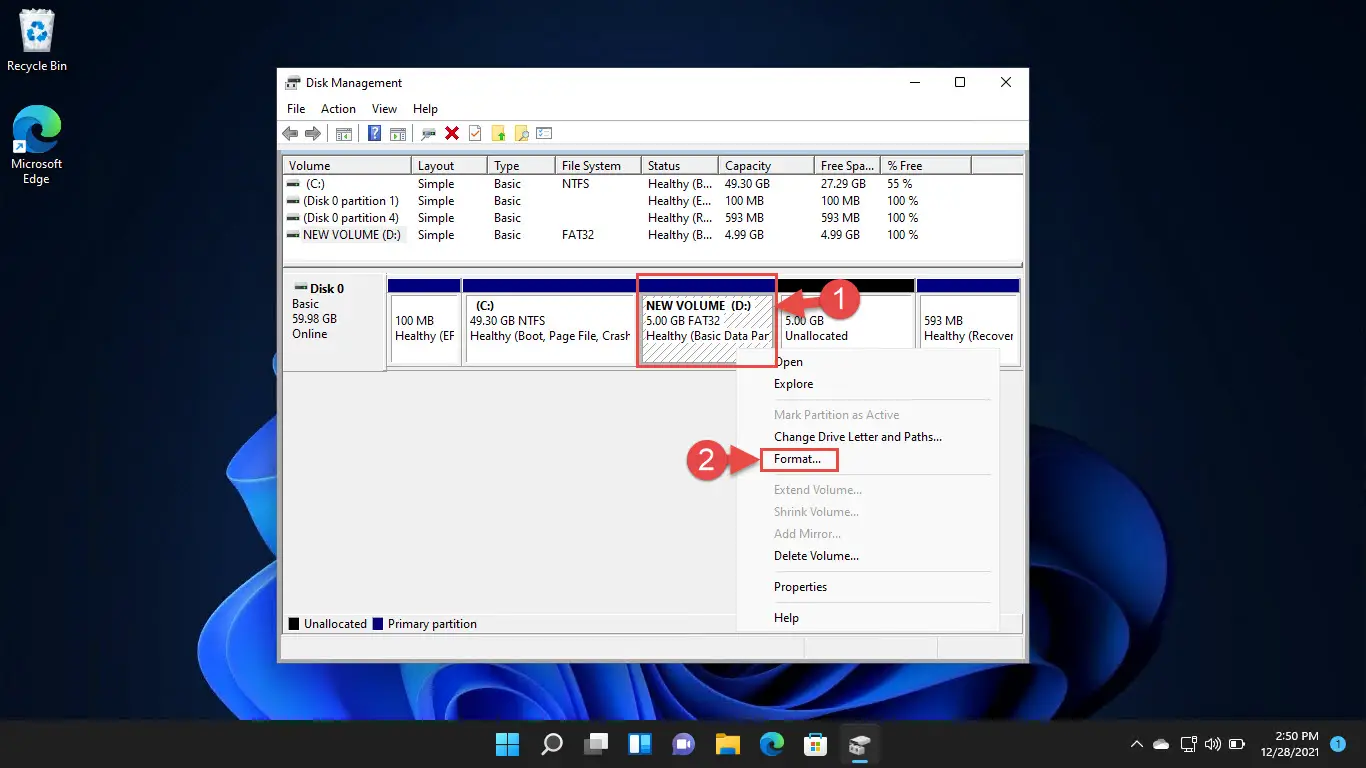
- From the formatting window, select NTFS from the drop-down menu in front of File System and then click OK. Leave all other options in their default settings.

- Click OK on the confirmation dialog box.
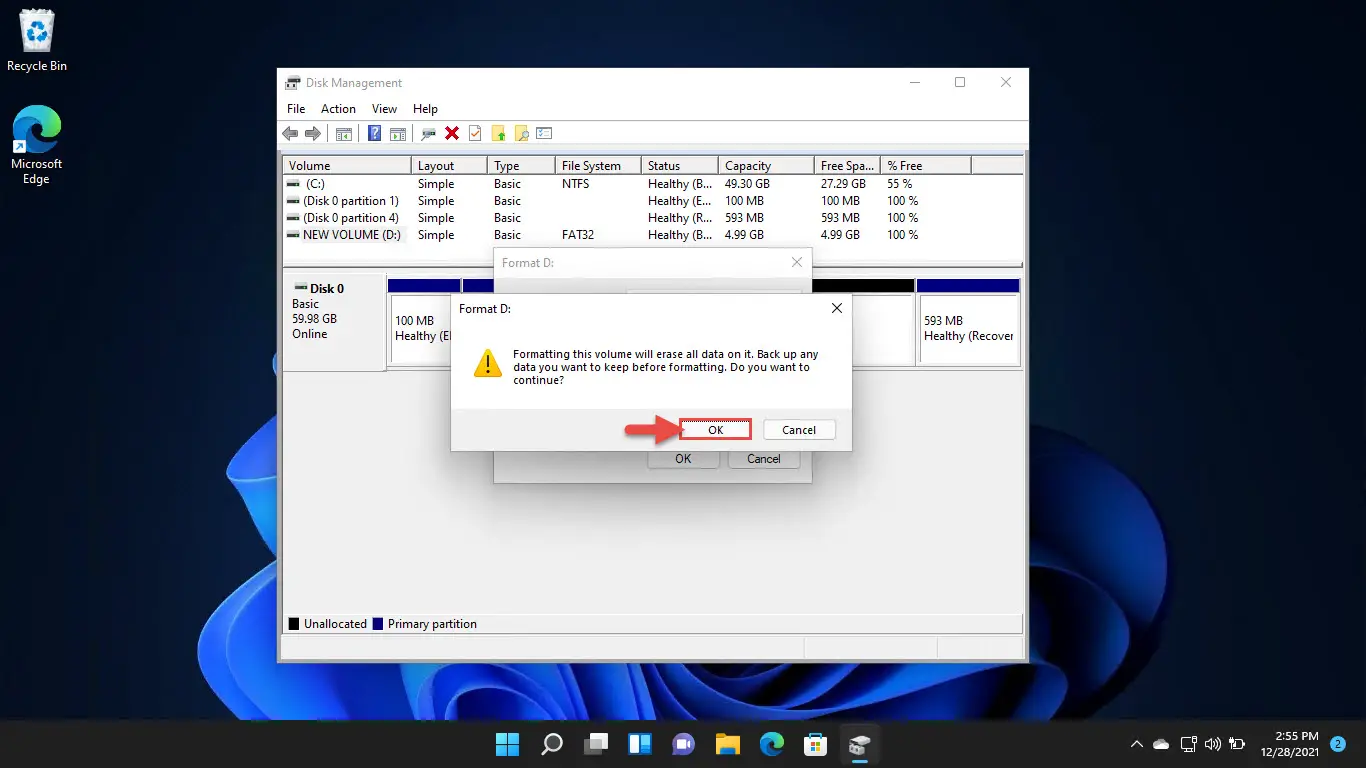
As you may now notice, the partition will be reformatted in NTFS. Try to extend the partition now and see if the issue has been resolved. If the issue persists, there is likely no unallocated/available space for the partition to expand to.
Delete Adjacent Volume
If there is no contiguous unallocated space to the right of the volume that you wish to extend, the Extend Volume option will remain grayed out. For this reason, an unallocated space is required to the right of the partition in the disk management console.
As you may see in the image below, the volume (D drive) still cannot be extended even though there is unallocated space (to the left) available.
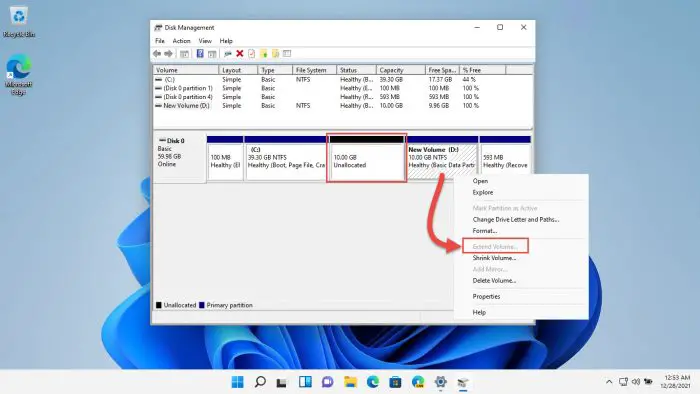
In this scenario, the partition to the right of the volume you want to extend must be deleted to convert it into unallocated space. Deleting the volume will erase all the data on it. Therefore, ensure your files and folders are backed up before proceeding with the given steps:
- Open the Disk Management Console by typing in diskmgmt.msc in Run.
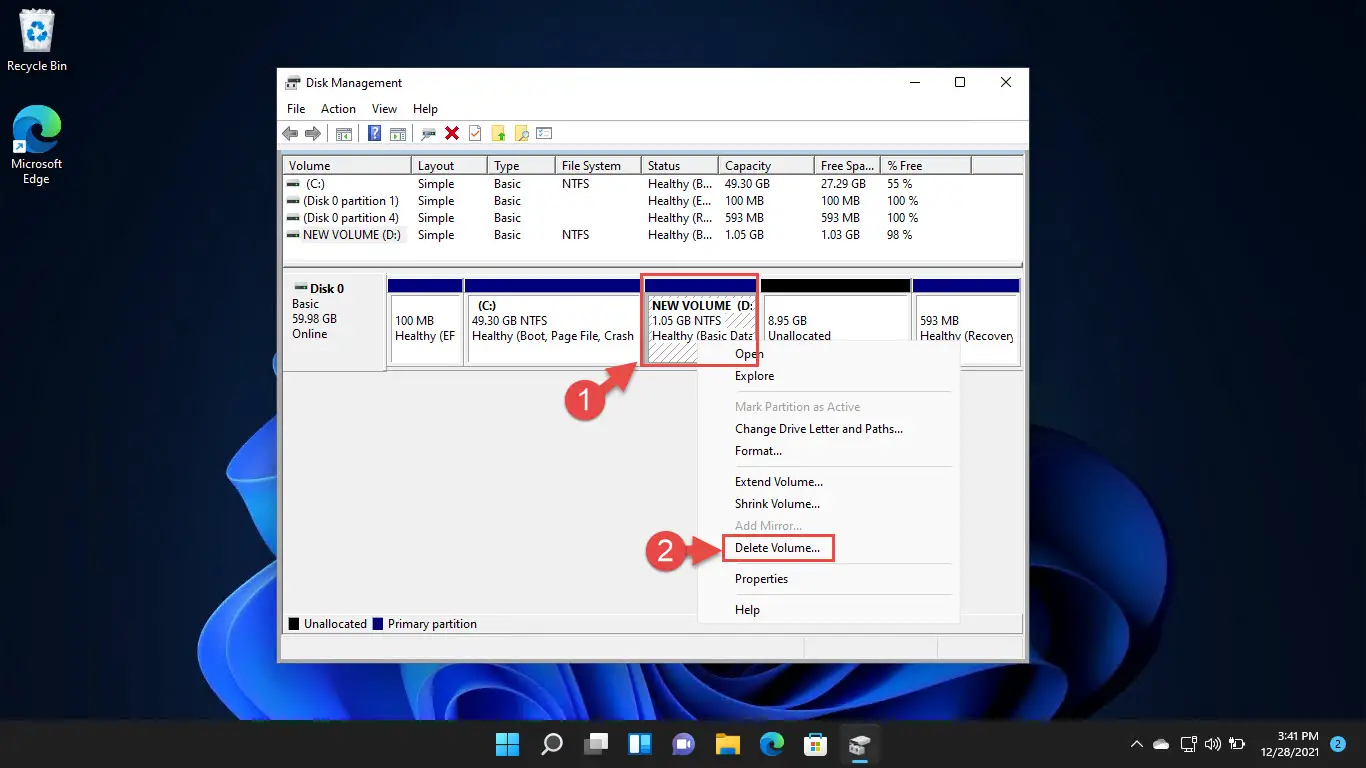
- Right-click on the volume up to the right of the partition that you wish to extend, and then click Delete Volume from the context menu.
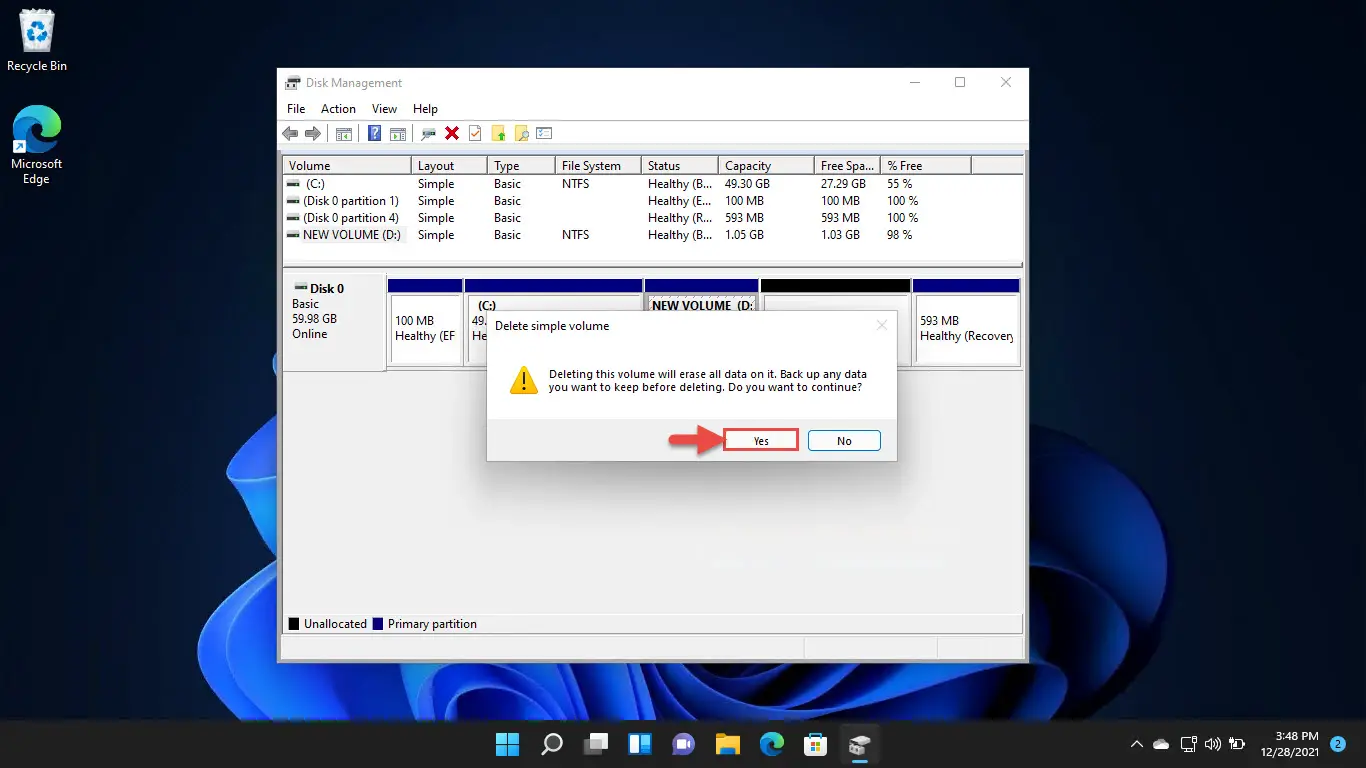
- In the confirmation dialog box, click Yes.
- The volume will now be deleted, which you should now see as “Unallocated.” Now right-click on the volume you want to extend, you should be able to click Extend Volume from the context menu.
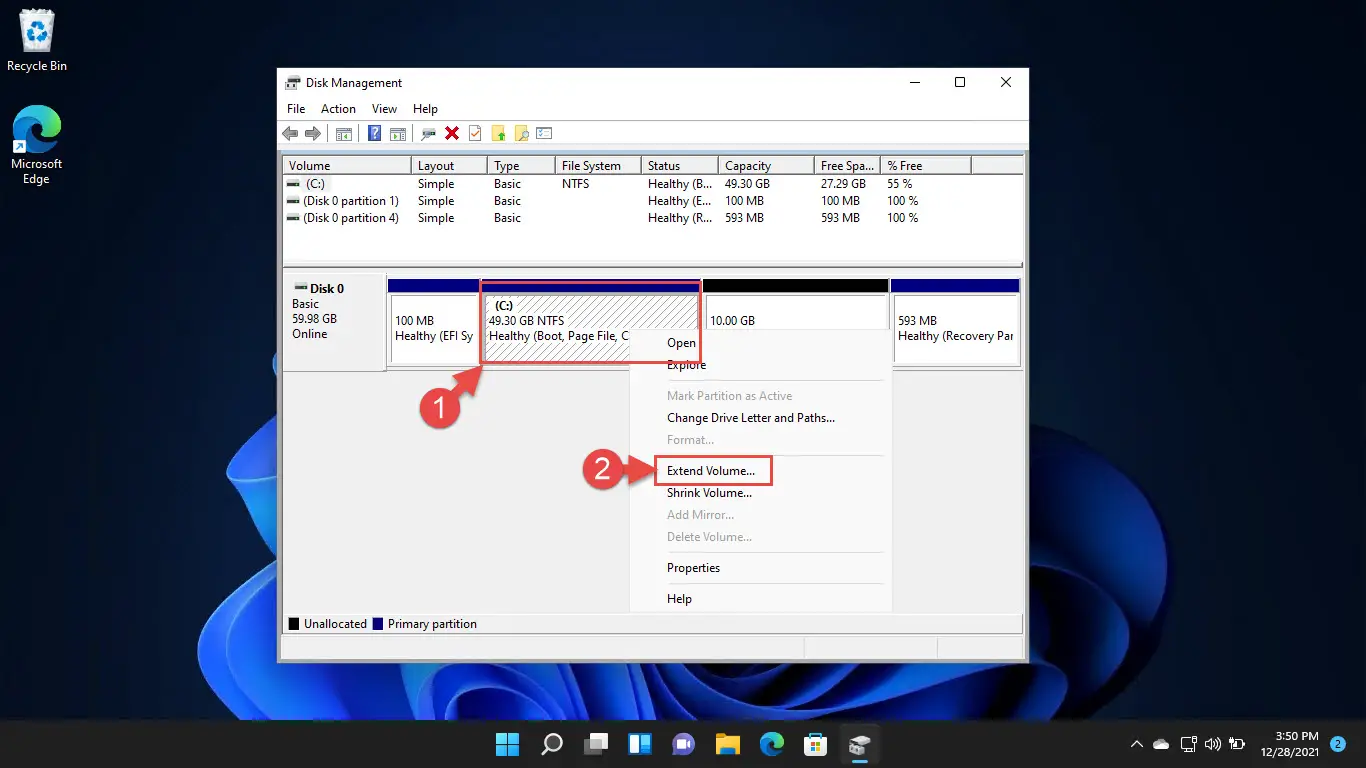
- The Extend Volume Wizard will now launch. Click Next on the welcome screen.
- On the next screen, make sure the unallocated space is in the Selected category. Then, enter the amount of space (in MBs) that you want to extend it by. Click Next when done.

- On the final screen, click Finish.
You will now have successfully extended the volume.
Extend to Another Disk
Windows cannot extend the volume if there is unallocated space on another disk, but this is only if the disk is basic. If the disks are dynamic, it can create a partition that seems like it is located in a single place, but is distributed across 2 or more disks.
If you cannot spare some space on the current disk, you can attach a separate disk with your PC and make the older disk dynamic to extend its partition across the other disk.
Note: This method is only applicable for non-boot volumes. This means that the system volumes cannot be extended using the given method.
Also note that once a disk is converted to dynamic, it cannot be converted back to basic without completely reformatting it.
Follow the steps below to convert your basic disk to dynamic, and then extend a partition:
- Start by shutting down your computer and attach a new hard drive. If on a VM, attach a new Virtual Hard Disk (VHD).
- Once attached, turn on your computer and open the Disk Management Console by typing in diskmgmt.msc in Run.
- You will see that the new hard drive has been attached. If there are existing partitions, we suggest you delete (some or all) and create some unallocated space.
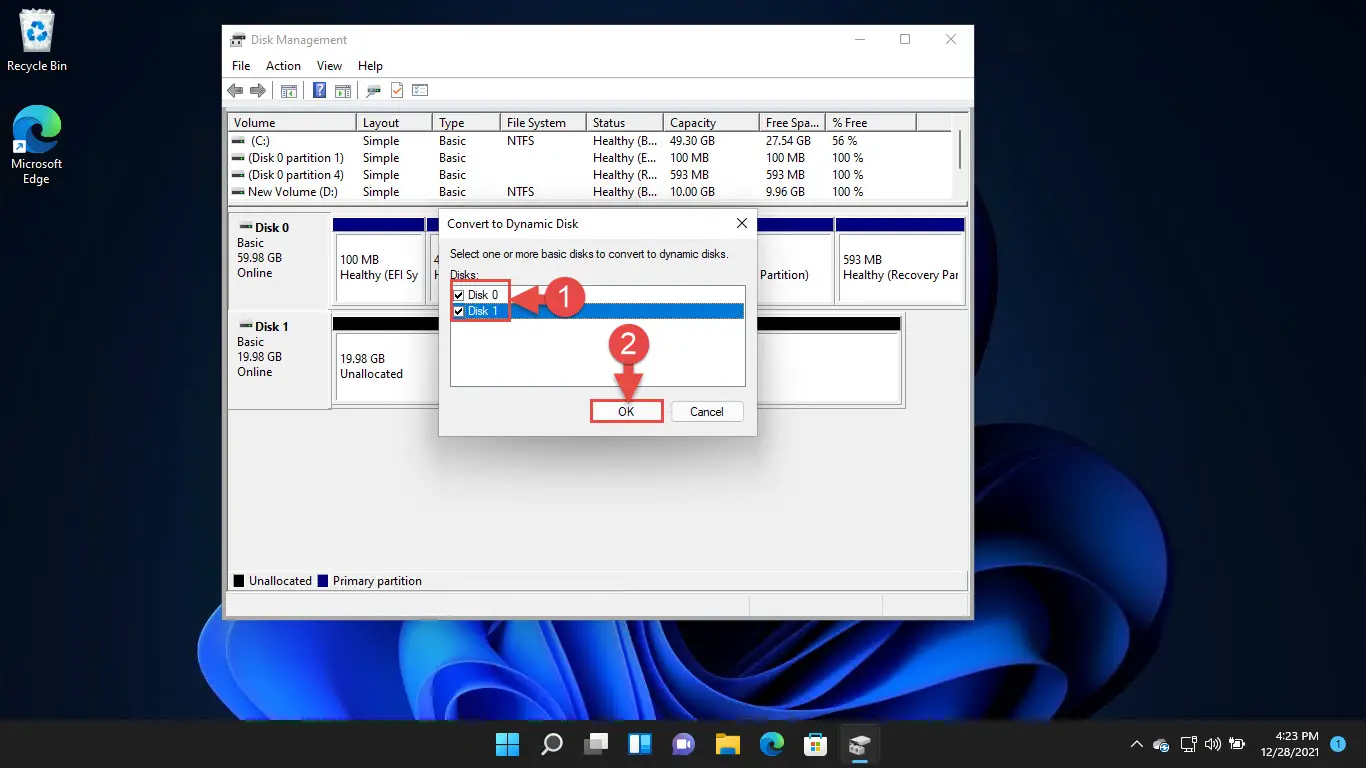
- Now right-click on the disk which has the partition you want to extend (or onto which you want to extend it to) and click Convert to dynamic disk.

- From the pop-up window, check the correct disks are selected, and click Ok.
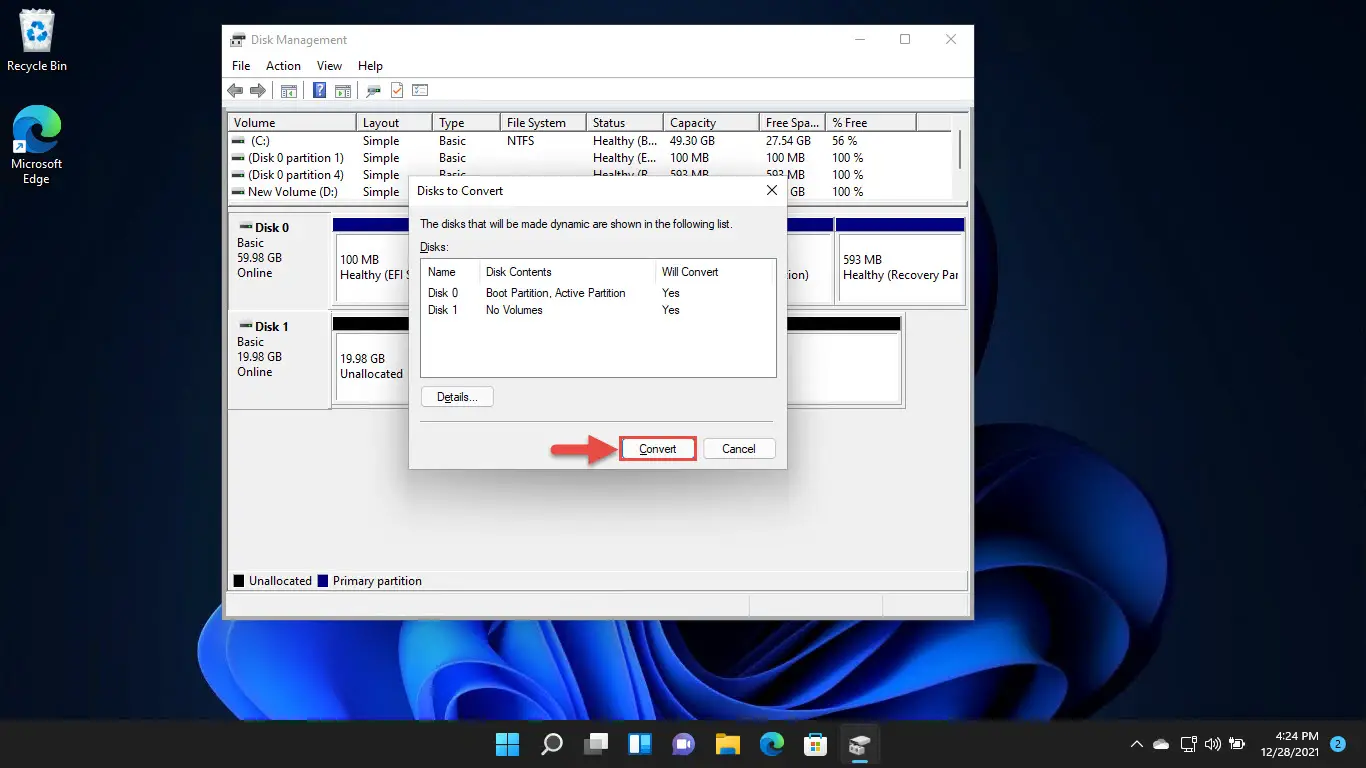
- Now click Convert on the next screen.
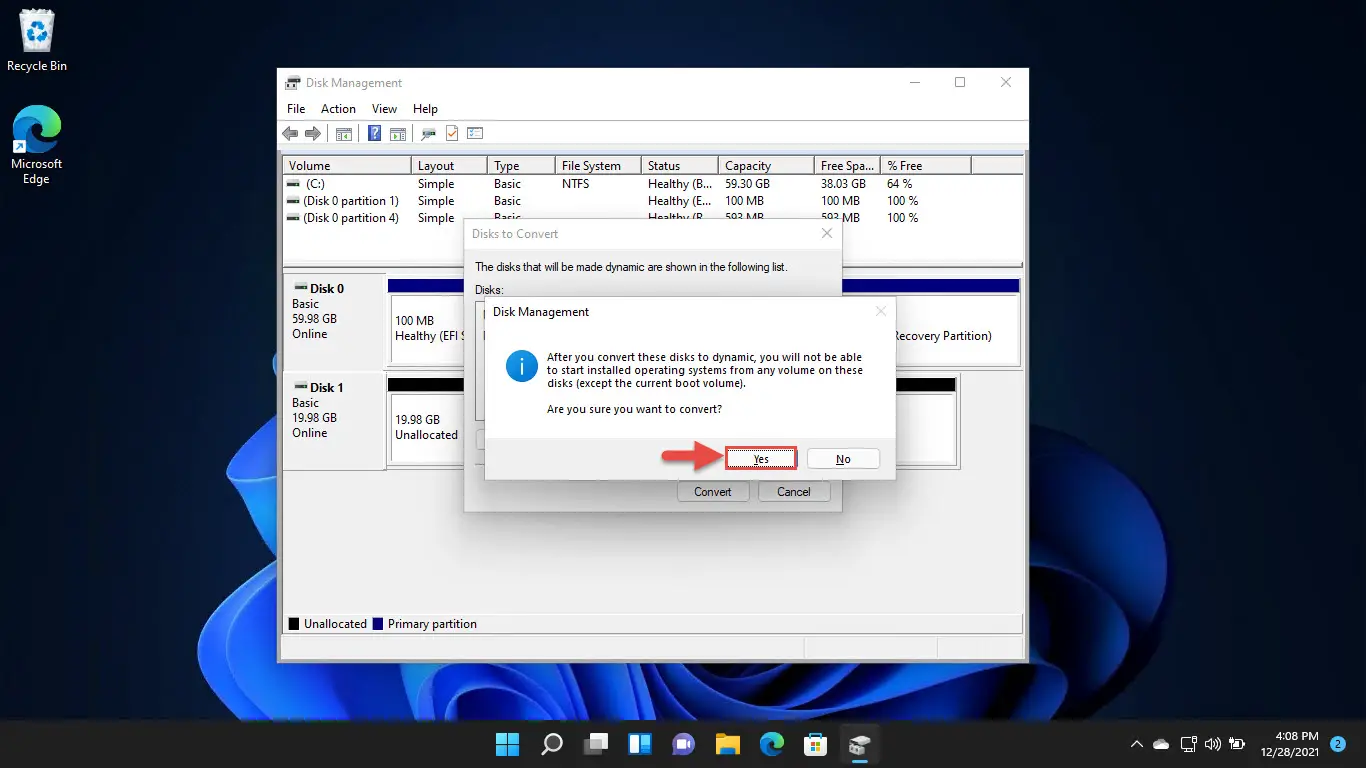
- You will now be presented with a confirmation box. Click Yes.
- The disks will now convert to dynamic. You should now see the Extend Volume option in the context menu of the volume you want to expand. Click on it.

- The Extend Volume Wizard will now launch. Click Next on the welcome screen.
- On the next screen, click on the Available unallocated space, and then click Add.
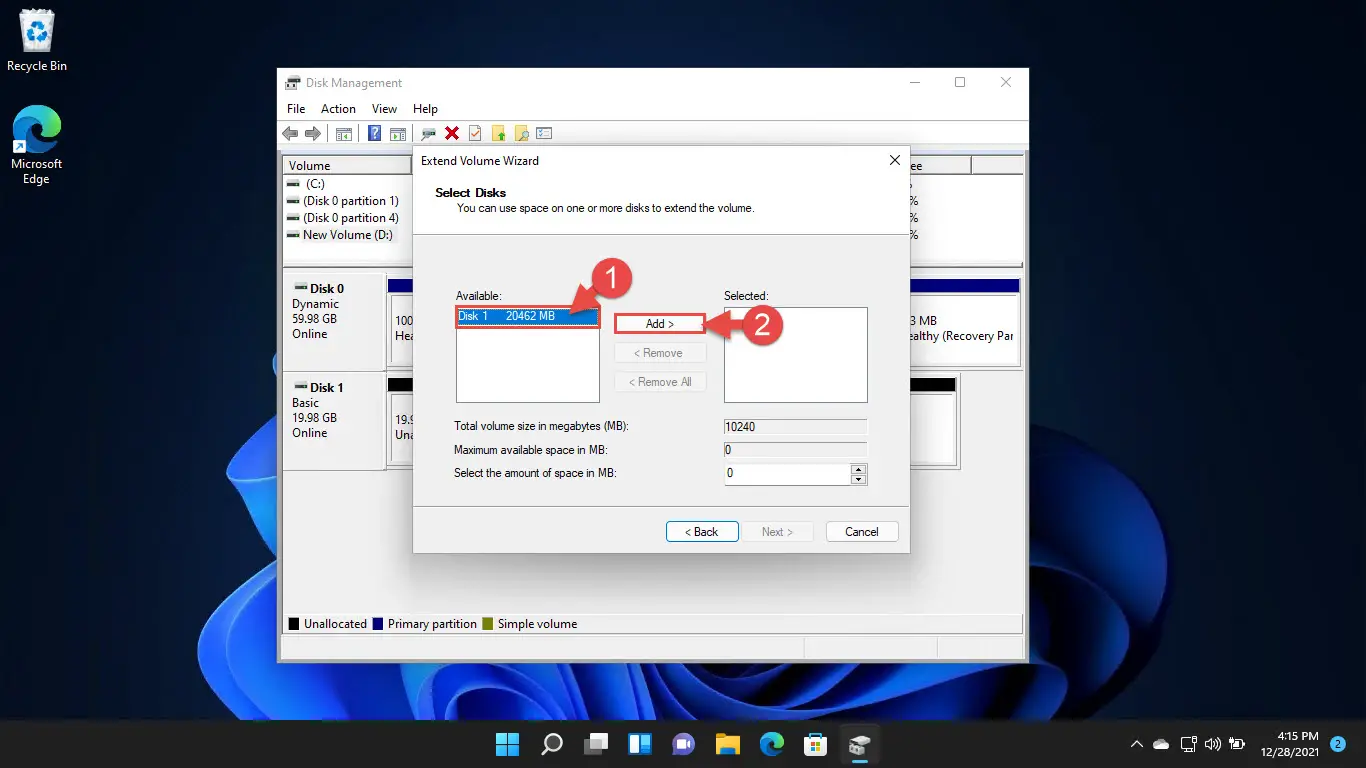
- Now enter the space you want to extend the partition by (in MBs) and click Next.

- On the final screen, click Finish.
You will now see that the partition has been extended onto another disk, having the same color code, as in the image below.
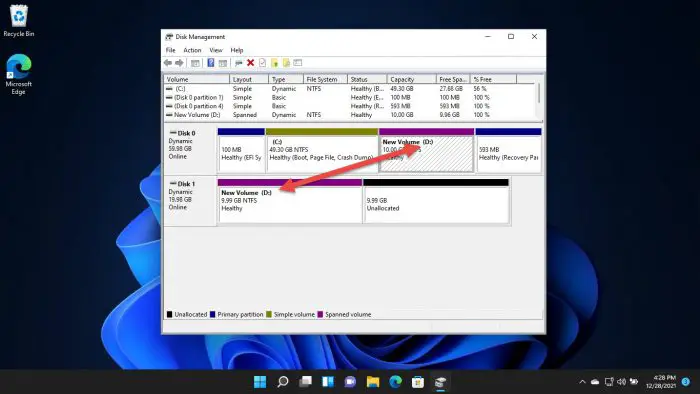
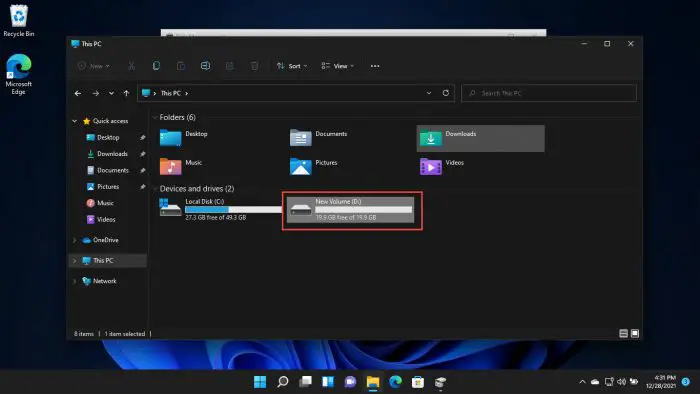
Although the volume is extended across 2 different disks, it will look like the one in File Explorer has the same label and drive letter.
Using Third-Party Tools
You may often need to extend the system partition (C drive) with no unallocated space to spare. In that case, you can resort to a third-party application that will extend (or shrink) the volumes as you prefer. They will even work if you find the Extend Volume option grayed out in the Disk Management Console.
There are a variety of such tools available on the internet. The downside is that they are paid and will only perform such tasks if you have a valid license for the tool.
However, these tools will perform all the shrinking and extending tasks required to get the job done. Moreover, these tools can also shift unallocated space from one area in the hard disk to another, so you won’t have to delete entire volumes to create unallocated space adjacent to the volume you want to expand.
Below is a list of the tools that we found useful:
Note that these tools also have free versions. However, those are only helpful in performing the basic partition-related tasks.
Verdict
Extending volumes often becomes a necessity. Therefore, investing in a third-party partitioning tool once in a lifetime may not be such a bad idea. These tools can also perform other critical tasks, such as data recovery, data migration, etc.
That said, expanding the partition using the built-in consoles and utilities in Windows is the way to go if you do not want to spend your money.
This article is a part of our ongoing “Disk cleanup and optimization” series. Also see the following relevant articles:
- 13 tips on how to free up disk space on Windows 11/10
- Free up space on Windows using Compactor
- Enable and Disable reserved storage in Windows
- Clean up WinSxS folder to save space in Windows
- Fix File Explorer showing wrong disk space in drive properties
- Fix Extend Volume option grayed out in Windows 11/10
- How to cleanup the SoftwareDistribution folder
- Uninstall/remove old drivers from Windows
- Fix and disable Low Disk Space warning in Windows

