Key Points
- To disable individual apps from running in the background, go to Settings > Apps > Installed apps, click the 3 dots in front of the app, select “Advanced options,” then select “Never” under “Let this app run in background.”
- To block all apps, open Registry Editor, go to Computer Configuration> Administrative Templates > Windows Components > App Privacy, open policy “Let Windows apps run in the background,” Select Enabled, then select “Force deny,” and save the changes.
The Windows operating system runs various applications in the background so that they can prompt the user in case there is an update, an action needs to be taken or simply launch the application in a jiffy when demanded. However, this often consumes unnecessary power and system resources.
Thus, some people prefer disabling apps running in the background. On Windows 11, you could previously disable applications from running in the background from the “Privacy” Settings page, globally and per app. However, this option is no longer available. Instead, you now need to adapt different methods to disable apps from running in the background and consume system resources.
This guide will show you different methods to prevent applications from running in the background. If you are a user who wants to maximize their device’s battery life, or simply use the resources for more important tasks, then you could benefit from any one of your preferred methods.
Disable background applications from Windows 11 Settings
While one option to prevent background apps from running is removed from the Settings app, two are still available. You can individually control which applications are allowed to run in the background from the “Installed apps” and the “Power & battery” Settings page.
Block background apps from Installed Apps Settings
Implement the following steps to disable single or multiple apps from running in the background from the Installed Apps Settings page:
-
Press the Windows Key + i to open the Settings app.
-
Click Apps on the left, and then click “Installed apps” on the right side.
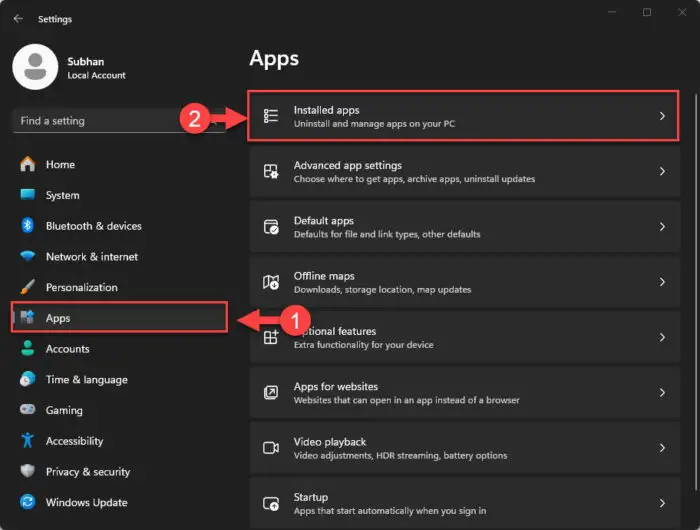
Open the Installed Apps Settings page -
Click on the 3 dots in front of the app you want to disable and then click “Advanced options.”
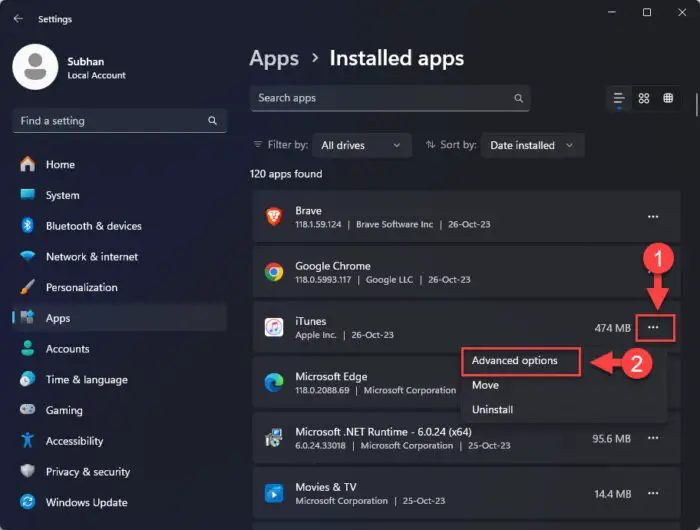
Open advanced options for the app -
Expand the drop-down menu under “Let this app run in the background” and select Never.
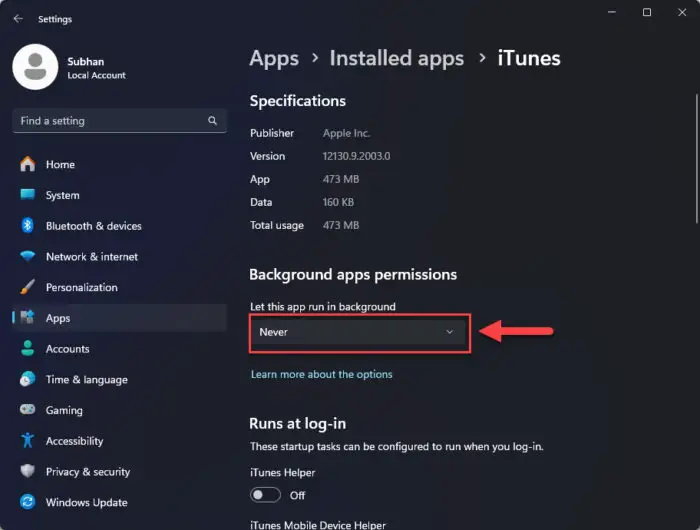
Block app from running in the background from the Installed Apps page
You can then continue to repeat steps 3 & 4 to block more apps from running in the background.
Block background apps from Power and Battery Settings
-
Press the Windows Key + i to open the Settings app.
-
Click System on the left, and then click “Power & battery” on the right side.

Open the Power and battery Settings page -
Scroll down and expand “Battery usage.”
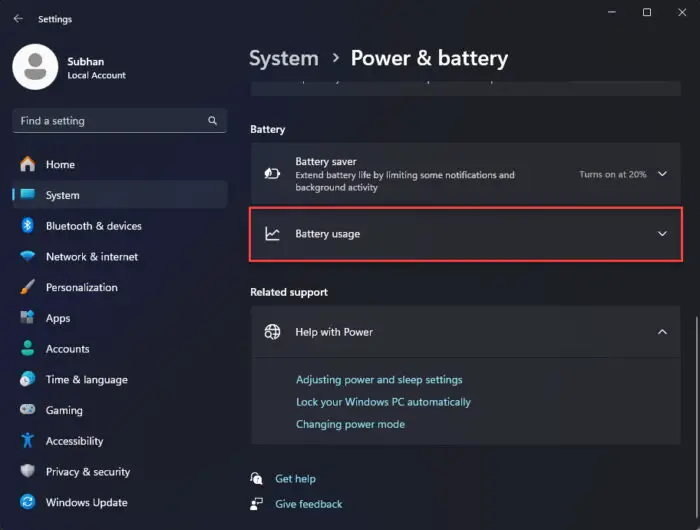
Expand Battery usage history -
Expand the drop-down menu in front of “Battery levels” and select “Last 7 days.”
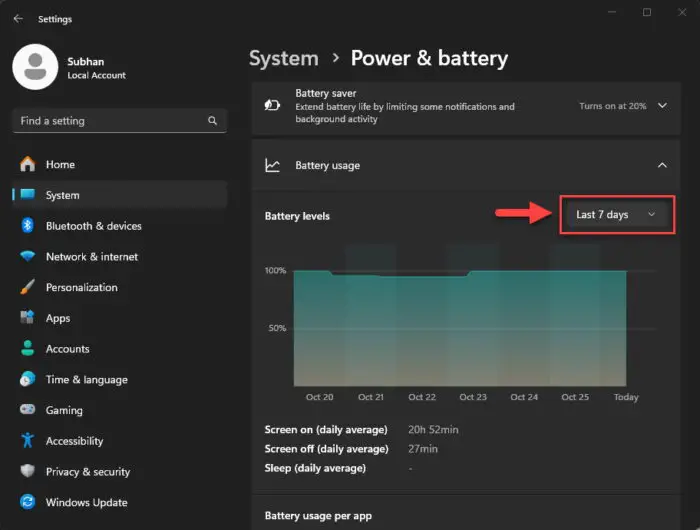
View battery usage for last 7 days -
Scroll down, click the 3 dots in front of the app that you want to disable from running in the background, and then click “Manage background activity.”
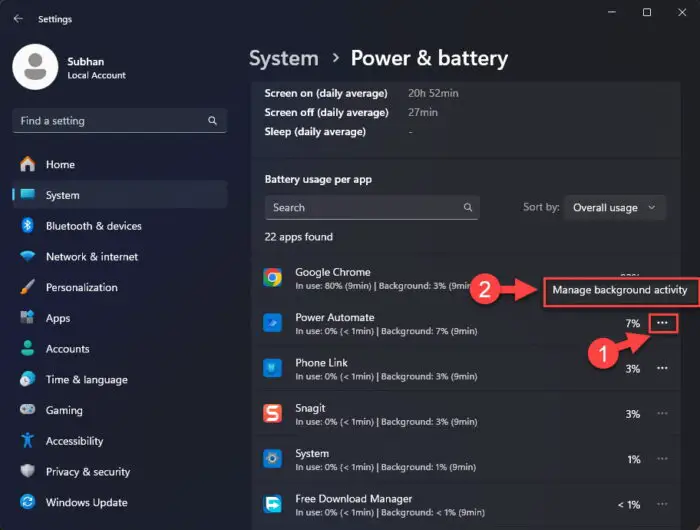
Manage background app activity -
Expand the drop-down menu under “Let this app run in the background” and select Never.

Disable app from running in the background from the Power and battery Settings
You can now repeat steps 5 and 6 to disable more apps from running in the background.
Disable background apps from Group Policy
If you do not prefer going to each app’s settings individually to prevent them from running in the background and disable all background apps altogether, then this is the method you’d want to use. Here are the steps to block all applications from running in the background using Group Policy.
-
Press the Windows Key + R to open the Run Command box.
-
Type in “gpedit.msc” and press Enter to open the Group Policy Editor.
-
Navigate to the following path from the left pane:
Computer Configuration> Administrative Templates > Windows Components > App Privacy
-
Double-click the policy “Let Windows apps run in the background.”
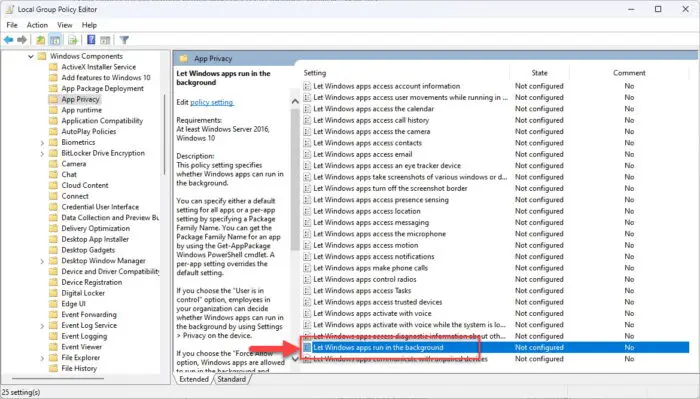
Open Group Policy to allow or block apps running in the background -
Select Enabled, and then select “Force deny” from the drop-down menu in the Options section.

Deny all apps from running in the background using Group Policy Note: Selecting “Force deny” will disable background apps from running, and users will no longer be able to control their behavior from the settings app. However, if you simply select “Disable,” then users would still be allowed to control whether the background apps should run or not.
-
Click Apply and OK.
-
For the changes to take effect, run the following command in an elevated Command Prompt instance:
GPupdate /Force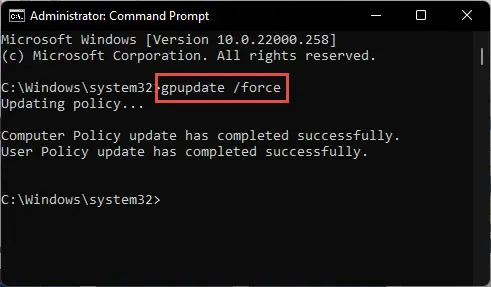
Enforce Group Policy updates
Disable background apps from Registry Editor
If the last method did not work for you, then you can manipulate the Windows Registry to block applications from running in the background. Here is how:
Note: Misconfiguration of critical values in the system’s registry could be fatal for your operating system. Therefore, we insist that you create a system restore point or a complete system image backup before proceeding forward with the process.
You can also use our top selection of disk imaging and backup software so you never lose your data or operating system again.
-
Press the Windows Key + R to open the Run Command box.
-
Type in “regedit” and press Enter to open the Registry Editor.
-
Navigate to the following path from the left pane:
Computer\HKEY_LOCAL_MACHINE\SOFTWARE\Policies\Microsoft\Windows
-
Right-click the Windows, key, expand New, and then click Key. Name this key “AppPrivacy“.
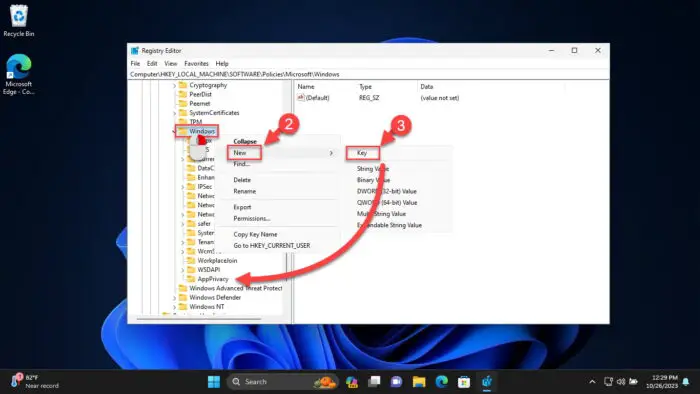
Create the AppPrivacy Key -
Right-click on the AppPrivacy key, expand New, and then click “DWORD (32-bit) Value.” Name this DWORD “LetAppsRunInBackground“.
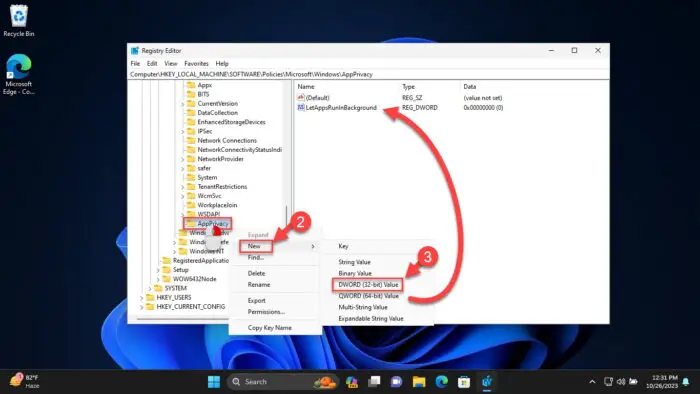
Create the LetAppsRunInBackground DWORD -
Double-click the DWORD LetAppsRunInBackground and set its Value Data to 2, then click OK.
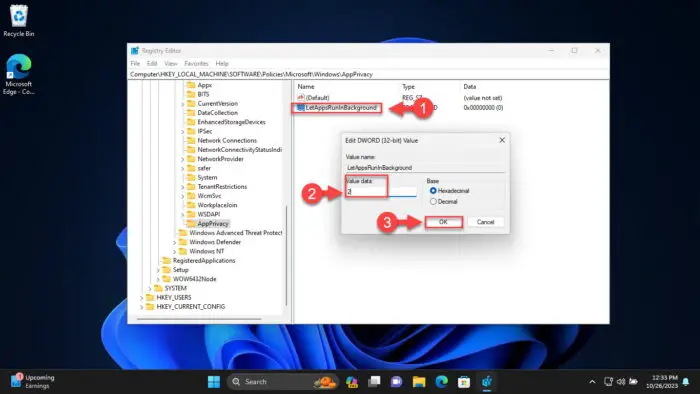
Disable background apps from Registry Editor on Windows -
Close the Registry Editor and restart the computer for the changes to take effect.
When the computer restarts, the Microsoft apps should no longer be able to run in the background.
In case you want to revert these settings in the future, set the Value Data for LetAppsRunInBackground to 0, or delete the DWORD altogether.
Prevent apps from running in the background using .REG file
If making changes manually using the Registry Editor seems too much work, then you can use our preconfigured .REG, or registry files to implement the changes for you.
Remember that these .REG files are user-specific only. Therefore, the background apps will be blocked on the user you run the Registry file on.
Download the file(s) by clicking on the provided link:
 Disable background apps for current user (358 bytes, 25 hits)
 Enable background apps for current user (346 bytes, 28 hits)
Once downloaded, use these steps to run the respective .REG file:
-
Right-click on the .ZIP file and click “Extract all.”
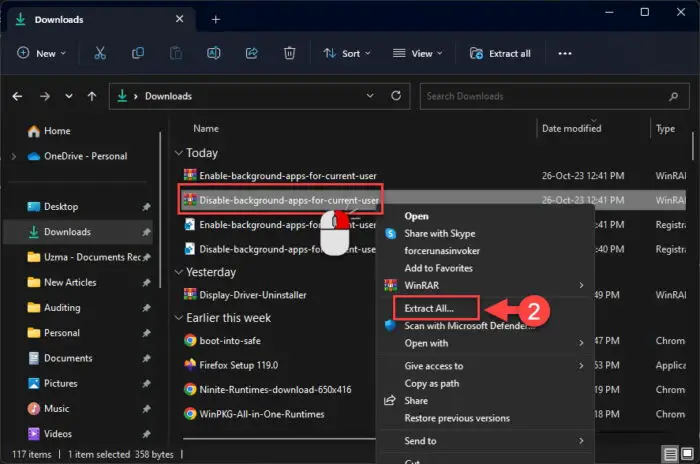
Extract the zip file -
Click Extract in the extraction wizard.
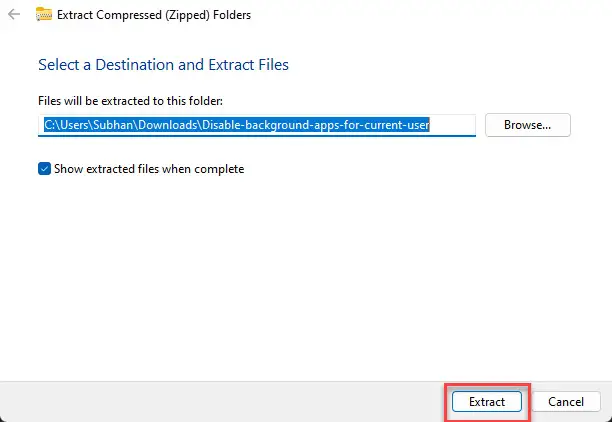
Extract the contents -
Go to the extracted folder using File Explorer and double-click the .REG file.
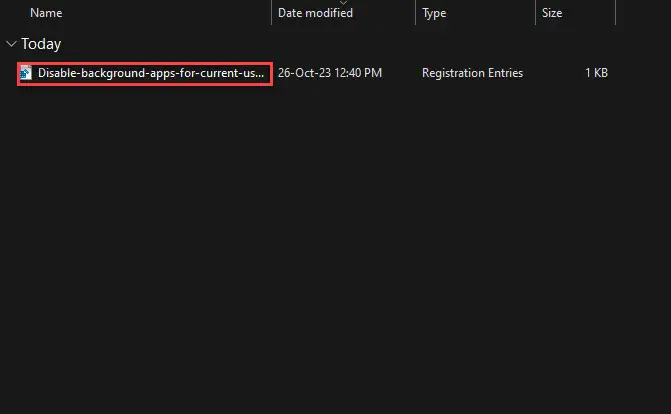
Run the .REG file -
If prompted with a UAC, click Yes.

Confirm action -
When asked to continue, click Yes again.
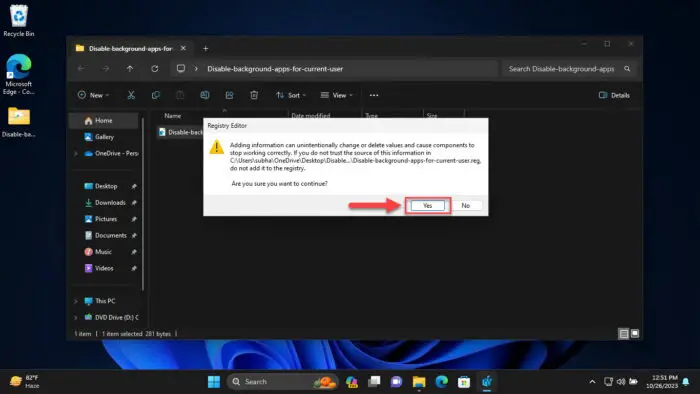
Confirm again -
Click OK on the successful execution of the Registry file.
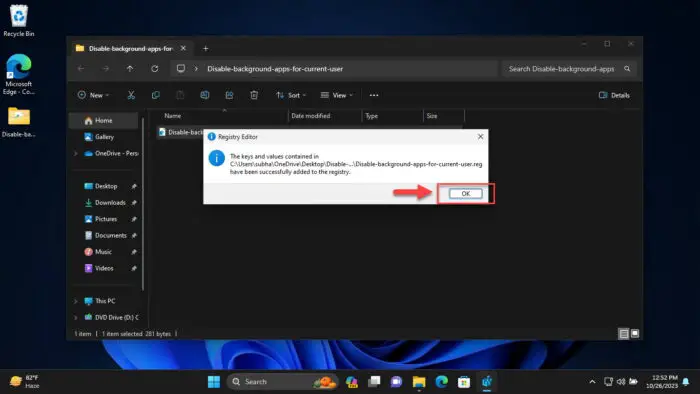
Registry has been updated -
Restart the computer for the changes to take effect.
Takeaway
Applications running in the background consume system resources, and power, which is a thing to worry about if you are using a laptop and want your battery to last longer. However, apps running in the background are often useful as well.
For example, Microsoft Edge runs in the background as it is required by the Windows operating system. Moreover, it also allows the browser to launch quickly when demanded.
Therefore, we recommend caution when blocking apps from running in the background. Moreover, as you may have learned, some methods discussed in this post to prevent apps from running in the background are for individual apps, while some block all of them. Additionally, some methods apply only to the current user, and some to all the user accounts on the computer.


