Key Points
- To compress the files using File Explorer, right-click the folder, expand “Send to,” and click “Compressed (zipped) folder.” To uncompress it, right-click it and click “Extract all,” then click Extract again on the wizard.
- In PowerShell, you can use the “Compress-Archive” command to create zip files and change their compression ratios, and use the “Expand-Archive” command to unzip files.
Compressing and decompressing files and folders is one of the functions of the Windows operating system. This OS natively supports .ZIP files, without the need for third-party apps and tools. You can create zip files using File Explorer and even uncompress, or unzip them. However, the same can be achieved using PowerShell.
With PowerShell, you gain more control over the type of compression that you want. Additionally, if you prefer using the Windows command line, then using PowerShell might just be your cup of tea.
This guide will show you how to use PowerShell to zip and unzip files and folders using PowerShell. it will also teach you how to add more content to existing zipped files, and how to change their compression ratios.
Zip and unzip files on Windows
Usually, you compress and uncompress files and folders using File Explorer.
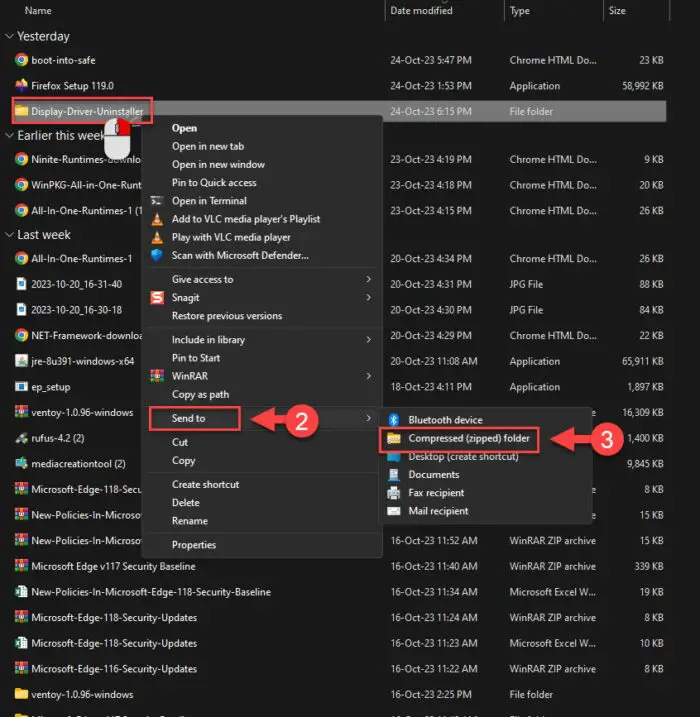
To compress a folder using the traditional File Explorer, right-click on the folder to compress, expand “Send to,” and then click “Compressed (zipped) folder.” This will create a .ZIP folder within the same directory.
To unzip a folder, right-click on it, and click “Extract all.” From the extraction wizard, select a location for the extraction and click Extract.
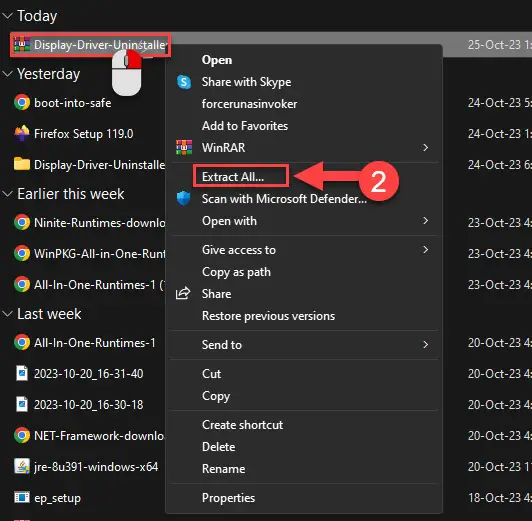
As you can see from the images above, the compression method does not allow you to adjust the compression ratio. However, it is possible while compressing files and folders using Windows PowerShell.
In PowerShell, you can use the Expand-Archive command to unzip files, and the Compress-Archive command to create zip files, as you will learn below.
Zip files using PowerShell
Use the following steps to compress/zip files with PowerShell:
-
Search for PowerShell and run it with elevated privileges.
-
Use the following command while replacing the variables [CompletePathToFiles] with the complete path to the files that you want to compress, [ExtractionPath] with the path to the location where you want to create the extracted folder, and [FileName] with the name of the file that you want to set.
Compress-Archive -Path [CompletePathToFiles]\* -CompressionLevel Optimal -DestinationPath [ExtractionPath]\[FileName].zip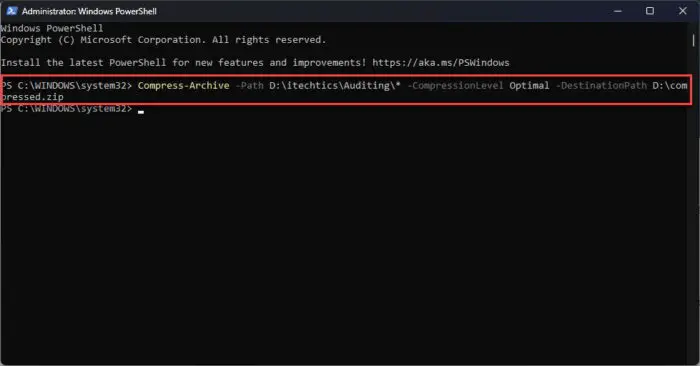
Zip files using PowerShell
The “*” in the command instructs to compress all of the contents within the source folder. Additionally, you can also replace “optimal” with one of the following compression ratios:
- Optimal – Compresses the files to the highest ratio, but takes more time.
- Fastest – Minimal compression but does it quickly.
- NoCompression – Creates a zip file without compression, and has the same size as the regular files.
Once this command is executed, you will find the compressed folder in the designated directory.
Add more files to zipped folder using PowerShell
If you already have a compressed folder and want to add more items to it, you can also do so using PowerShell. Here is how:
-
Search for PowerShell and run it with elevated privileges.
-
Use the following command to update the zip file with additional files. Replace the variables [CompletePathToFiles] with the complete path to the files that you want to add to the zipped folder, [CompressedFolderPath] with the path to the compressed folder, and [FileName] with the name of the compressed folder.
Compress-Archive -Path [CompletepathToFiles] -Update -DestinationPath [CompressedFolderPath]\[FileName].zip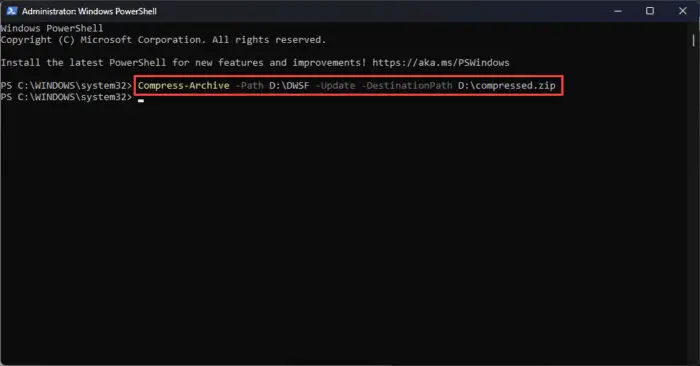
Add more files to zipped folder using PowerShell
Once this command i executed, PowerShell will add the selected files and folders into the existing compressed file. Make sure that the name that you provide for the compressed file is the same, otherwise a new compressed folder will be created.
Change zip compression ratio using PowerShell
The compression ratio controls how much the files and folders of a zip file are compressed. The greater the compression ratio, the smaller the size of the zip file. However, it also takes relatively longer to compress the items.
As mentioned earlier when creating zip files using PowerShell, you can choose one of the following three compression ratios:
- Optimal
- NoCompression
- Fastest
To change the compression ratio of a zip file, use these steps:
-
Search for PowerShell and run it with elevated privileges.
-
Use the following command to adjust the compression ratio. Replace the following variables accordingly:
- [CompletePathToFiles] – Path to the folder that you want to compress
- [Radio] – one of the three compression ratios discussed above
- [CompressedFolderPath] – Path to where you want to create the compressed file
- [FileName] – Name of the zip file that you want to set
Compress-Archive -Path [CompletePathToFiles]\* -CompressionLevel [Ratio] -DestinationPath [CompressedFolderPath]\[FileName].zip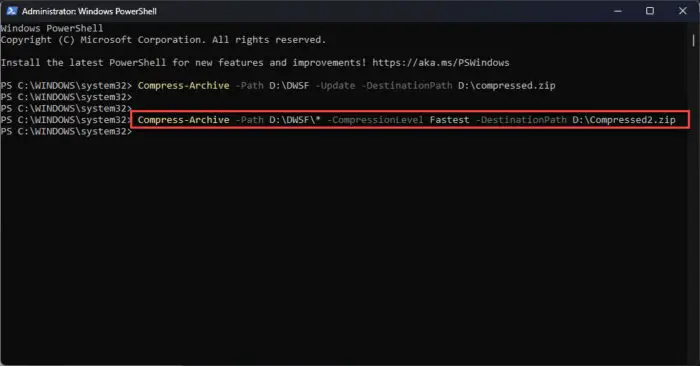
Change compression ratio for zip files using PowerShell
Unzip files using PowerShell
With PowerShell, you can quickly unzip files and access their contents, regardless of whichever compression ratio they have. This process is even quicker than using File Explorer, as it does not involve using the context menu or the extraction wizard.
Here is how you can unzip compressed files with PowerShell:
-
Search for PowerShell and run it with elevated privileges.
-
Type the following command to unzip a folder while replacing the necessary variables:
Expand-Archive -Path [PathToCompressedFile]\[FileName].zip -DestinationPath [PathToExtract]\[NameOfExtractedFolder]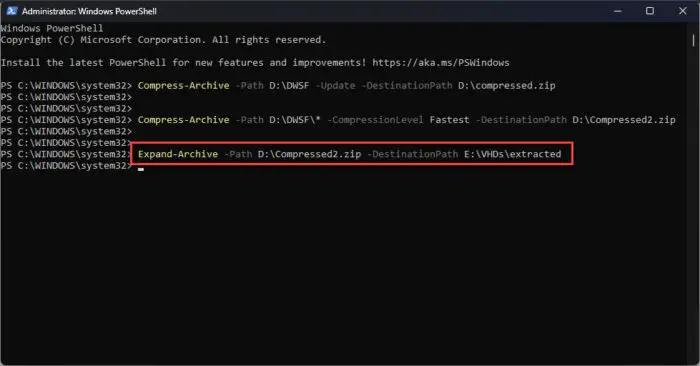
Unzip files with PowerShell
You will now find your extracted folder at the location specified within the command.
Ending words
PowerShell provides the user with more control over the parameters for almost every task, which is why the command line may be the preferred medium for certain Windows users to perform advanced tasks.
This guide taught you how to use PowerShell to compress and decompress files and folders on a Windows computer. It also discusses how to add more content to existing zip files or change their compression mode.
You can now use this information to better manage your data for lower storage consumption, and hence, convenient sharing.

