A complete system image backup means securing your operating system and everything on it, including your personal data, in case of a disaster. If your computer fails to boot one day, you can enter the Windows Recovery Environment (WinRE) and recover your system using the backup image. Or, in case you only want to restore your files and folders; that could be done too.
Creating a system image backup consists of copying your system partition (usually the C drive) into a remote storage location, which can be a USB flash drive or a network drive. You also have the option to create a system image on a local partition as well, but people do not usually opt for this in case the hard drive gets corrupted or the entire computer is destroyed during a natural disaster.
The backed-up data can then later be used by your computer to recover and restore the items to their original state. Additionally, you can select more partitions to be backed up if needed.
This is an excellent technique for sysadmins when they want to replicate a system onto multiple computers – all they need to do is create a system image for a single machine (that they want to replicate) and then restore it on other computers.
Let us now show you how to create a complete system image on a Windows 11 computer, and then learn how to store it completely, or, only back up your files and folders from it.
Table of contents
Create System Image Backup on Windows
Note: The following methods are also valid for Windows 7 and Windows 10.
Use the following steps to create a full backup of your Windows 11 computer. Before you do, make sure that you have ample free space on the backup USB/drive.
-
Make sure that the backup location is formatted in the NTFS format.
-
Now go to the following:
Control Panel >> System and Security >> backup and Restore (Windows 7)
-
Now click “Create a system image” on the left of the window.
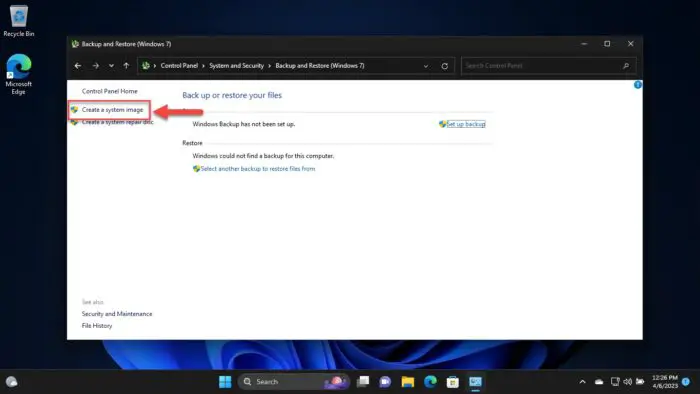
Create a system image -
Now, select a location to create the system image and click Next.
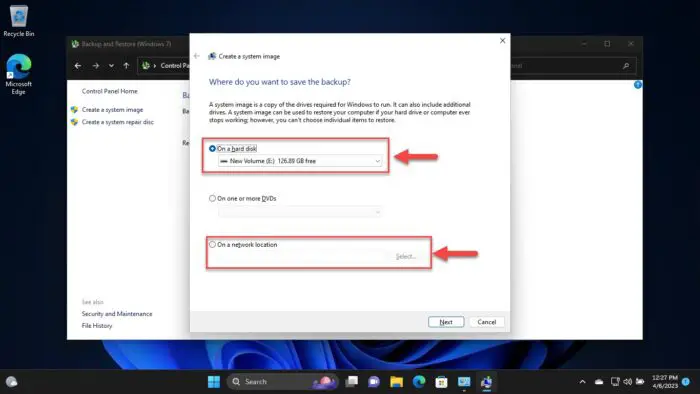
Select the location to create a system image Choose “On a hard disk” if you want to create the system image on a local hard disk or a USB flash drive, and then select it from the drop-down menu. Alternatively, select “On a network location” if you want to create the system image on a remote location. Once selected, click Next.
-
On the next screen, select the additional partitions (if any) that you want to back up and click “Start backup.”
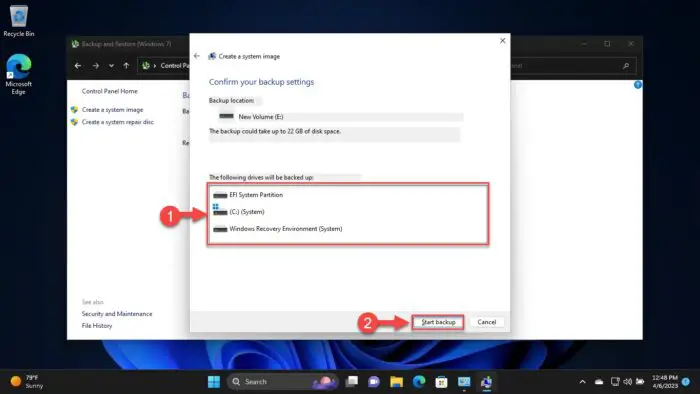
Begin system backup The tool will now begin backing up your system drive as well as any additional partitions that you may have selected. This step can take a while depending on the size of the data being backed up.
-
When asked to create a system repair disc, click No.
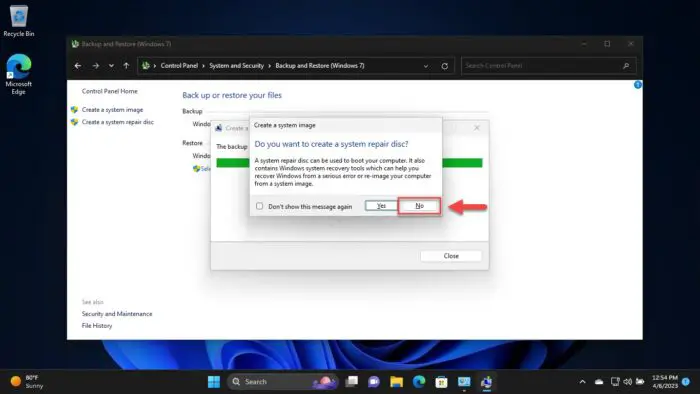
Do not create a system repair disc The backup will now be completed. Close the backup tool.
Now that the system image backup is created, you can keep it safe and secure until the time that you may need it.
Let us now show you how to store a backup on a Windows 11 PC.
Restore Image Backup
When you have a complete system image backup, you can use it to restore your PC in case it is experiencing problems, not boring up anymore, or simply to revert your files and folders to an earlier state.
Follow the given steps below to restore the system image completely:
-
Plug in the USB/ mount the network drive to the computer containing the system image backup.
-
Boot from the medium using the “One Time Boot Menu.”

Boot from the USB -
You will then see the installation screen. Click Next.
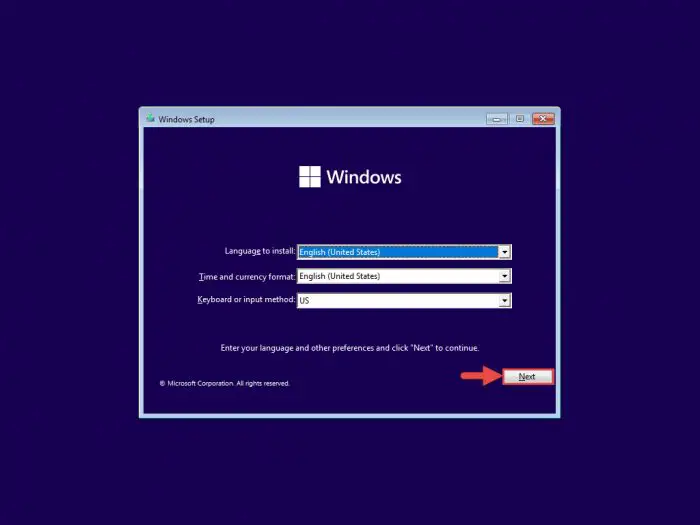
Proceed to install Windows -
On the next screen, click “Repair your computer.”
This will take you to the Windows Recovery Environment (WindowsRE or WinRE).
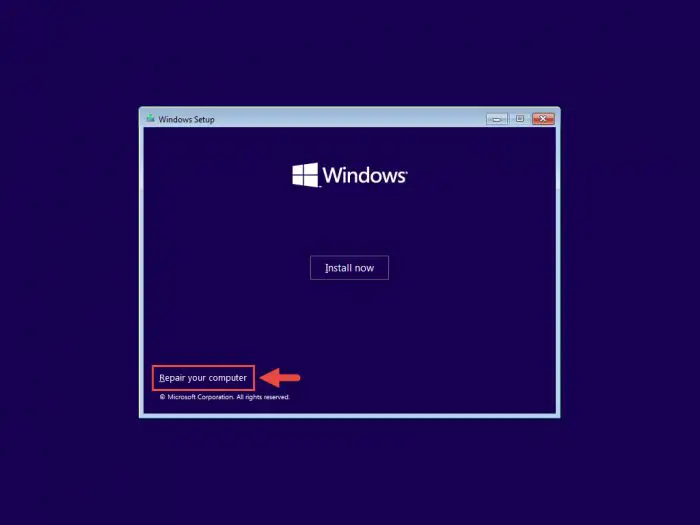
Repair Windows -
Click Troubleshoot.
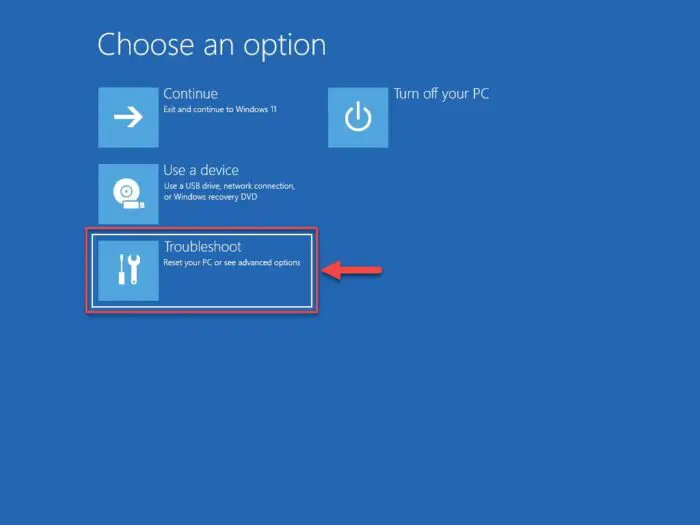
Troubleshoot from WinRE -
Click “System Image Recovery.”
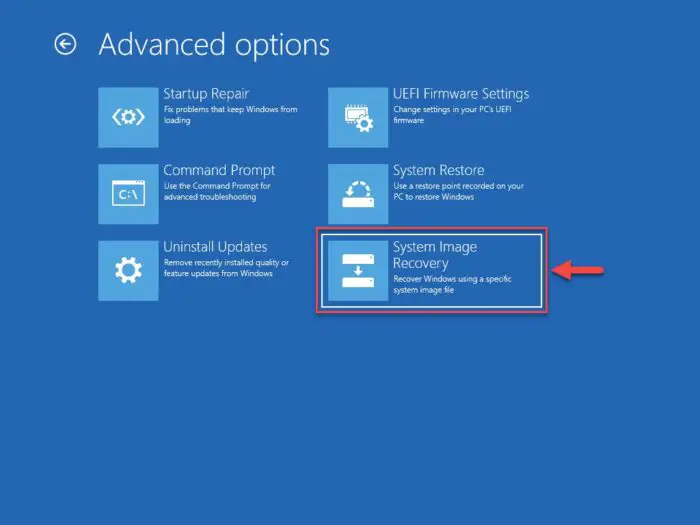
System Image Recovery from WinRE -
Select the target OS, which will be “Windows 11.”
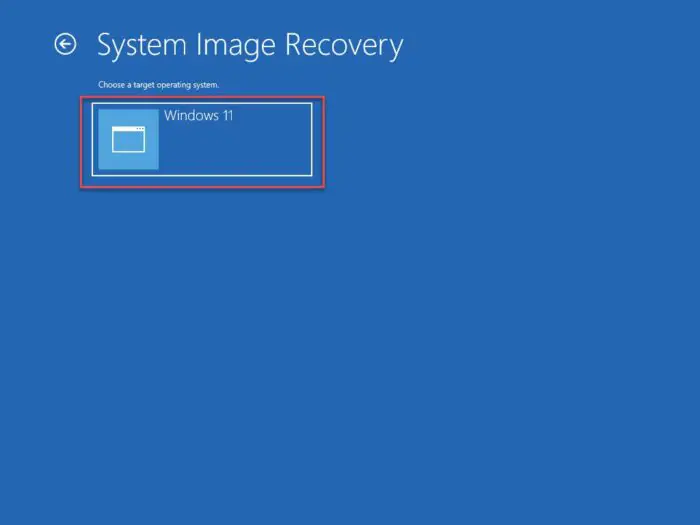
Select the target operating system -
Select “Use the latest available system image” and click Next.
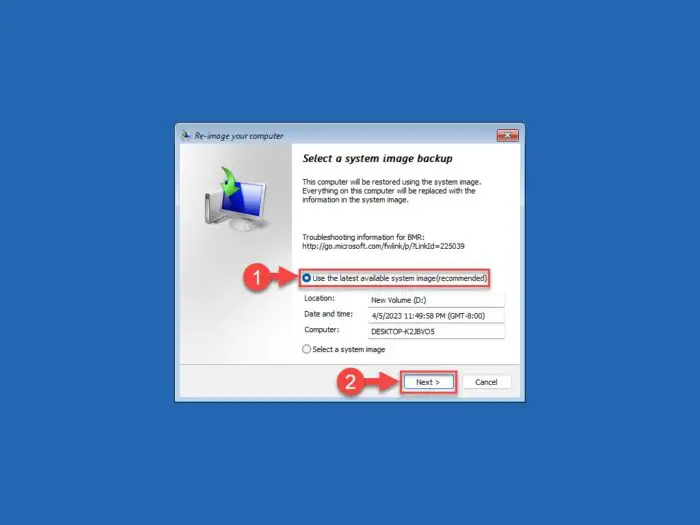
Recover from the latest system image In the case you have more than one system image backed up, you can select “Select a system image” and then select the image from which you want to recover from.
-
[Optional] Check the box next to “Format and repartition disks” and then click Next.
Only check this option if you want to delete all existing partitions and format all disks on the computer to match that of the system image. This is usually selected if the image is being restored on a new hard drive or a new computer.
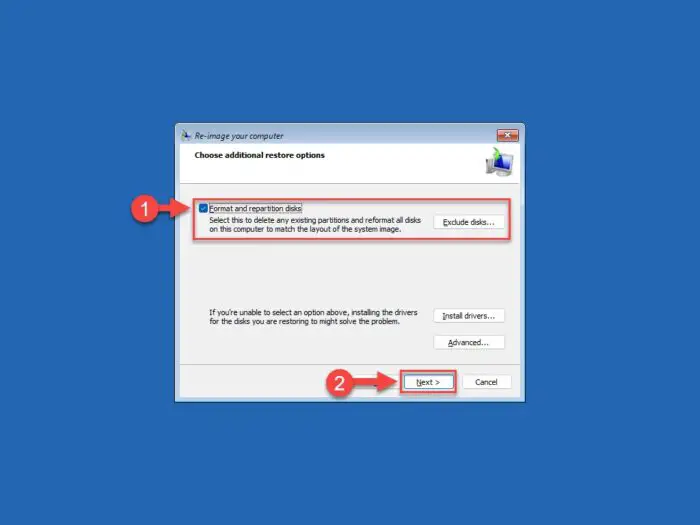
Optional Delete partitions and format the disk Alternatively, you can skip it and only click Next.
[Conditional] You may also see an option “Only restore system drives” if the system image includes other partitions. You may or may not check this option before proceeding.
-
Click Finish.
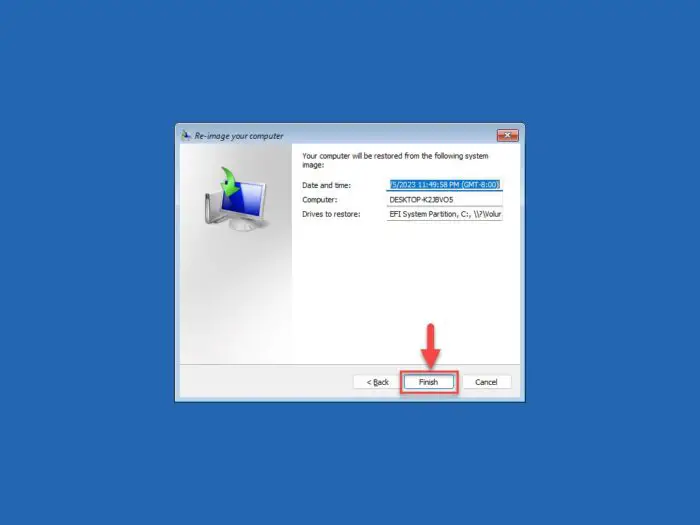
Begin complete system restoration -
When asked for confirmation, click Yes.
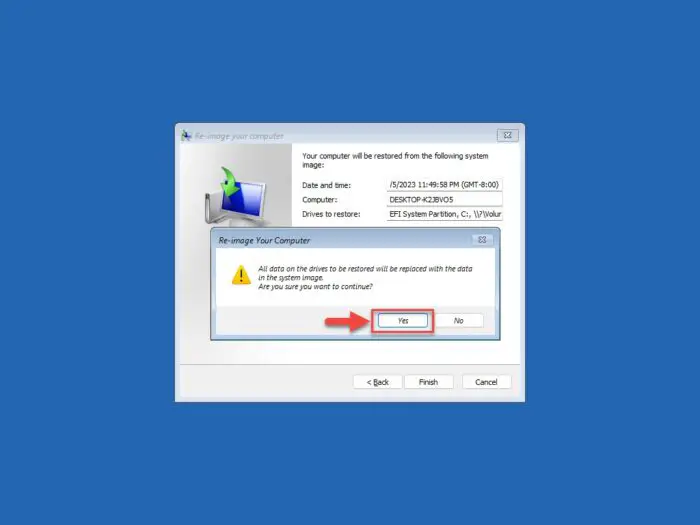
Confirm system image restoration
The system image will now begin restoring to the computer. This can take a moment depending on the size of the backup image. When the process is completed, the Windows will restart. You may then continue to see that the image has been restored successfully.
Restore Files and Folders from System Image
If you have previously created a complete system image, it does not necessarily mean that you have to perform a complete image restoration in order to get your files and folders back. You can simply extract/copy it from the system image onto your local hard drive. Here is how:
-
Open the Disk Management Console by typing in “diskmgmt.msc” in the Run Command box.
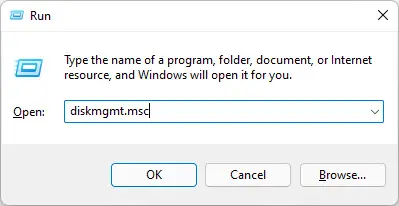
Open the Disk Management Console -
Click “Action” from the top ribbon menu and then click “Attach VHD.”
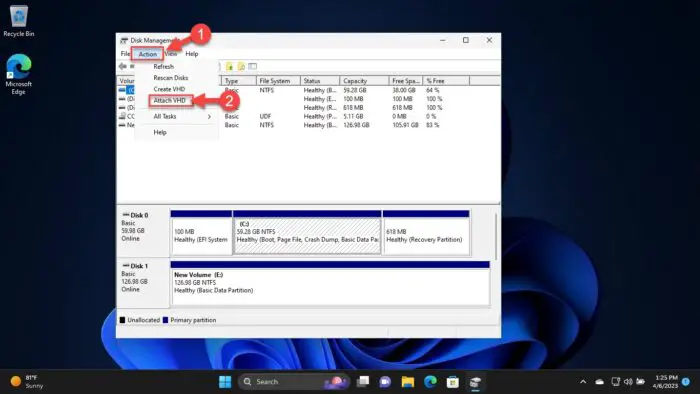
Attach Virtual Hard Drive (VHD) to the system -
Now click the “Browse” button and navigate to the WindowsImaegBackup folder where you created the system image.
-
Go inside the “Backup XXXX-XX-XX…” folder and double-click the largest VHD file available.
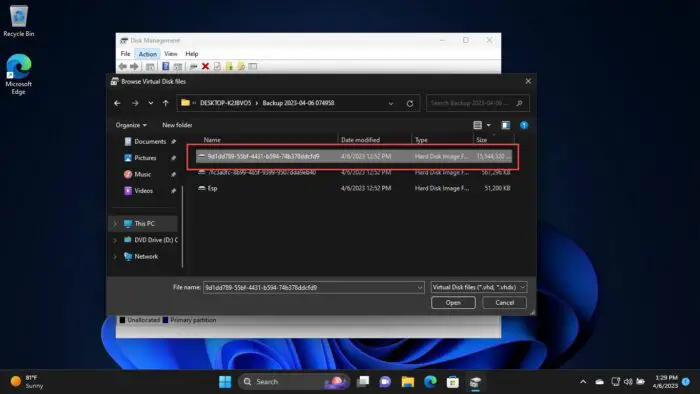
Select the largest VHD The largest VHD is usually the primary system partition. If your files and folders are located in another partition, then you will need to adapt the hit-and-trial error by mounting each of the VHDs one by one.
-
Click Ok.
-
Inside the Disk Management Console, right-click on the mounted VHD and click “Change Drive Letter and Paths.”
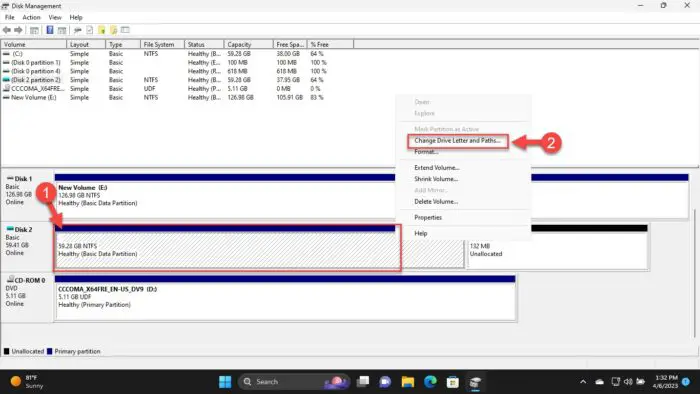
Change drive letter -
Click Add.
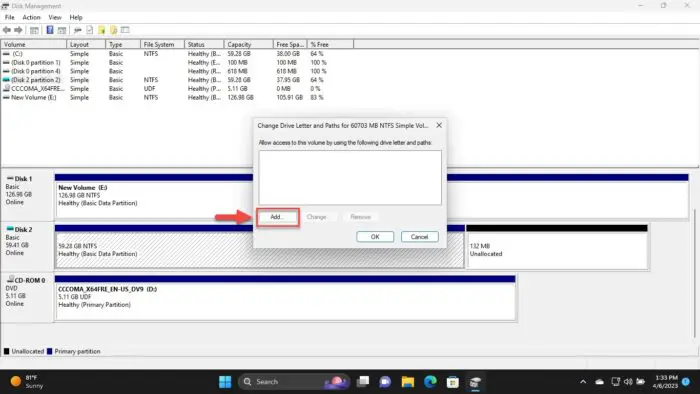
Add a drive letter -
Select “Assign the following drive letter” and then select a drive letter from the drop-down menu. Click Ok when done.
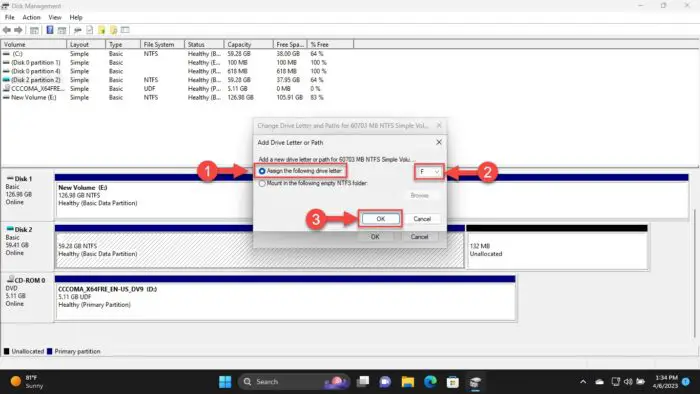
Select and assign a drive letter to the VHD -
Now, use File Explorer to open the VHD, and then copy the files and folders you need. Then, paste them to your local hard drive.
-
Once you have restored your files and folders, remember to detach the VHD from the Disk Management Console by right-clicking it, and then clicking “Detach VHD.”
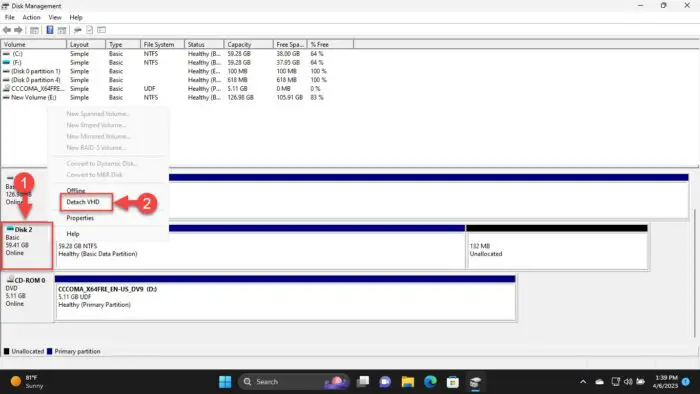
Detach VHD -
When asked for confirmation, click Ok.
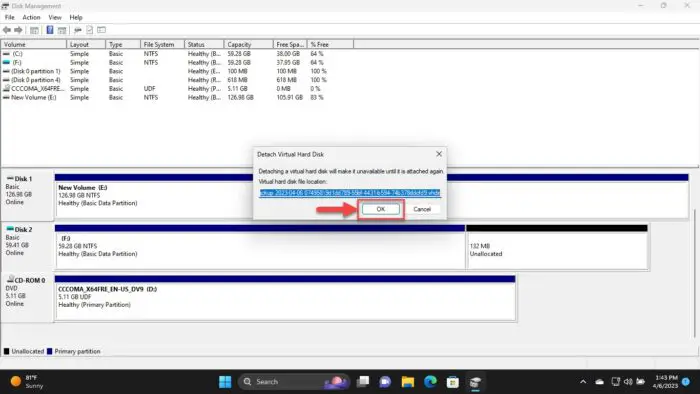
Confirm VHD detachment
This concludes the process of restoring only your files and folders from a system image backup.
Takeaway
The system image backups need to be created manually. Unlike File History and Backup and Restore (Windows 7), this process cannot be automated.
Do not confuse complete system image backups with either File History or Backup and Restore – these are three different things. File History is used to maintain an older version of files and folders in case they need to be reverted, whereas Backup and Restore simply create restore points to which your complete system can be reverted if needed.
A complete system image backup takes a snapshot of all Windows files and any selected personal files and stores them in a separate location. These can then be used to replicate the exact data, as well as the system partitions, onto other computers, as well as the original computer which the backup was created from.

