Key Points
- You can enable “never combine taskbar buttons” from Settings > Personalization > Taskbar > Taskbar behaviors > Combine taskbar buttons and hide labels.
- Other ways to disable icon grouping in the taskbar include using the Group Policy, Windows Registry, and a third-party app named “StartAllBack.”
Windows operating systems, both 10 and 11, have come a long way since they were originally released. Microsoft has made significant changes to both of them, where they have added new features, and also omitted some. This is probably why some people prefer updating their operating systems, while others prefer remaining on the same versions.
The taskbar is one of the features in the Windows operating system that Microsoft has meddled with quite often. One of the features of the taskbar used to be that it would show you the labels of each open window, and the icons would not be grouped on top of each other. This would allow you to quickly navigate between apps and windows without wondering which one is which.
This feature was later removed, as Microsoft wanted to save space on the taskbar for more icons. However, this feature has recently returned to both Windows 10 and 11 operating systems. You can now choose whether you want to ungroup the taskbar icons or keep them grouped, which is the default setting.
On this page
What is taskbar grouping?

From the Windows taskbar, you can quickly open and access apps and programs just by single-clicking on their respective icons. You can pin the icons so that they are saved there, and move them about to arrange them according to your preferences.
If you open multiple instances or multiple windows of the same app, they will not show as different icons in the taskbar by default. Instead, when you will hover your cursor over the icon, it will then display different windows of the same app, and then you must click on the respective window that you wish to access.
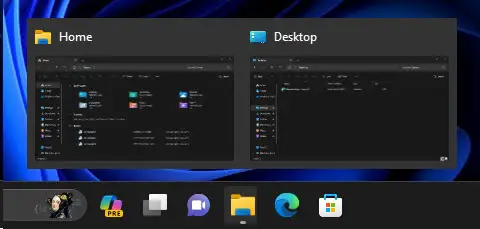
When you set the taskbar to ungroup the icons, each instance of the same app will be displayed as a separate entity and will also be labeled, allowing you to quickly access the right window.

How to ungroup taskbar icons in Windows
There are multiple ways of regrouping the taskbar icons on a Windows computer. If one method does not work for you for any reason, you can continue to the next method.
Enable “Never combine taskbar icons” from Settings
The Windows operating system now allows you to set whether you want the taskbar icons to be grouped and unlabeled or ungrouped and labeled. Here are the steps to enable the “Never combine taskbar icon” if you want to:
-
Press the Windows Key + i shortcut keys to open the Settings app.
-
Click Personalization on the left and then click Taskbar on the right.
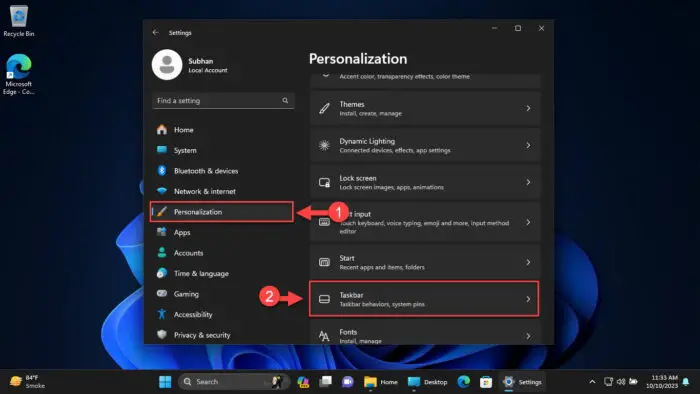
Open taskbar settings -
Scroll down and click “Taskbar behaviors” to expand it.
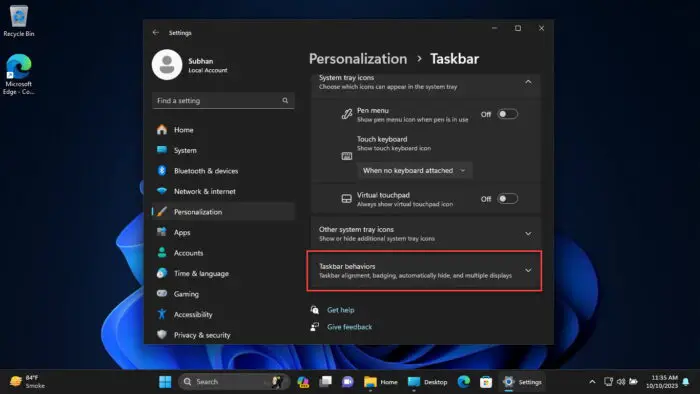
Open taskbar behavior settings -
Expand the drop-down menu in front of “Combine taskbar buttons and hide labels” and select Never.
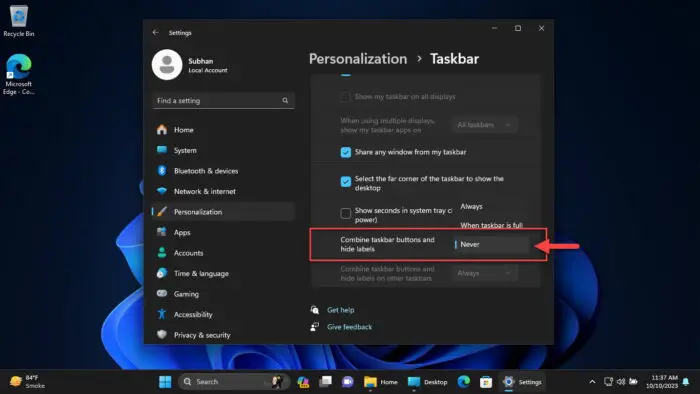
Never combine taskbar icons from Settings
All windows will now be shown individually in the taskbar.
If you want to revert settings in the future, all you need to do is select “Always” from the same drop-down menu, or select “When taskbar is full,” depending on your preferences.
Additionally, performing the steps above will only make changes to the taskbar icons on your primary display device. If you have multiple display devices, then you also need to select “Never” from the drop-down menu in front of “Combine taskbar buttons and hide labels on other taskbar” as well.
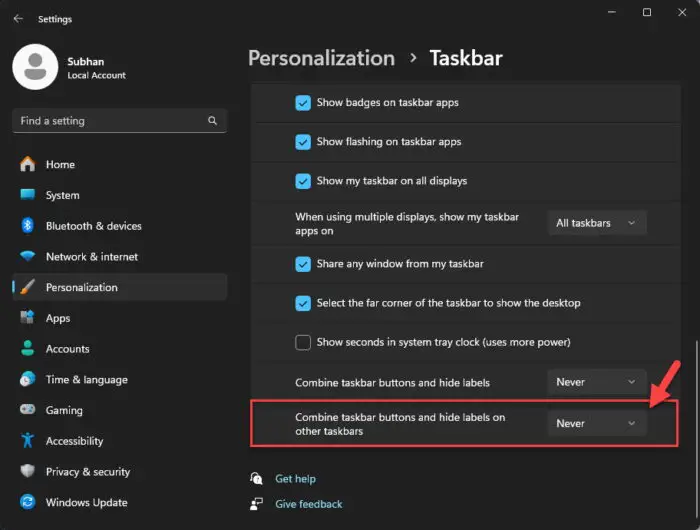
Note: If you find that these options are missing from your Settings app, install any pending Windows updates and then recheck. Alternatively, you can also adopt any one of the following methods.
Ungroup taskbar icons from Group Policy
Another method to ungroup the taskbar icons is from the Group Policy editor. Here is how:
Note: If you are using the Windows Home edition, then the Group Policy editor will be missing. Learn how to install gpedit.msc in Windows Home.
-
Press the Windows Key + R keys to open the Run Command box.
-
Type in “gpedit.msc” and press Enter to open the Group Policy editor.
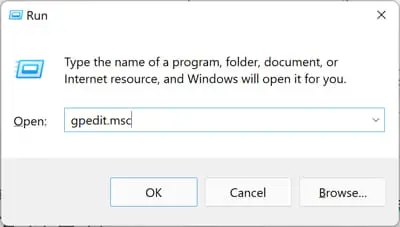
Open Group Policy editor -
Navigate to the following from the left pane:
Local Computer Policy > User Configuration > Administrative Templates > Start Menu and Taskbar
-
Double-click the policy “Prevent grouping of taskbar items.”
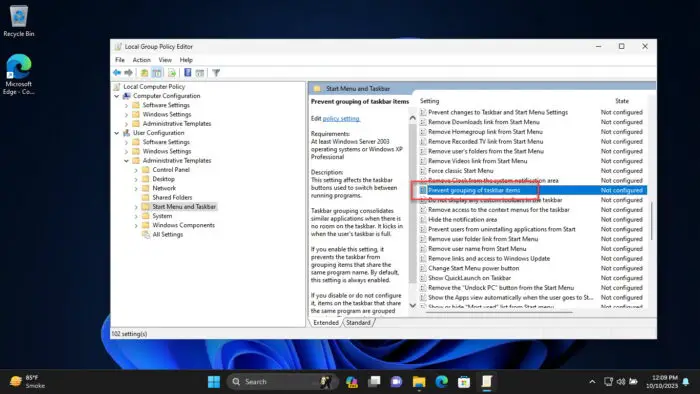
Open policy to prevent grouping of icons in the taskbar -
Select Enabled, and then click Apply and Ok.
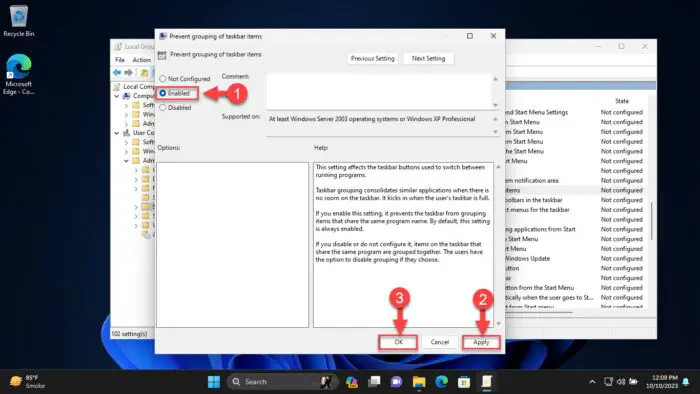
Enable policy to ungroup taskbar icons -
Restart your computer for the changes to take effect.
Note: Although policy enforcement should impact the changes, it didn’t. Therefore, restarting File Explorer or the complete PC does the trick.
When the computer restarts, you should see individual and leveled icons in the taskbar for every window. If you want to revert the changes, return to the “Prevent grouping of taskbar items” policy, select “Not configured” or “Disabled,” and restart the PC.
If this method doesn’t work for you, you can try the remaining two methods discussed below.
Ungroup taskbar icons from Windows Registry
You can also ungroup the taskbar icons from the Windows Registry. Here is how:
Note: Misconfiguration of critical values in the system’s registry could be fatal for your operating system. Therefore, we insist that you create a system restore point or a complete system image backup before proceeding forward with the process.
You can also use our top selection of disk imaging and backup software so you never lose your data or operating system again.
-
Press the Windows Key + R keys to open the Run Command box.
-
Type in “regedit” and press Enter to open the Registry editor.

Open the Registry Editor -
Navigate to the following path from the left pane:
Computer\HKEY_CURRENT_USER\SOFTWARE\Microsoft\Windows\CurrentVersion\Policies\
-
Right-click the Policies key, expand New, and then click Key. Name this key “Explorer“.
Note: If the Explorer key already exists under the Policies key, then skip this step.
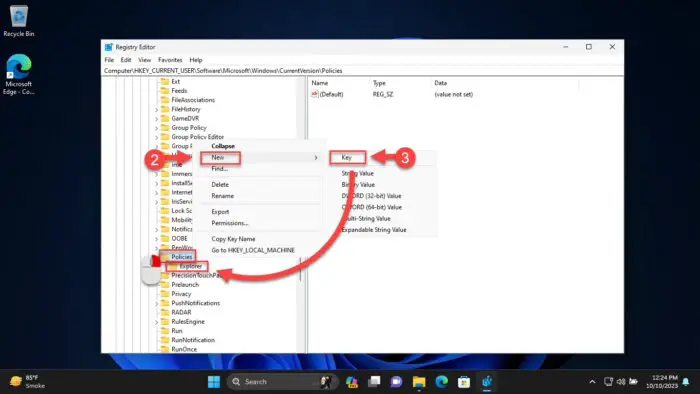
Create the Explorer key -
Right-click the Explorer key, expand New, and then click DWORD (32-bit) Value. Name this DWORD “NoTaskGrouping“.
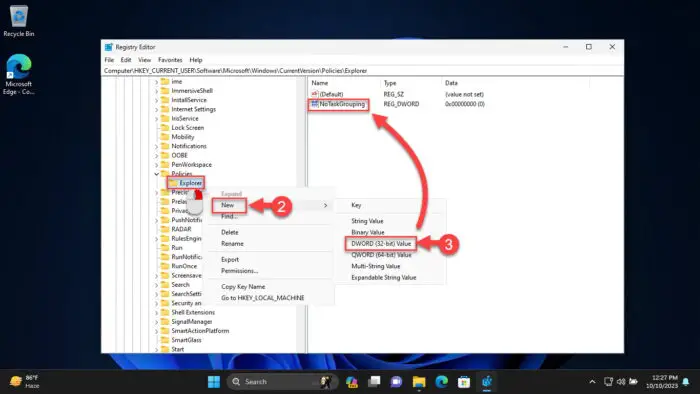
Create the NoTaskGrouping DWORD -
Double-click the DWORD “NoTaskGrouping,” set its Value Data to 1, and click Ok.
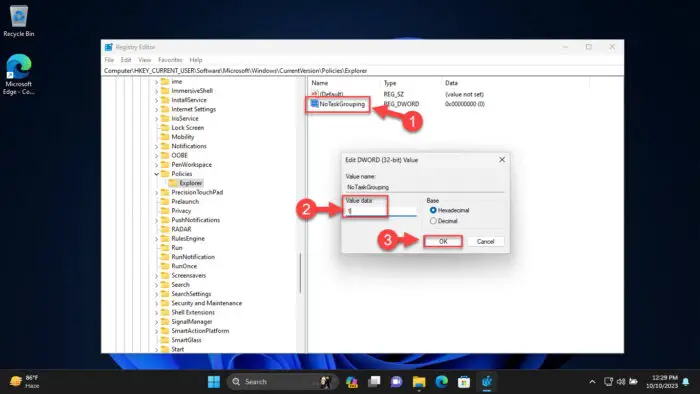
Disable icon grouping in taskbar from Windows Registry -
Restart your computer for the changes to take effect.
This will disable the icon grouping in the taskbar and you should be able to see separate icons for every open window, with labels.
If you want to revert the changes and re-enable icon grouping, you can change the Value Data for the NoTaskGrouping DWORD to 0, delete the DWORD, or delete the Explorer key.
Ungroup taskbar icons using third-party app
You can also use a third-party app to ungroup taskbar icons for you. The StartAllBack application is used to tackle the annoyances many people face while using the Windows OS. One of these is configuring the layout and setting the preferences, including enabling and disabling icon grouping.
You can use the StartAllBack application to ungroup the icons in the taskbar. Here is how:
-
Open the StartAllBack website and download the app.
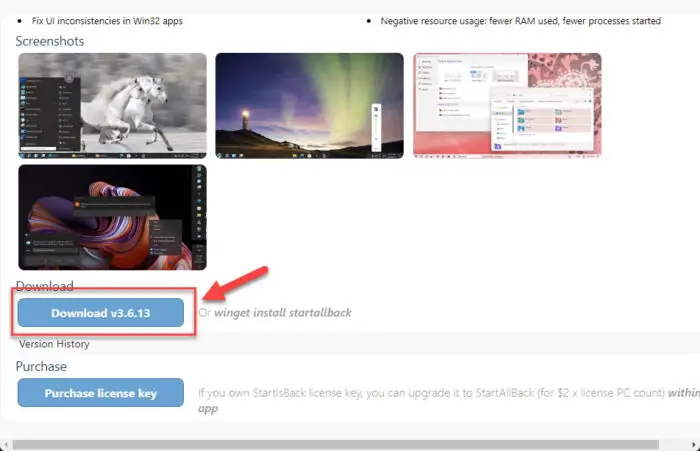
Download StartAllBack -
Run the downloaded setup file.
-
Select either of the following installation options according to your preferences:
- Install for me
- Install for everyone
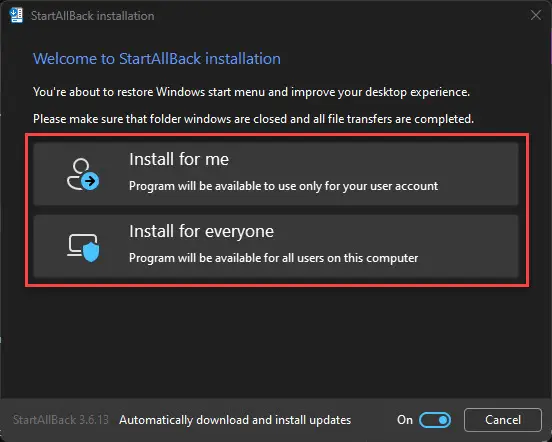
Select installation preferences The application will now be installed almost immediately, and you will notice some changes in the taskbar.
Note: You can undo the automatic changes from within the StartAllBack app.
-
Open the StartAllBack app. Although it should launch automatically, if it doesn’t, right-click on the Start menu and then click Properties to open it.
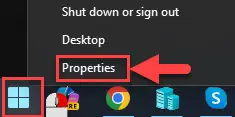
Launch the StartAllBack app -
Switch to the Taskbar tab on the left.
-
In front of “Combine taskbar buttons,” expand the drop-down menu and select Never.
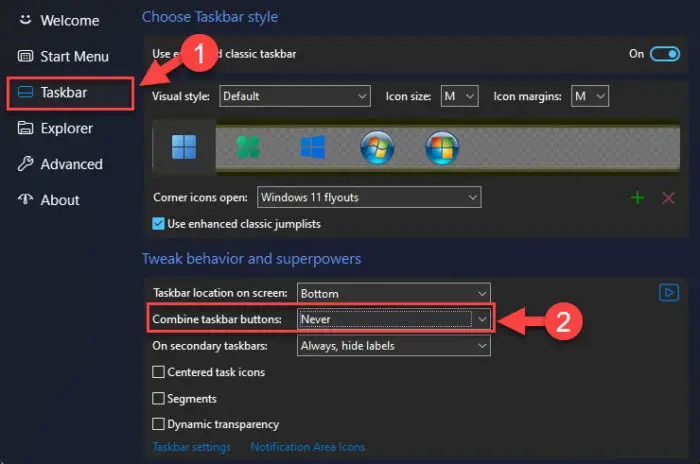
Disable icon grouping in taskbar from StartAllBack -
If more than one display device is connected, also select Never from the drop-down menu in front of “On secondary taskbars“.
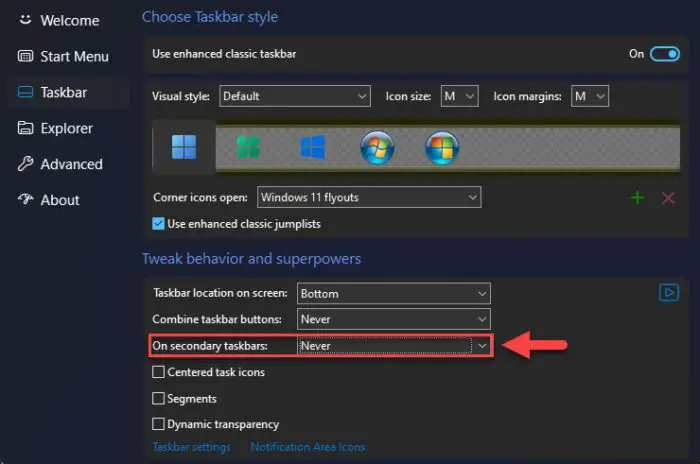
Disable icon grouping on secondary taskbars using StartAllBack
The taskbar should now display individual icons with labels instead of grouped icons.
If you want to revert changes, you can do so from the same drop-down menus in the StartAllBack app.
Ending words
Each of us has different preferences when it comes to Windows settings and layouts. This is exactly why Microsoft continuously works on improving the user experience and giving them the option to manage their preferences.
You can choose whether you want grouped icons or separate icons in the taskbar for both Windows 10 and Windows 11. You can also do so without having to install the latest Windows update (it is always recommended that you keep your computers updated at all times).


