Windows 11 needs to meet some minimum hardware requirements to be installed on a physical machine. Similarly, a Virtual Machine (VM) must have similar properties and specifications if you want to run Windows 11 on it.
This article discusses how you can create a Windows 11 VM on your device using either Hyper-V, VMWare Workstation, or Oracle VirtualBox while meeting the basic requirements for Windows 11.
Table of contents
The requirements for Windows 11 to be installed are the following:
- Minimum 2 CPU Cores.
- TPM 2.0 Chip available.
- Only UEFI, with Secure Boot enabled.
Ensure that the host device meets all Windows 11 requirements before proceeding to create the VM through any hypervisor.
Microsoft Hyper-V, VMWare Workstation, and Oracle VirtualBox are all hypervisors that allow you to run an operating system on top of another OS. These hypervisors can be installed on your computer and you can run multiple instances of virtual machines on it simultaneously.
Let us now give a step-by-step guide on how you can create a Windows 11 VM on each of these hypervisors.
Create Windows 11 Virtual Machine in Hyper-V
Hyper-V comes preinstalled in Windows (Pro, Education, and Enterprise editions) as well as Windows Server. However, it needs to be enabled through the “Optional Features” applet in Windows 10 & 11, and Virtualization must also be enabled through BIOS.
The 3 requirements mentioned above need to be met to install Windows 11 on a Hyper-V VM as well. Moreover, you will also need a Windows 11 ISO image before you begin creating a VM.
Once you have the Windows 11 image and Hyper-V is enabled, you can now create a Windows 11 VM using this guide:
-
Launch the Hyper-V Manager by searching for it through the Search Box.
-
Now right-click on the computer name in the left pane under “Hyper-V Manager,” expand New, and then click Virtual Machine.
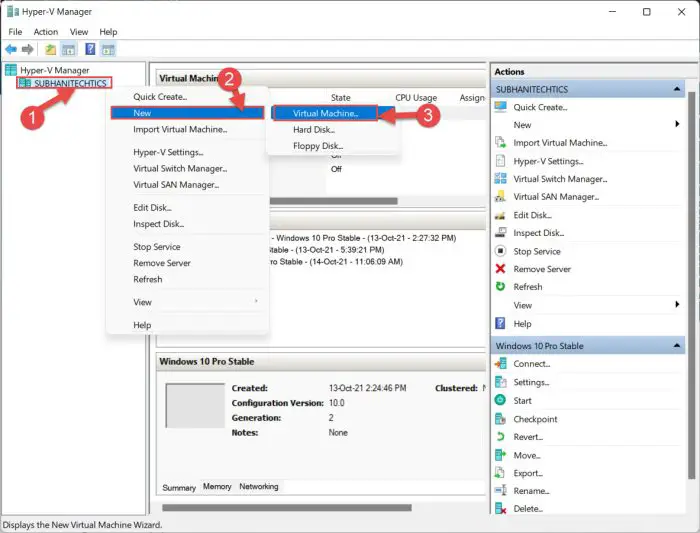
Create new VM in Hyper-V -
The “New Virtual Machine Wizard” will now launch. On the Before you begin screen, click Next.
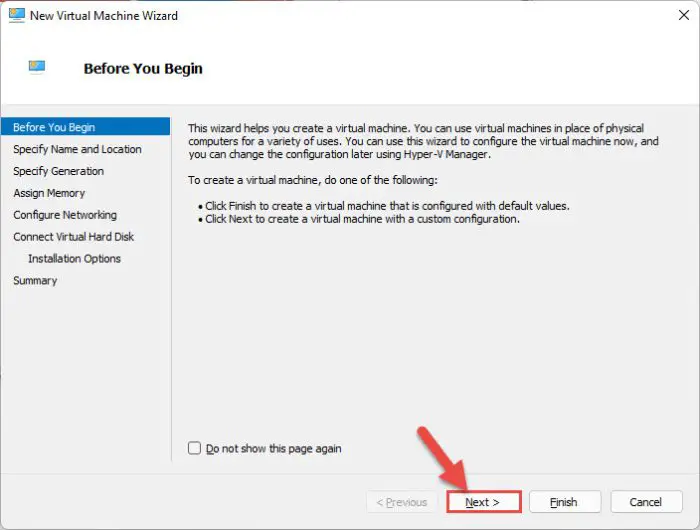
Proceed -
On the next screen, type in a name for the VM that you want to create and click Next.
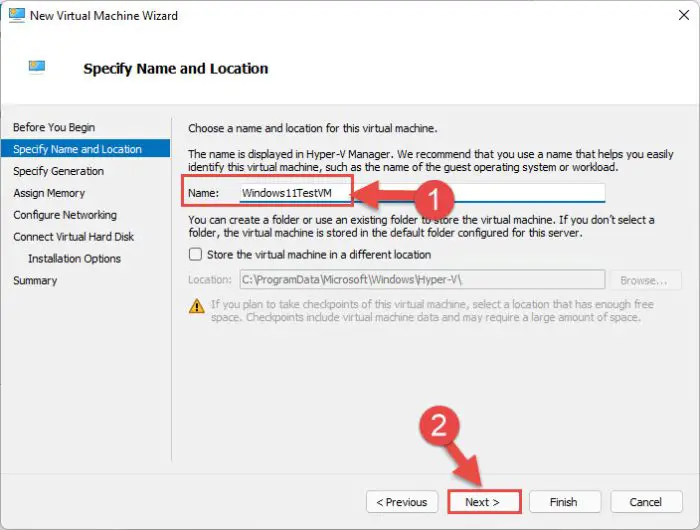
Name the VM -
Now select the Generation 2 radio button and click Next. We select Generation 2 because it supports UEFI and requires a 64-Bit OS (which Windows 11 is).
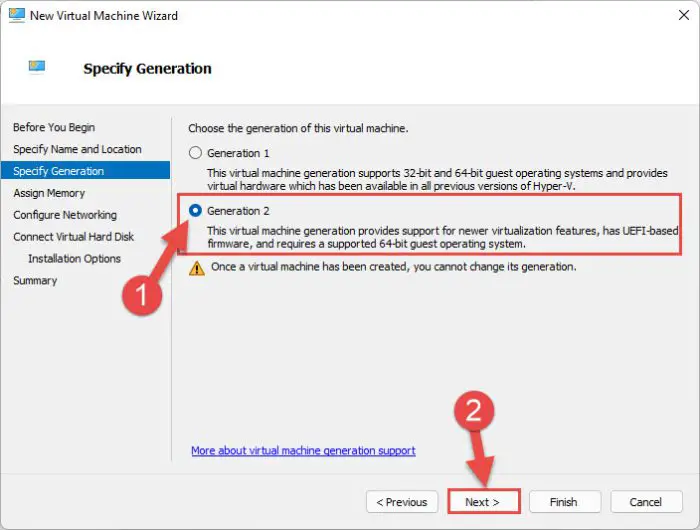
Select VM generation type -
On the next screen, enter the Startup Memory 4096 MB or greater (multiples of 1024 only). Click Next when done.
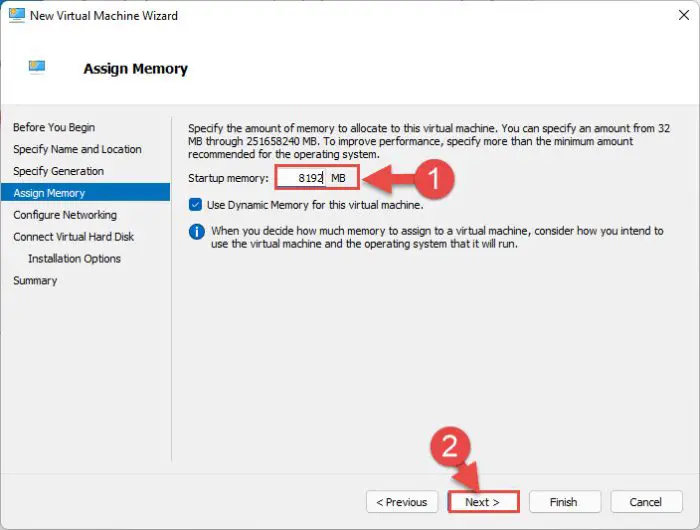
Assign RAM to VM -
(Optional) Now select a Connection (virtual switch) and click Next.
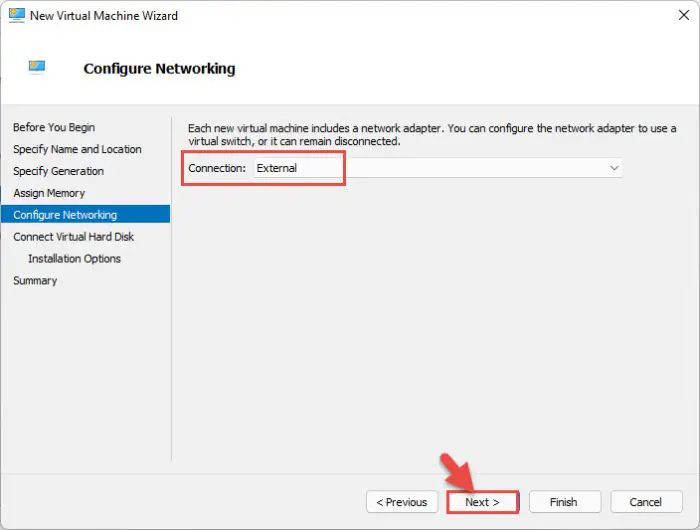
Connection network adapter to VM -
On the next screen, select a location where you want to create the Virtual Hard Disk (VHD) for the VM (optional) by clicking the Browse button. You can also leave it as default. Then, enter the size of the VHD in GBs (minimum 64 GB). Click Next when finalized.
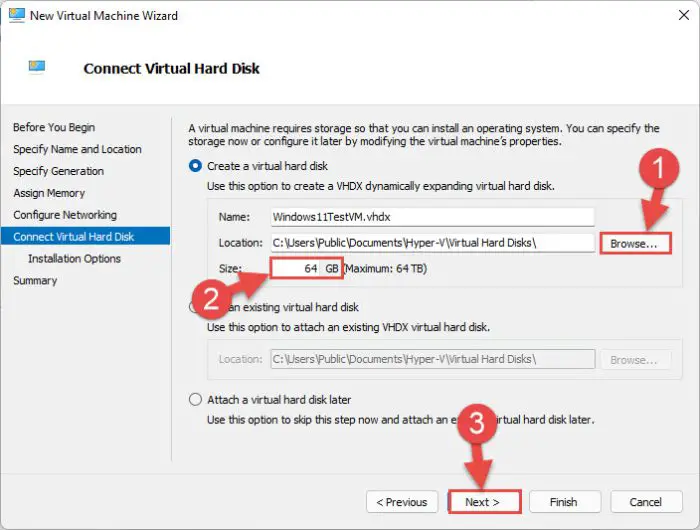
Create VM’s hard disk -
Select the “Install an operating system from a bootable image file” radio button, and then click the Browse button and select the Windows 11 ISO image. When done, click Next.
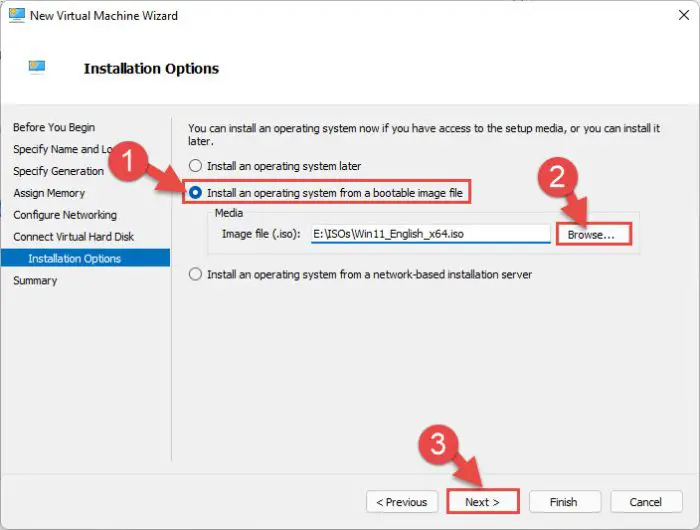
Select ISO to install -
On the final wizard screen, confirm the configurations and click Finish.
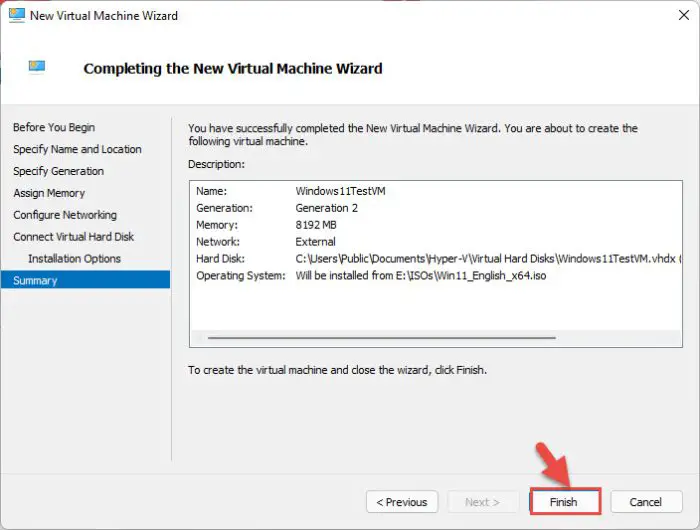
Complete VM setup -
The VM is now created. However, there are still some configurations to be done. In the “Virtual Machines” tab in Hyper-V Manager, right-click on the VM that you just created and click Settings from the context menu.
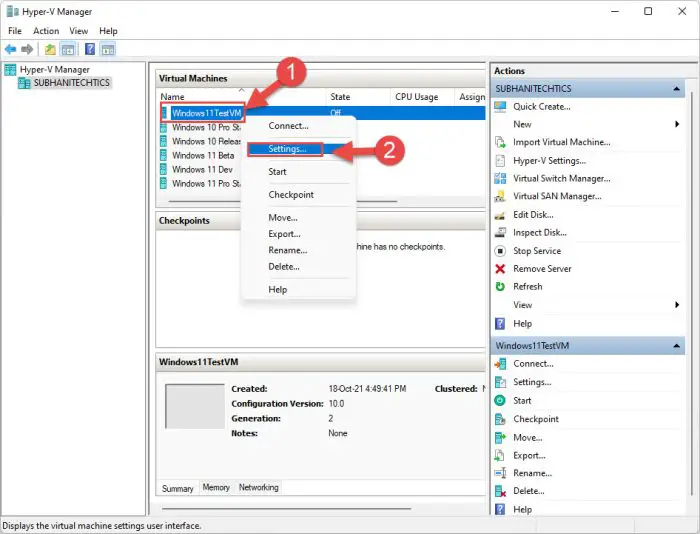
Open VM settings -
In the Settings window, switch to the Security tab, make sure that Enable Secure Boot is checked. Then also check Enable Trusted Platform Module.
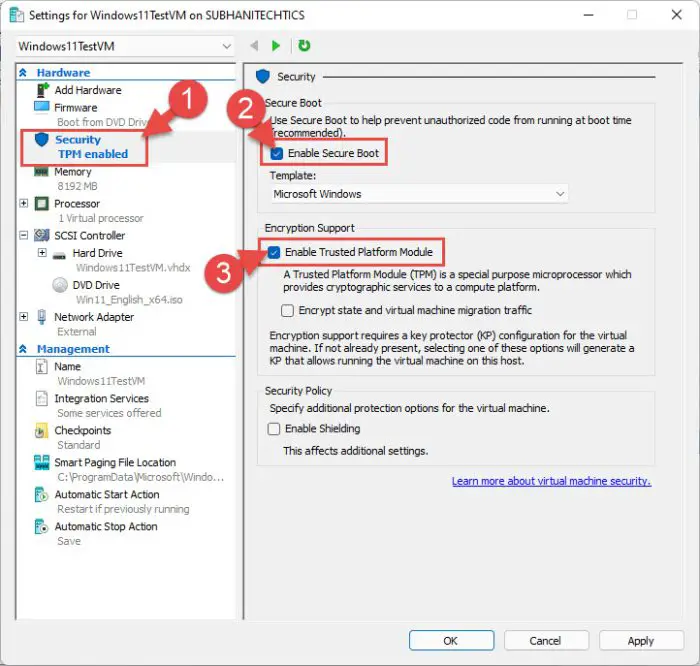
Enable Secure Boot and TPM -
Now switch to the Processor tab and increase the number of Virtual Processors (minimum 2). Click on Apply and Ok when done.
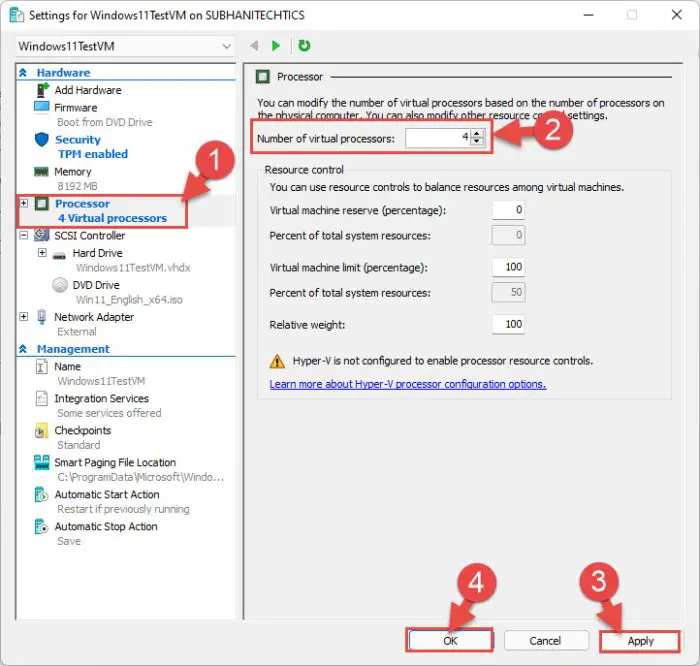
Increase virtual processors
You are now finished with the VM creation process in Hyper-V. Now, you can proceed to run the VM and install Windows 11 like any regular machine.
Create Windows 11 Virtual Machine in VMWare Workstation
Here is how you can successfully create a Windows 11 VM in VMware Workstation:
VMWare version 14 or above is required.
-
Launch VMWare Workstation and click Create a new virtual machine.
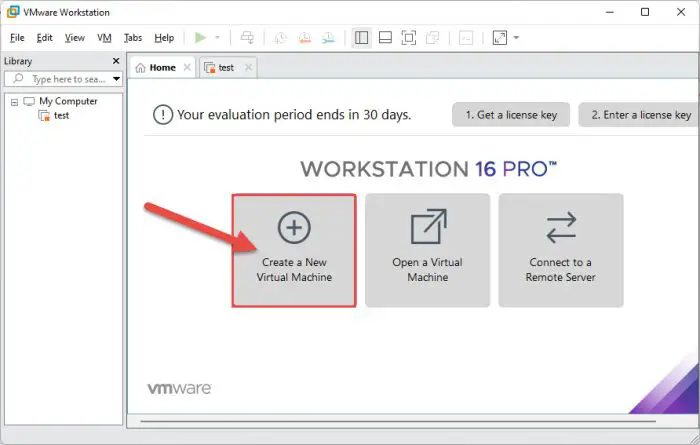
Create new VM -
The “New virtual machine wizard” will now open. Select the Typical radio button and click Next.

Create VM with typical settings -
Now select Installer disc image file (iso) radio button, then click browse and select the Windows 11 ISO image. Click Next when done.
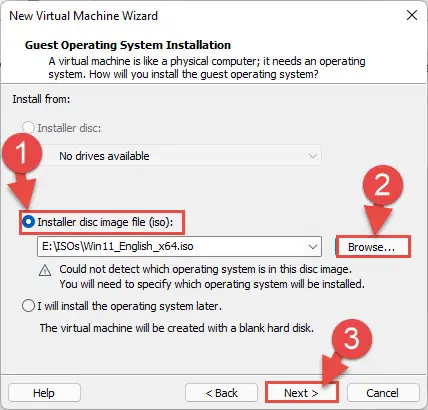
Select ISO image to install -
Next, select the Guest operating system as Microsoft Windows, and select Windows 10 and later x64 from the drop-down menu under Version. Click Next when done.

Select type of OS -
Now enter a name for the VM that you are creating. You can also click Browse to change the path of the VHD (optional). Then click Next.
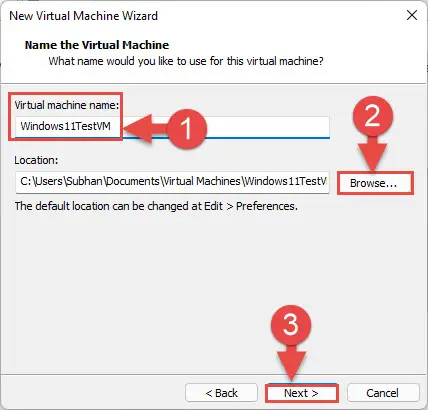
Name the VM -
Now enter the size of the VHD in GBs (minimum 64 GB) and click Next.
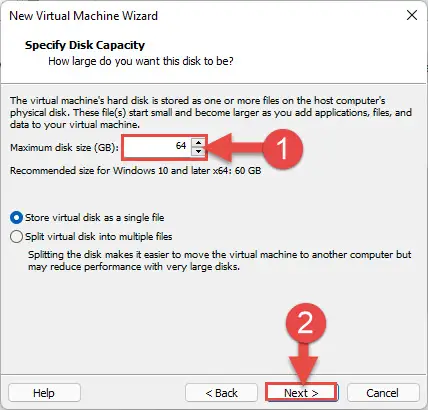
Select disk size for VM -
On the final wizard screen, confirm the configurations and click Finish.
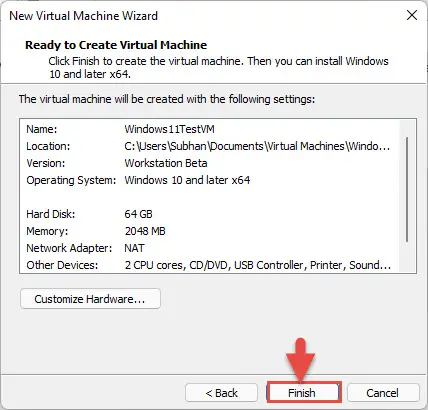
Finalize VM -
The VM has now been created. However, there are still some configurations left to do. On VMWare Workstation, click Edit virtual machine settings under the VM tab.
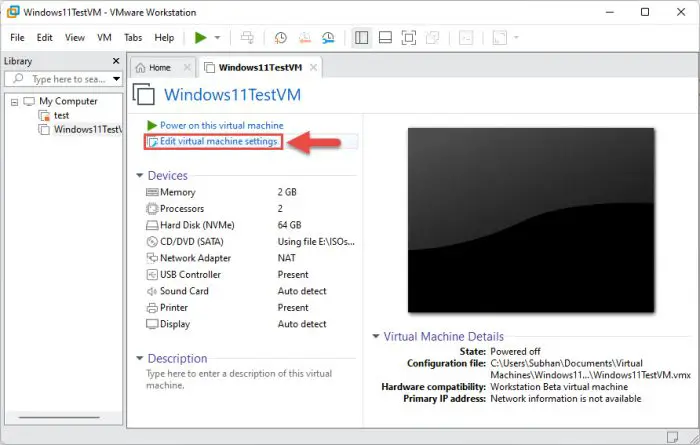
Open VM settings -
The Settings window will now open. In the Memory option, increase the Memory of this virtual machine to a minimum of 4 GB.
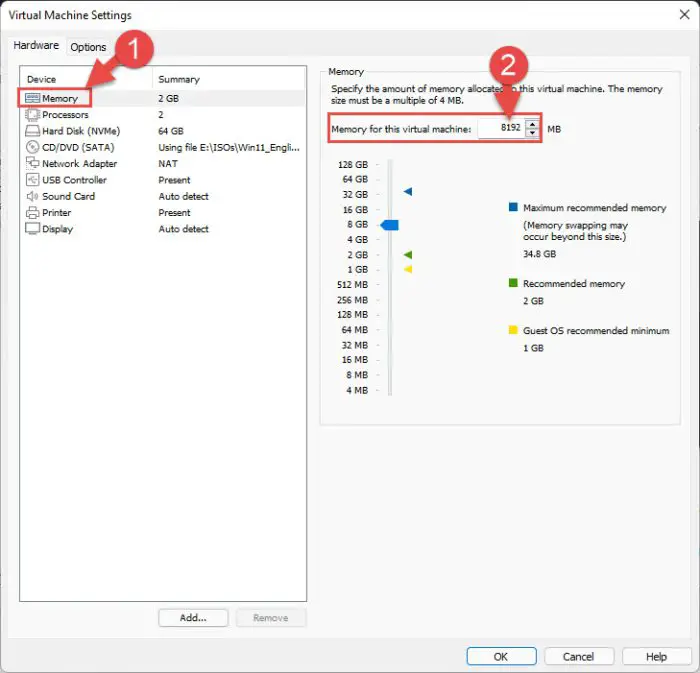
Increase RAM for VM -
Now switch to the Processors option and increase the Number of cores per processor to a minimum of 2.
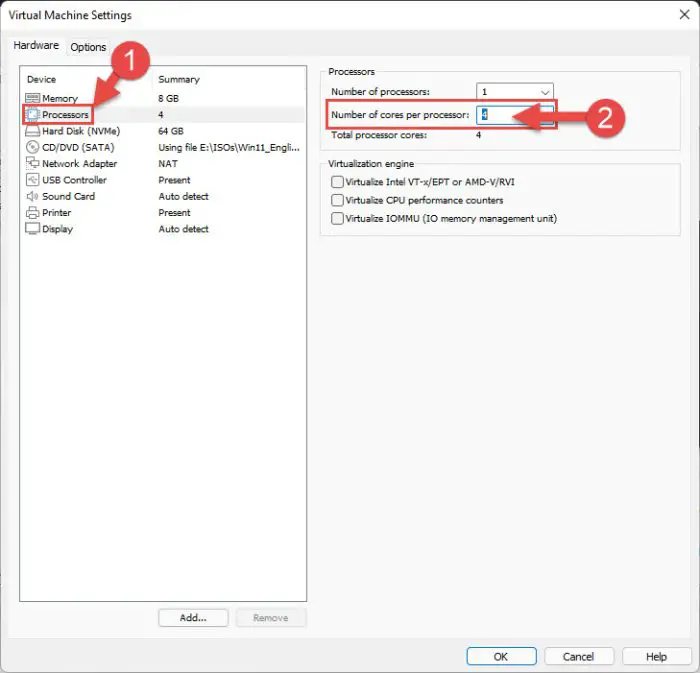
Increase virtual cores -
Now switch to the Options tab from the top of the window. Click the Access Control option and then click Encrypt.
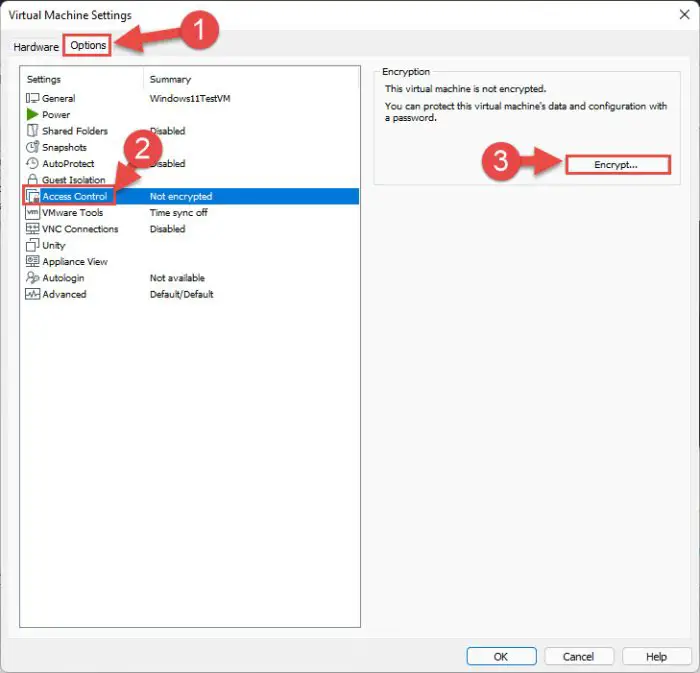
Encrypt VM -
In the “Encrypt virtual machine” popup, enter a pin code (twice) and then click Encrypt.
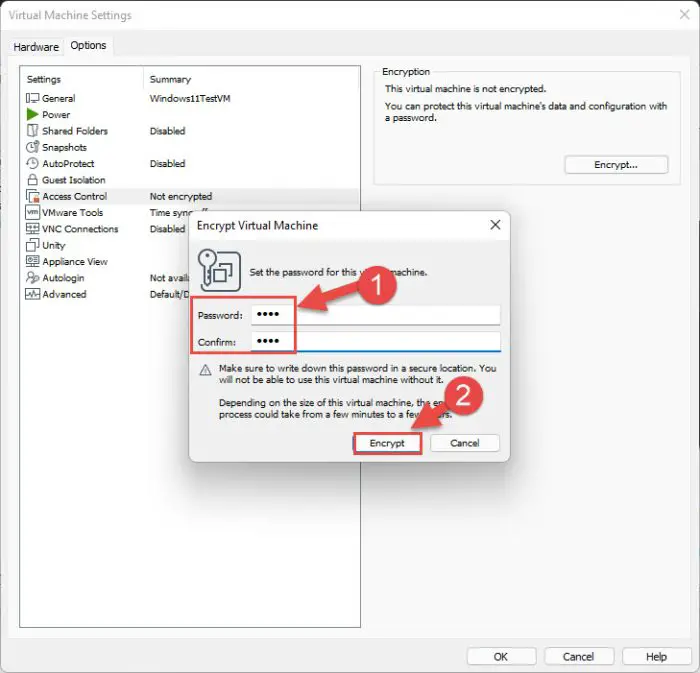
Configure encryption -
Open the Advanced options and select the UEFI radio button. Also, check the box next to Enable Secure Boot beneath it.
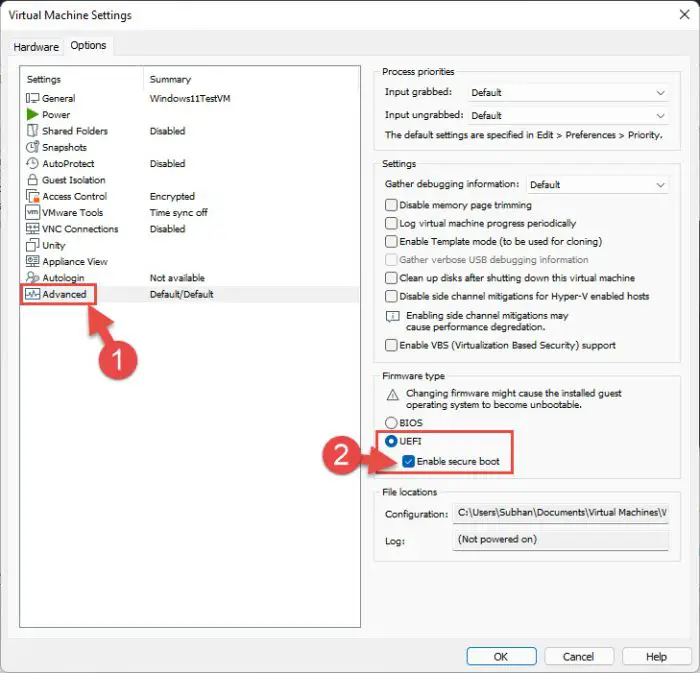
Enable Secure Boot -
Now return to the Hardware tab from the top of the window and click Add at the bottom.
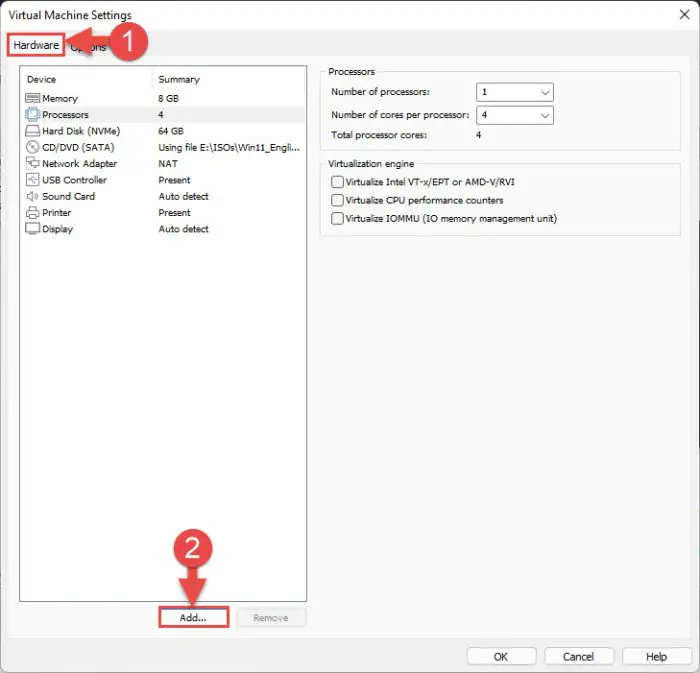
Add new hardware to VM -
From the “Add hardware” popup, select Trusted Platform Module and click Finish.
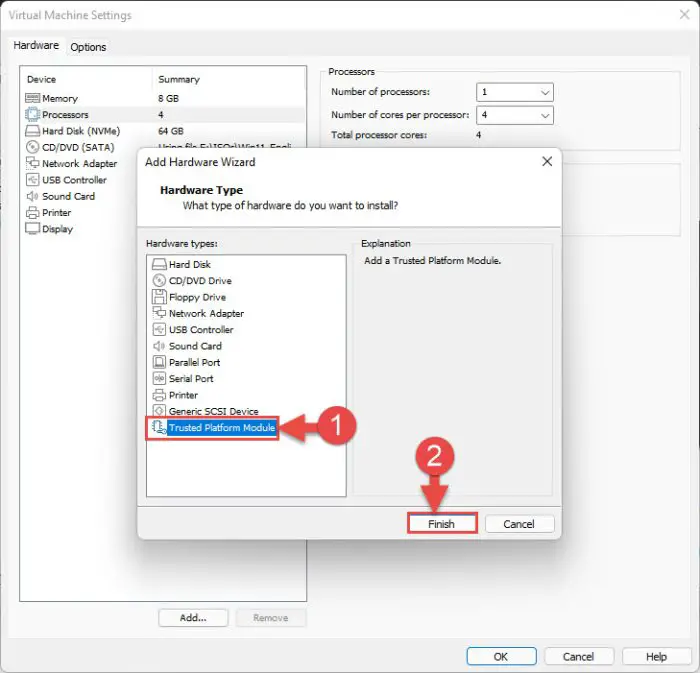
Add TPM -
Then click Ok on the “Virtual machine settings” window to make the changes take effect.
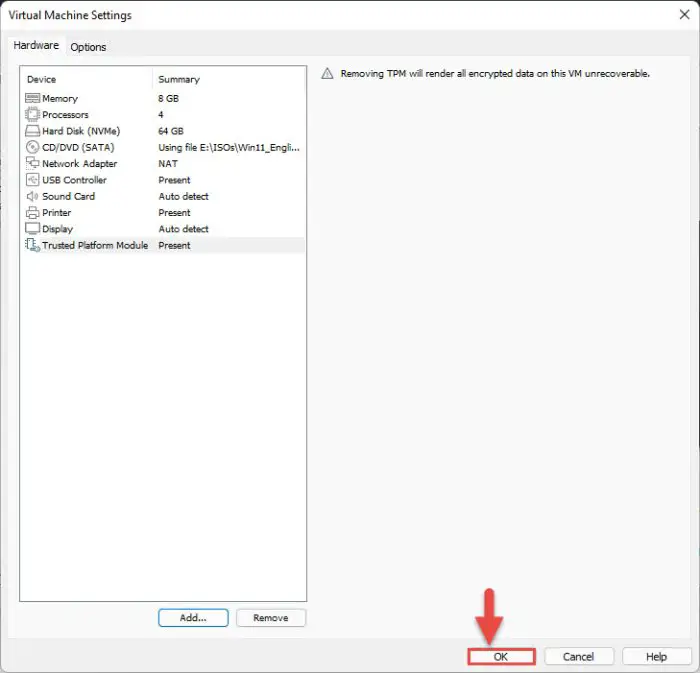
Close settings
You can now start the VM and begin the installation of Windows 11 like on a regular computer.
Create Windows 11 Virtual Machine in VirtualBox
Previously, you were unable to create a Windows 11 VM using VirtualBox. However, recently, Oracle updated the software to VirtualBox 7 which includes support for Secure Boot, TPM, and other features. Therefore, you can now create a Windows 11 VM atop VirtualBox as well!
Follow these steps to create a Windows 11 VM using Oracle VirtualBox:
Note: You need to have VirtualBox 7 or higher to create a Windows 11 VM.
-
Launch VirtualBox and click New from the top menu.
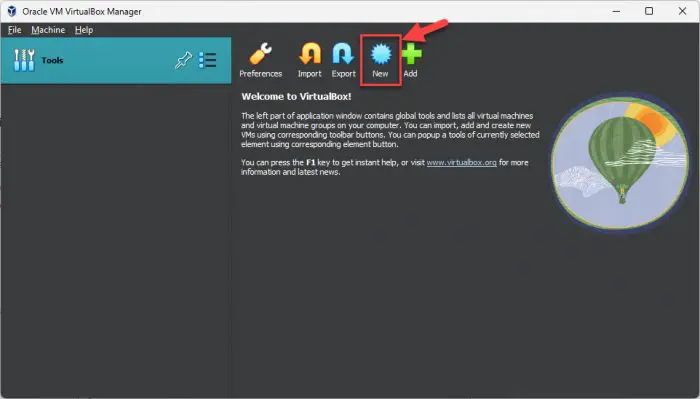
Create a new VM -
The new VM creation window will now open. Here, enter a name for the VM, select the ISO image, check the box next to “Skip Unattended Installation” and then click Next.
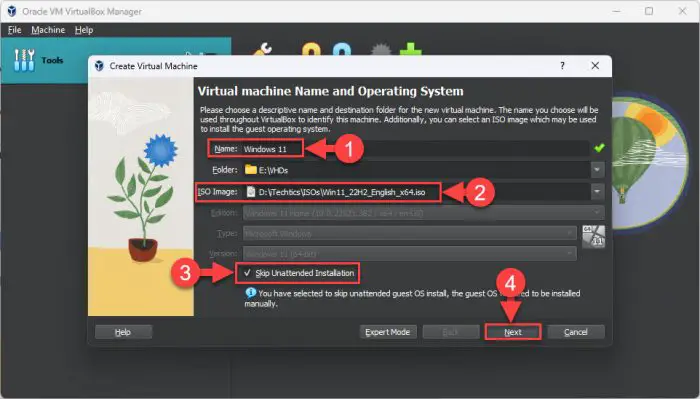
Configure the VM to be created -
Assign the RAM and virtual processors for the VM and ensure that the box next to “Enable EFI (special OSes only)” is checked. Then, click Next.
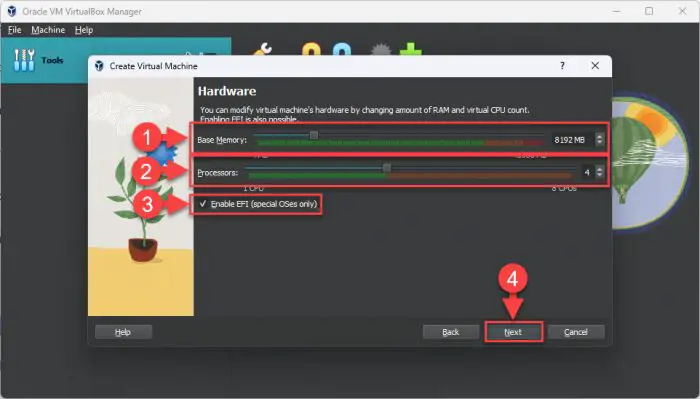
Assign RAM vCPU and enable EFI -
Now create a new hard disk for the VM and assign its size, then click Next.
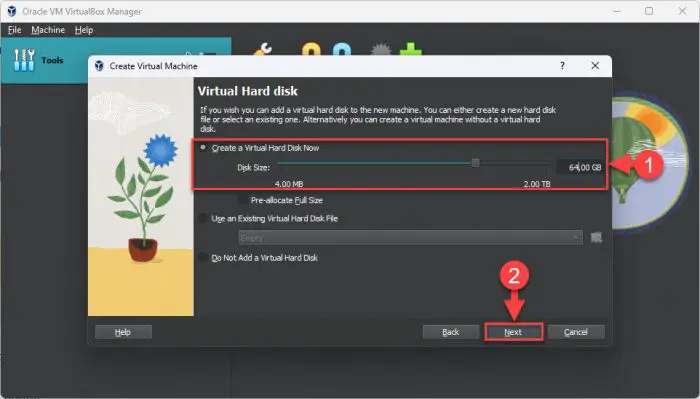
Create hard disk -
Now finalize the VM creation by clicking Finish.
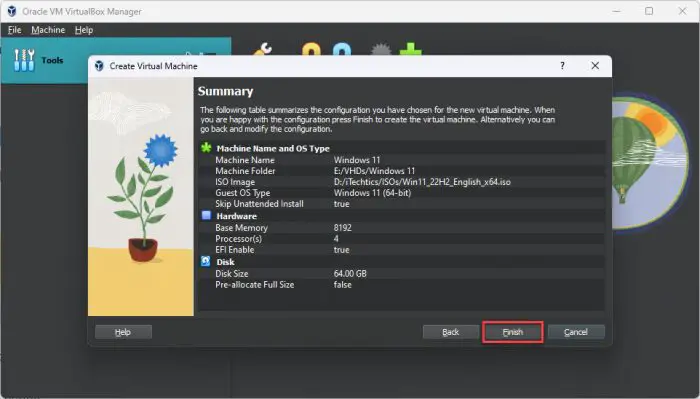
Finalize VM creation
The virtual machine will now be created. You may now boot it up and begin the OS installation process.
Closing Words
After creating a Windows 11 VM on the 3 hypervisors, we found that the easiest method was using the VirtualBox. It involved fewer steps and was the only one out of the 3 hypervisors that did not need additional configuration in the VM’s settings after just having created it.
Can Windows 11 run in VirtualBox?
You can create a Windows 11 VM in Oracle VirtualBox. However, you need VirtualBox 7 or higher since they support Secure Boot, TPM, and disk encryption, which are the basic requirements for Windows 11.
Does VMWare support Windows 11?
Yes, you can run a Windows 11 VM in VMWare as long as TPM and Secure Boot are enabled, and the VM hardware meets the minimum system requirements for Windows 11.
Will Windows 11 run on a virtual machine?
Yes, you can run Windows 11 on a virtual machine as long as the hypervisor supports TPM passthrough and Secure Boot. This also requires the host machine to meet the minimum system requirements that are indicated by Microsoft.

