Key Points
- To delete the temporary files, go to Settings > System > Storage > Temporary Files. Select the temp files and click Remove Files.
- C:\Windows\Temp folder contains OS-specific files, while C:\Users\[username]\AppData\Local\Temp contains app-specific temporary data. You can clean both manually using File Explorer.
- To clean the %Temp% folder from the Command Prompt, use the command “del /q /f /s %TEMP%*”.
Temporary files, or “Temp” files are files that are used during other major processes, like installing an app, updating the OS, etc. Once the process is completed, the files become useless. Most often, these temporary files are removed automatically once they are no longer needed, however, over time, they tend to accumulate and are left behind on your PC.
Although most temporary files are tiny, they can take up significant disk space when combined. Since they are not needed for any purpose any longer, you can safely delete them (permanently) from your computer.
Temporary files are of different types. This guide illustrates how to delete all kinds of temp files on a Windows 11 computer since the OS provides so many different ways. Note that these methods will also work for Windows 10.
What are temporary files in Windows
Temporary files are those needed by the operating system, or another app or program only temporarily, while they are in use. When the task at hand is performed, the temporary files can be discarded without consequences.
For example, if you download a setup file from the internet and install an app using the downloaded package, the setup file is useless once the app has been installed. Therefore, you can safely delete the app without causing any harm to the OS, or the app.
A temporary file can be any one of the following files:
- Downloads
- Windows Update files
- Windows Upgrade Log Files
- Windows ESD Installation Files
- Temporary files from apps and programs
- Temporary internet files
- Thumbnails
- Microsoft Defender Antivirus
- Device driver packages
All of the above mentioned files can be removed from your PC. The different file types are stored at different locations inside Windows, by default. Therefore, you may need to apply more than one method to get rid of all sorts of temporary files.
Temp vs. %Temp% folders
Before discussing the various methods to clean up temporary files on Windows 11, you must first understand the difference between the Windows temporary data folder, and the application-related temporary data folder.
When logged into Windows, you will find two “Temp” folders: one will have the path “C:\Windows\Temp,” while the other will be at “C:\Users\[username]\AppData\Local\Temp.” The former stores the OS-related temp files, while the latter stores the user and app-specific temp files.
You can access these temp files through File Explorer and navigate to them, or through the Run Command box. To open the “Temp” folder at C:\Windos, run this command:
TempTo open the “Temp” folder at C:\Users\[username]\AppData\Local, run this command instead:
%Temp%Benefits of cleaning up temp files
Removing temporary files from your computer not only frees up storage space but also has another benefit.
Cleaning up temporary files aids in running the computer smoothly. Temporary files often cause issues with Windows, like being unable to install a Windows update or an app. If the temporary files get corrupted, they can behave abnormally, interfering with the system’s operation.
Therefore, it is my recommendation that you perform a regular cleanup of the temporary files on your PC from time to time.
Now that you understand the difference between the temporary file types, stored locations, and the benefits of deleting them, let’s continue to see how to clean them up.
How to cleanup temporary files in Windows
Delete temporary files from Windows Settings
Windows 11 provides convenient methods to delete the temporary files directly from Windows settings. Use the following steps to delete temp files with ease:
-
Press the Windows Key + i to open the Settings app.
-
Click System.
-
Click Storage.

Open the Storage settings page -
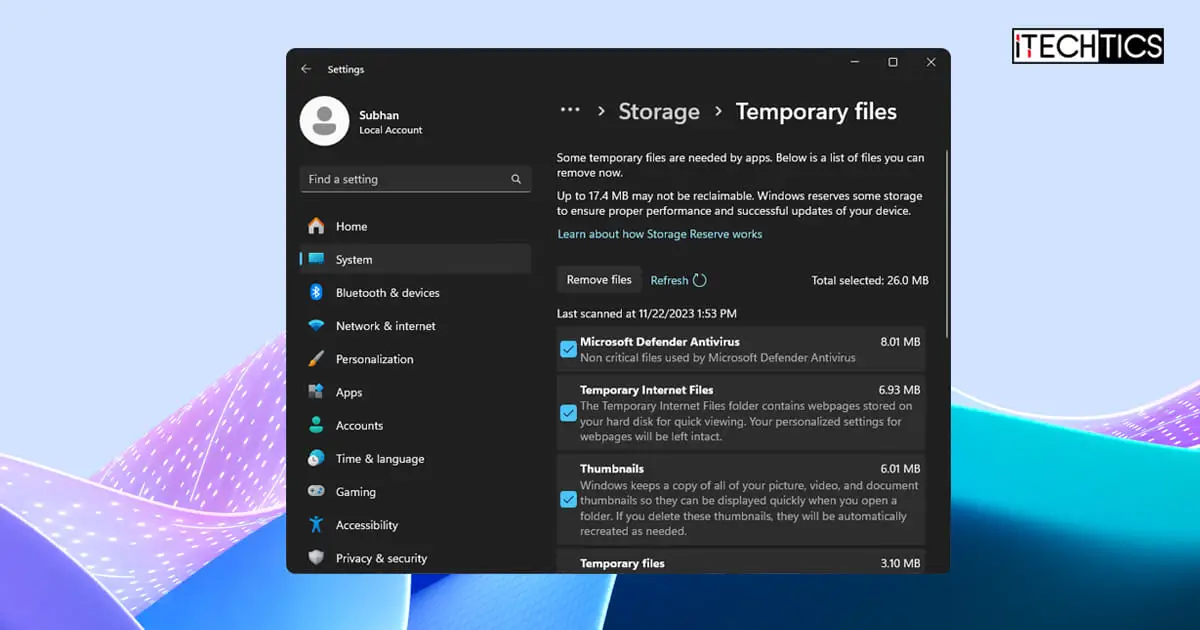
Go to “Temporary files.”

Open Temporary files Alternatively, you can also click “Cleanup recommendations” and then click “See advanced options” to end up on the same “Temporary files” settings page.
-
Select the files that you want to remove and click “Remove files.”

Select temporary files and delete them from Settings app


Windows will now begin removing the temporary files that you selected.
Delete temporary files using Storage Sense
Items that you don’t need, such as temporary files and deleted items in the Recycle Bin, can be automatically removed by Storage Sense to free up disc space. Here are the steps to delete temporary files using Storage Sense:
-
Press the Windows Key + i to open the Settings app.
-
Click System, and then go to Storage.
Open the Storage settings page -
Toggle the slider in front of “Storage Sense” to enable it, and then click the option again to go to the Storage Sense settings page.

Enable Storage Sense and open it -
Check the “Keep Windows running smoothly by automatically cleaning up temporary system and app files” option.

Allow Storage Sense to automatically clean up temporary files


After performing these steps, Storage Sense will automatically begin cleaning up the system and app temporary files in the background.
Delete temporary files using Disk Cleanup
Disk Cleanup is a Windows-native tool that does exactly what its name implies. Previously, the Disk Cleanup tool was accessible via the partition’s properties. However, this option has been removed from Windows 11 recently, but the tool is still available.
Here are the steps to use Disk Cleanup to delete temporary files from your PC, one disk at a time:
-
Open the Start menu and search for “Disk Cleanup.”
-
Launch the Disk Cleanup app.
Alternatively, you can launch the Disk Cleanup tool by running “cleanmgr” in the Run Command box.
-
Select the boot drive (Windows installation drive) from the drop-down menu and click OK.

Select drive in Disk Cleanup -
Click “Clean up system files.”

Cleanup system files with Disk Cleanup -
You will be asked to select a drive again. Select the same drive and click OK.
The tool will then scan the drive.
-
Now select the files that you want to delete and click OK.

Select files to delete with Disk Cleanup -
When asked for confirmation, click “Delete files.”

Confirm the temporary file deletion
Disk Cleanup will now begin removing the selected files from your PC.
Delete temporary files from Command Prompt
If you prefer using the Windows command line instead of the GUI-based interface, then you can use the Command Prompt to delete the temporary files. Here is how:
-
Press the Windows Key + R to open the Run Command box.
-
Type in “cmd” and press CTRL + Shift + Enter to run an elevated Command Prompt.
-
Now execute the following command to delete all app-specific temporary files:
del /q /f /s %TEMP%\*
Delete temporary files from Command Prompt

With this command, all temporary files in “C:\Users\[username]\AppData\Local\Temp” will be deleted. Note that some files, that may still be in use, will be skipped.
Delete temporary files using File Explorer (manually)
You can also delete the temp files in either of the “Temp” folders using File Explorer. Here is how:
-
Open File Explorer and navigate to the respective “Temp” folder.
- For OS-specific files: C:\Windows\Temp
- For app and user-specific files: C:\Users\[username]\AppData\Local\Temp
-
Press CTRL + A to select everything.
-
Hold down the Shift key and then press Del.
This will delete everything that is selected, permanently.
-
When asked for confirmation, click Yes.

confirm deletion -
[Conditional] If administrative rights are needed, select “Do this for all current items” and click Continue.

Provide administrative rights for restricted folders -
[Conditional] If prompted with a “File in use” dialog box, select “Do this for current items” and click Skip.
This will skip the files that cannot be deleted right now.

Skip items in use


The temporary files in the Temp folder will now be deleted permanently.
Conclusion
This concludes all the methods to clean up temporary files in Windows 11. Note that these methods also apply to Windows 10, with a slightly different layout of the Settings app. Even so, the options are still there.
Note that you cannot just adopt one of the methods above and expect all sorts of temporary files to be cleaned from your PC. Depending on what type of temp files are available on your computer, you may just need to adapt 2 or more of these.
That said, I recommend that you start from the Settings app and clean out all temporary files from there first. Then, use File Explorer to manually examine and delete all temp files in both of the “Temp” folders. This should clear all sorts of temporary files.


