There have been reports of people trying to copy/move large files onto external hard drives or USB flash drives and seeing the error message “The file is too large for the destination file system.” Even if your target storage device has ample of free space, this error pops up. This happens because the file you are trying to move exceeds a specific size limit and the destination file system does not support it.
If you are reading this article, it is likely that you are or have experienced this issue. Do not worry, for in this article, you are going to find multiple proven ways to fix the problem and successfully move or copy the large file to your destination target.
This Page Covers
Why Can’t I Move, Copy A Large File?
The external storage devices, such as USB flash drives or external hard drives, are usually formatted in the FAT32 file system. The FAT32 file system can handle a total storage capacity of up to 2 TB (terabytes). However, it can only handle a maximum single file size of 4 GB (gigabytes).
This means that if you try to move or copy files larger than 4 GB onto a device formatted in FAT32 format, you are most likely to see the error message and are unable to get it done.
There are mainly two solutions for fixing this issue; either split the large file into two or more files, each with less than 4 GB in size, or reformat the destination drive to either NTFS or exFAT format.
Both the NTFS and exFAT formats support larger single files. However, we recommend that you use the NTFS format if you are a Windows OS user. The NTFS format can also work with Linux and macOS devices, but only with read-only privileges.
That said, if you are a macOS user, then the exFAT format would also suffice.
Before you move on to fixing the error by applying the given solutions below, let us check the file size first.
Check File Size
Let us first confirm that the file size is above 4 GB, and that is why the error occurred in the first place.
To check the size of a file, right-click it, and then click Properties. In the Properties windows, you will find the size of the file written.
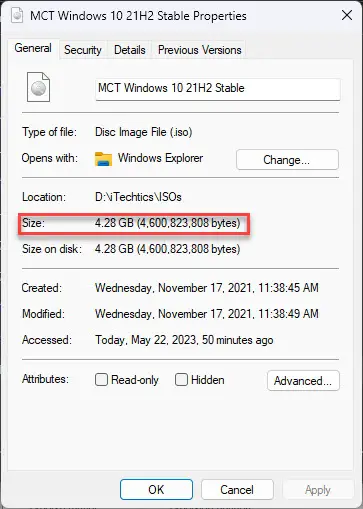
After viewing the file size is greater than that supported by the FAT32 file system, let us now show you how to fix the error message and move/copy the large file onto the destination target device.
Move Large Files to FAT32 Devices
Compress and Split Large Files
One way to move large files onto devices formatted in the FAT32 format is to split them into smaller files. This can be done by compressing and compacting the large files simultaneously. However, there is no native method to do so in Windows. You need to use third-party compression apps, like WinRAR, 7zip, PeaZip, etc.
Use the following steps to compress and split a large file into smaller, multiple files.
-
To begin, ensure that at least one of the aforementioned third-party compression software is installed on your PC.
-
Right-click the large file then click “Add to archive” from the context menu. This option can be hidden inside an extended menu, depending on your software.
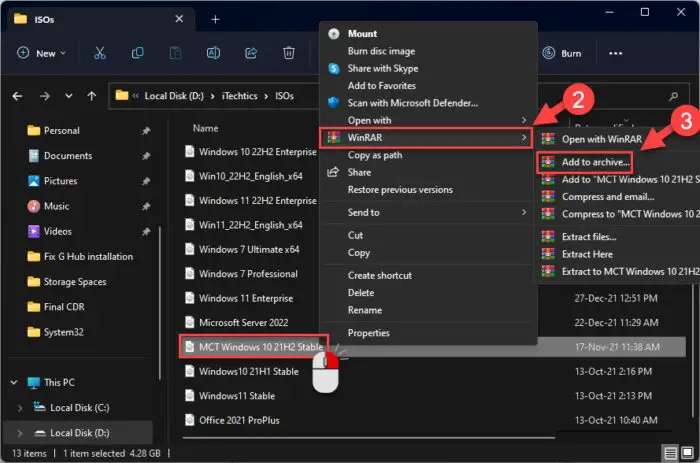
Add large file to archive -
From the popup window, in the “Split to volumes, size“, select the size units and enter the size of each file you want to split the larger file into.
You can select “MB” and the file size and then select “4095 MB (FAT32)” from the drop-down menus. This will split the larger file into the minimum number of smaller files, and each can be handled by the FAT32-formatted device.
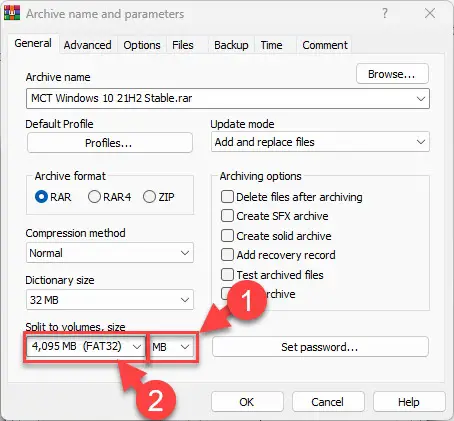
Split the large file into smaller, multiple files -
Now click Ok. The software will now begin compressing and splitting the file.

Large file split into smaller compressed files -
Once the files are split, you can continue to move/copy them to the destination target.
-
If you plan on moving the file onto another system, move all the files inside a single folder and then continue to extract any one of them.
This will extract all of the compressed, smaller files and reconstruct the original, larger file.
Another way to fix the “The file is too large for the destination file system” error is to reformat the destination target device into either NTFS or exFAT format.
Convert FAT32 to NTFS, exFAT File System
There are multiple ways to convert a FAT32 device to either the NTFS or the exFAT format. You can do so without data loss and preserve your data on the USB flash drive or the external hard drive.
Format FAT32 to NTFS from Command Prompt without Data Loss
The easiest method to convert a FAT32 device to the NTFS or exFAT format is using the Comand Prompt. This is a Windows-native method where you do not lose any data on the destination device during the formatting process. Here is how to do it:
-
First, make sure that the external device is connected and a drive letter is assigned.
Note down the drive letter.
-
Now, run the following command in an elevated Command Prompt while replacing [DriveLetter] with the letter assigned to the device:
Note: To convert the device into the “exFAT” format, use this command instead:
Format [DriveLetter]: fs/exFATNote that this is a full format, and will take significantly longer time.
Convert [DriveLetter]: /fs:NTFS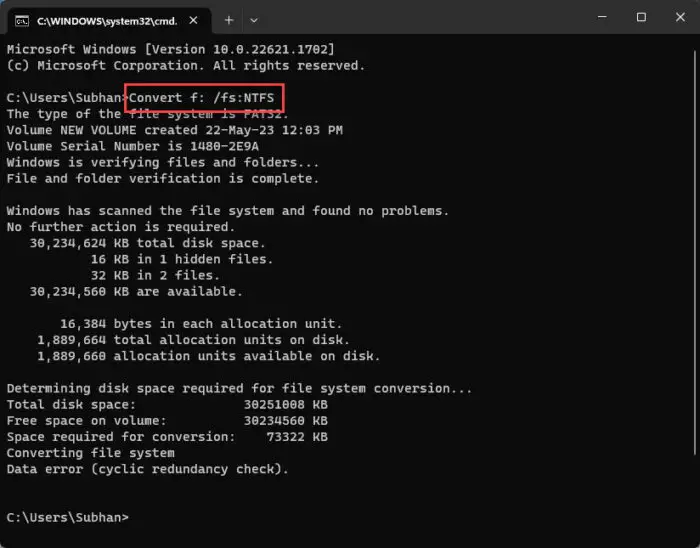
Format FAT32 to NTFS format using Command Prompt without data loss The destination device will now be converted to the NTFS with your data preserved.
-
Now continue to move/copy the large file onto the destination target device.
Once the target device has been formatted to either exFAT or NTFS, you should have no problem transferring any files larger than 4 GB anymore.
Format FAT32 to NTFS using Third-Party Software without Data Loss
You can also use third-party GUI-based software to convert FAT32 devices into NTFS. Software like AOMEI Partition Assistant or EaseUS Partition Master works just fine for this purpose and does not require a paid version of the app for the conversion. Additionally, no data is lost during the formatting.
Use the following steps to convert a FAT32 storage device to NTFS using a third-party tool:
-
Download and install a partition management tool of your choice.
-
Run the tool, right-click on the FAT32 device, expand Advanced, and then click “FAT to NTFS.”
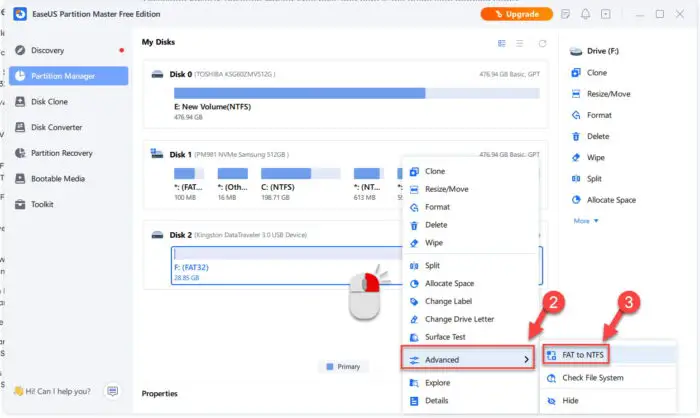
Convert FAT32 to NTFS file system using EaseUS -
Proceed with the confirmation.
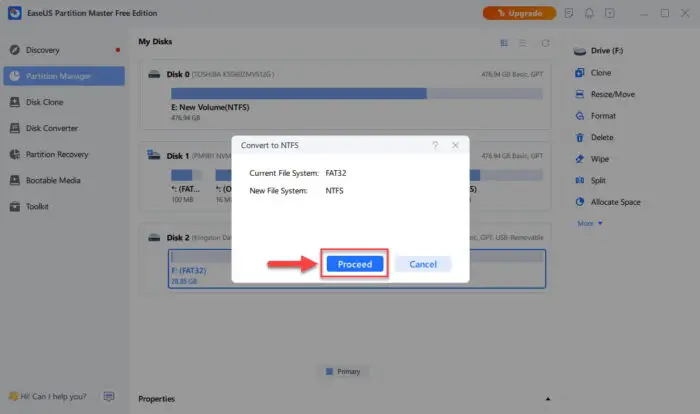
Proceed with the conversion The tool will now begin formatting the target device from FAT32 to NTFS format.
-
When the conversion is completed, click Done.
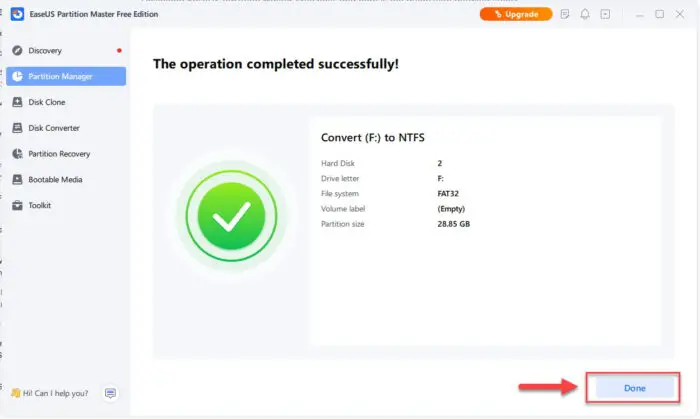
Conversion successful -
Now, continue to move the large file(s) onto the NTFS device.
There are two more methods to format a FAT32 device into another filing system. However, in both of them, all data on the formatted device is lost. You can apply any one of the following solutions and move the large file(s) onto the device if you do not need the existing data on the USB drive/external hard drive.
Format FAT32 to NTFS from File Explorer with Data Loss
Apply the following steps to format the drive into the NTFS format:
-
Open File Explorer and right-click on the external device. Then click Format.
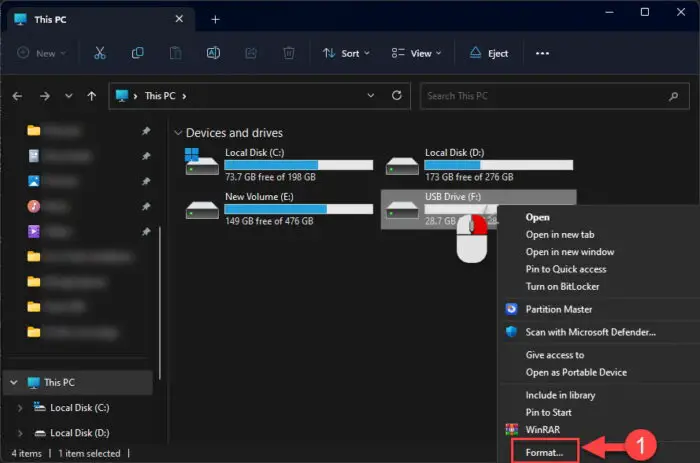
Format the drive from File Explorer -
From the popup, select “NTFS” from the drop-down menu under File system, enter a name for the volume (optional), check “Quick Format,” and then click Start.
Alternatively, you can also select “exFAT” instead of “NTFS” to convert the drive into the exFAT format.
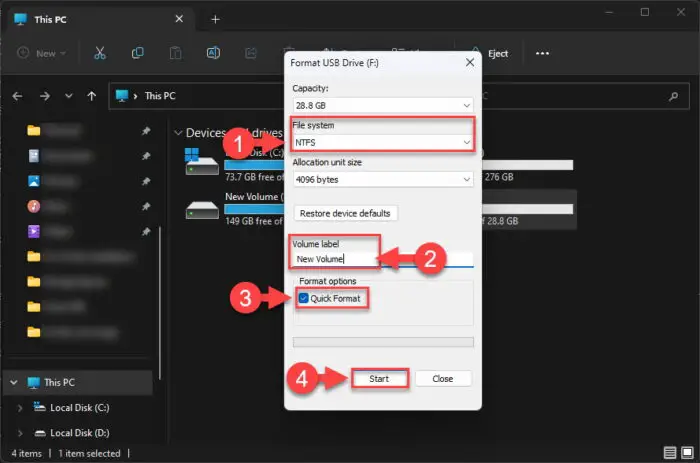
Convert the FAT32 drive to NTFS exFAT format from File Explorer -
Once the device is converted, continue to move/copy the larger file(s) onto the drive.
Format FAT32 to NTFS from Disk Management Console with Data Loss
The Disk Management Console is an excellent tool to manage the connected storage devices; including formatting them. Use the following steps to convert a FAT32 device to the NTFS (or exFAT) format while losing all your data:
-
Open the Disk Management Console by typing in “diskmgmt.msc” in the Run Command box.
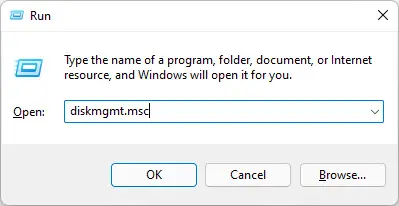
Open the Disk Management Console -
Right-click the FAT32 drive and then click Format.
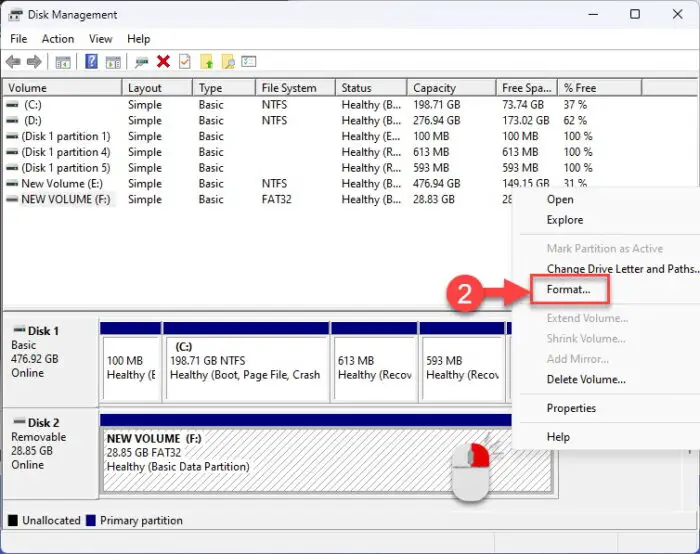
Format drive from the Disk Management Console -
Select “NTFS” (or “exFAT“) from the drop-down menu in front of the File system, select “Perform a quick format,” and then click Ok.
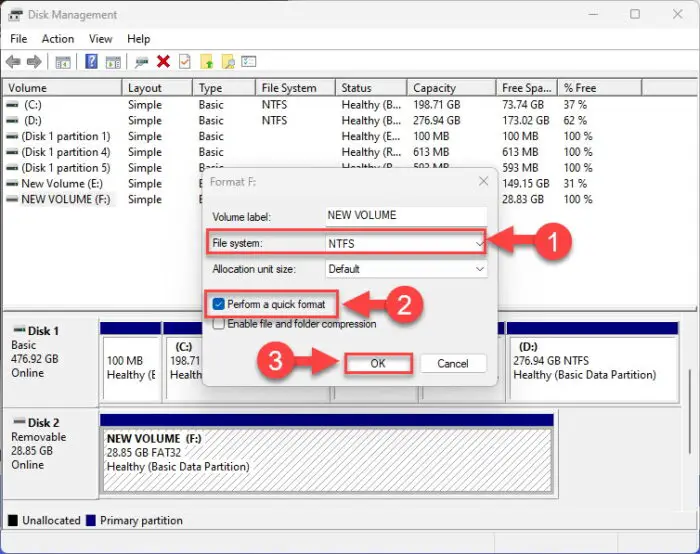
Convert the FAT32 drive to NTFS exFAT format from the Disk Management Console -
When asked for confirmation, click Ok.
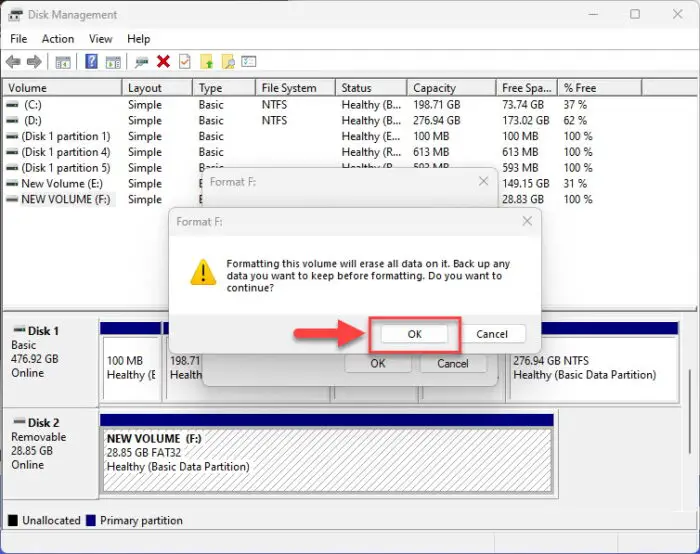
Confirm formatting -
Once the conversion is completed, continue to move the large file(s) onto the NTFS device.
Closing Words
The file systems are different standards to implement uniformity amongst different operating systems, storage devices, and other services. However, each one has its caveats. For example, the FAT32 file system cannot handle files that are larger than 4 GB. On the other hand, the NTFS file system can handle files as big as 256 TB (terabytes).
Therefore, the NTFS filing system gives the edge to users to use and manage large files. Therefore, if you see the “The file is too large for the destination file system” error while transferring or downloading large files, remember that it is usually caused by the file system format of the destination location. In this case, you can either change the format of the drive or split the large file into smaller portions.
Frequently Asked Questions (FAQs)
How to fix “file too large for destination file system” without formatting or losing data?
The error occurs because the destination file system cannot handle files larger than 4 GB (FAT32). Therefore, to fix this, you must format the destination device to either NTFS or exFAT format. You can format the device without losing your data by running the following command in Command Prompt: Convert [DriveLetter]: /fs:NTFS
This command will preserve your data and reformat the drive to NTFS. However, if you do not want to reformat it, you can split and compress the large file into smaller portions by using WinRAR, 7zip, WinZip, or similar third-party tools.
How to fix “file too large for destination file system” while downloading?
When attempting to download a movie, a show, or any large file, you may see the “The file is too large for the destination file system” error. This is because the file system of the target location is FAT32. You must either need to select a different downloading location with a different filing format or convert the FAT32 filing system to NTFS or exFAT.


