Microsoft released its Office 2021 Suite earlier this year with a redesigned interface with lots of new features and performance improvements. However, they are continuously working on improving the user experience, which means more updates for the suite through Windows Update.
No one would like their interface to change, especially when you have just begun getting used to a new Microsoft product. This is one of the reasons why users normally wish to turn off automatic updates for the Office suite.
Let us walk you through the different ways you can turn off automatic updates for Microsoft Office 2021.
Why Turn Off Automatic Office Updates
As we already mentioned, one of the reasons for switching off automatic updates for Office is the changing interface and functionality of the Office tools. However, Microsoft recommends keeping all your software, including apps, drivers, and other tools, up to date. But that is not always a good thing.
Another reason you may want to disable these updates is because of the bugs that accompany them. Although new updates often bring new features and patch up security vulnerabilities, they can occasionally be glitchy.
If they are, Microsoft could take several weeks before a bug is identified and fixed. If your Office products are functioning as they should, you can switch off automatic updates to prevent them from being faulty.
Although you may want to disable automatic updates, you should keep installing new Office updates from time to time.
How to Disable Microsoft Office 2021 Automatic Updates
Through Office Apps
The most conventional and convenient way to disable automatic updates for Office 2021 is through one of the tools itself, like Word, Excel, etc. Disabling automatic updates through one app automatically disables them for the entire suite. Here is how:
- Open any Office 2021 app (Word, Excel, PowerPoint) and click File from the top menu.

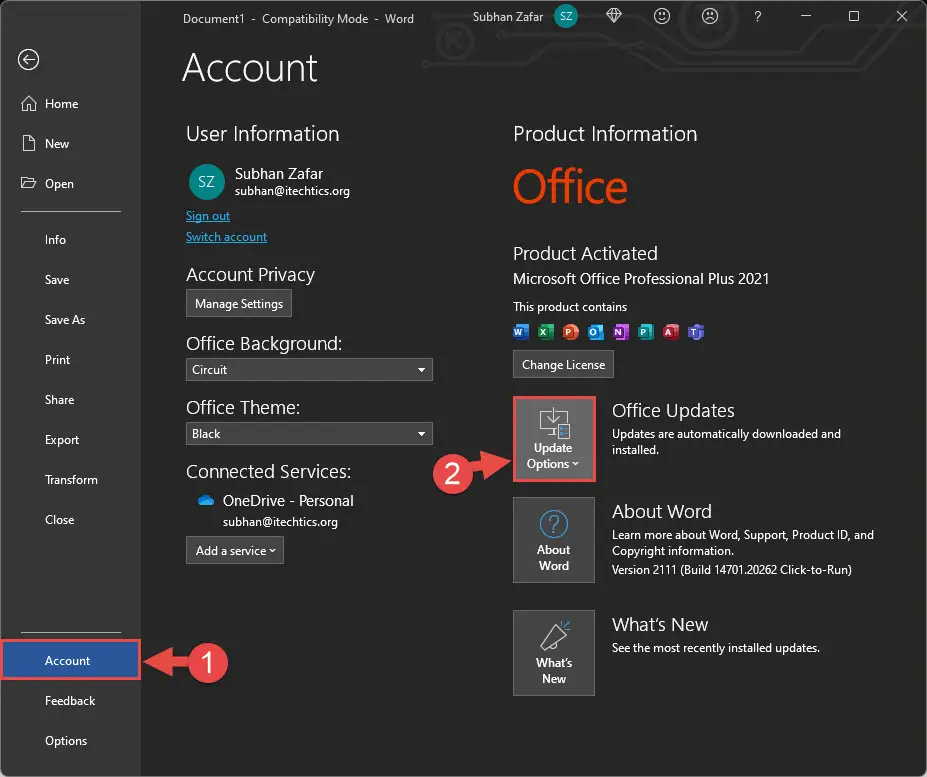
- Click Account from the left menu, and then click Update Options beside Office Updates to expand the menu.
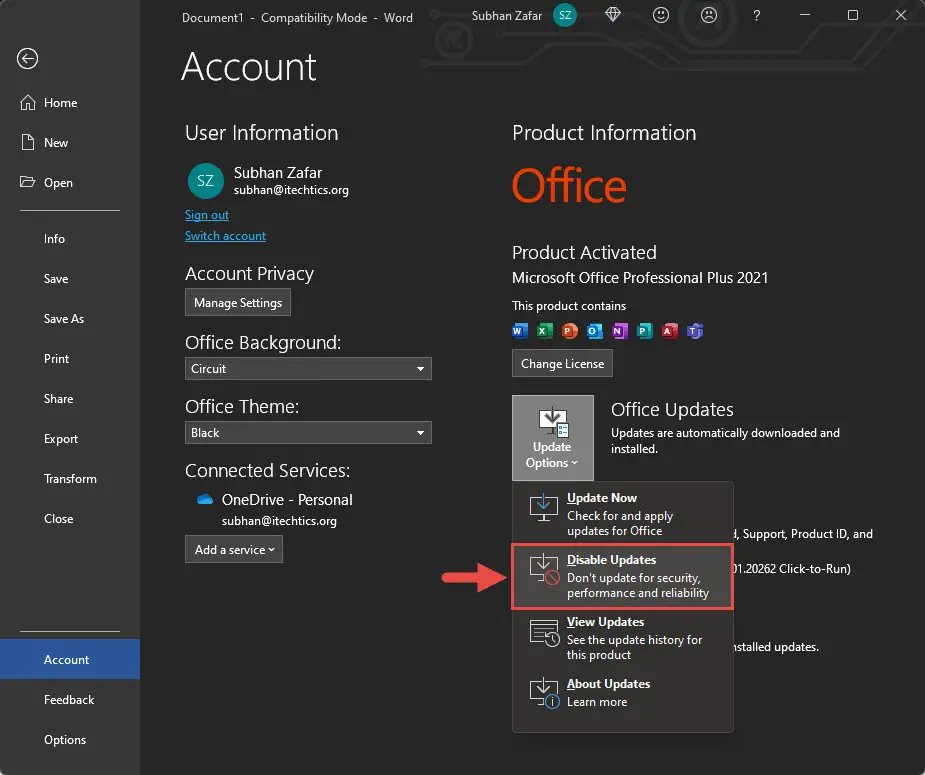
- From the drop-down menu, click Disable Updates.
- If prompted with a UAC, click Yes.
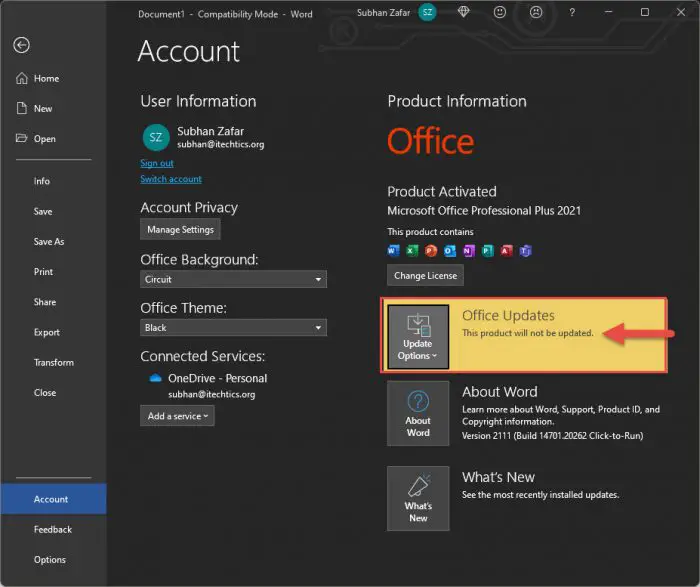
Automatic updates for all Office 2021 products will now be disabled. You can confirm this by returning to the Account page of any Office product and seeing “This product will not be updated” written under Office Updates.
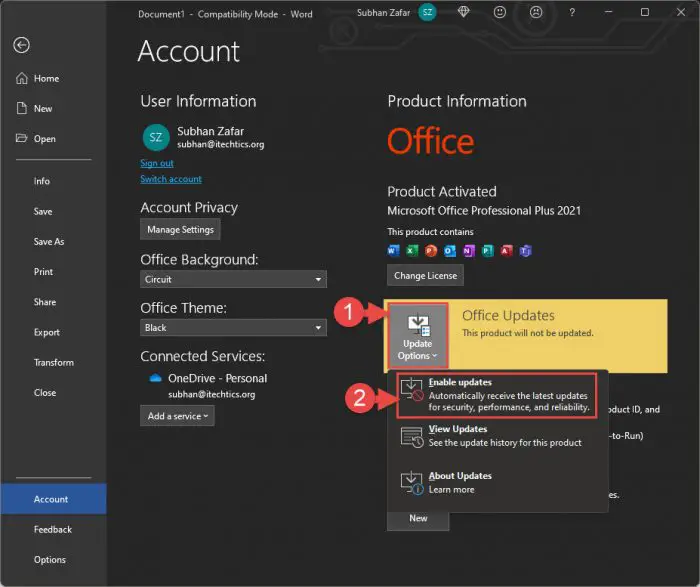
To revert changes, simply expand the Update Options drop-down menu and click Enable updates.
Through Windows Settings
Both Windows 10 and Windows 11 allow you to control whether you receive updates for other Microsoft products through Windows Updates. Microsoft Office is one of these products. By default, this option is enabled. However, it can be disabled so you do not receive automatic updates anymore.
Follow the steps below to disable automatic updates for Microsoft Office 2021 through the Settings app:
Please note that we are using Windows 11 to take screenshots but this method applies to both Windows 11 and Windows 10.
- Navigate to the following:
Settings app >> Windows Update >> Advanced options - On this page, toggle the slider in front of “Receive updates for other Microsoft products” into the Off position.

Office updates, along with other Microsoft updates, with the exception of Windows updates, are now disabled. If you want to re-enable them, simply turn the slider back into the On position.
Using Group Policy
Another way to control automatic Office 2021 updates is through Group Policy. By default, neither Windows 11 nor 10 gives you the option to manage Microsoft Office directly from the Group Policy Editor. However, the relevant options can be added by downloading and installing Administrative Templates (admx) for Microsoft Office products.
We have categorized this section into two parts so it is easier for you to follow through with the procedure:
- Download and Install Administrative Templates (admx) for Microsoft Office
- Disable Microsoft Office Automatic Updates using Group Policy
Download and Install Administrative Templates (admx) for Microsoft Office
Administrative Templates add a new set of policies through Windows Registry, which allows a system administrator to centrally control the devices on an Active Directory (AD). Using these new policies, we can disable automatic updates for Microsoft Office.
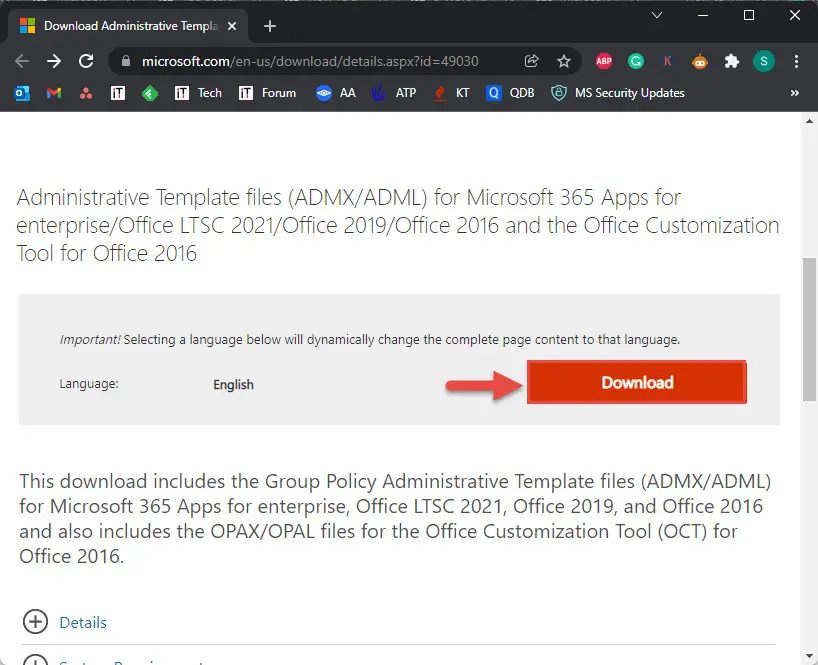
- Log in with an administrative account, open the Microsoft Office ADMX download page and click Download.
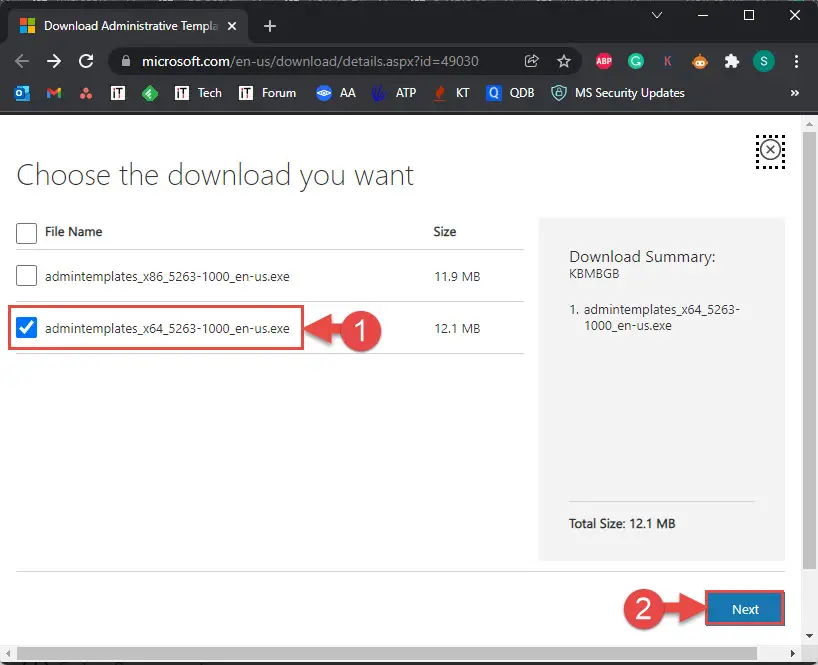
- From the popup, select the template bit version according to your operating system and click Next.
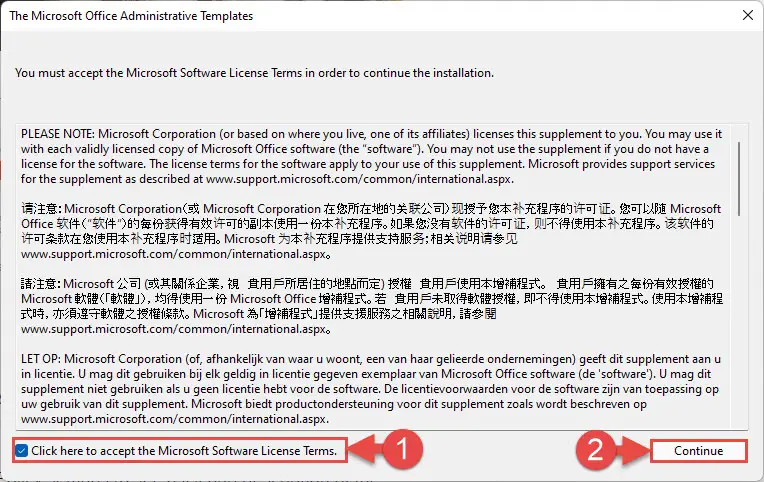
- A .exe will now be downloaded. Run the file. When it is executed, a window will open. Check the box to accept the licensing terms and click Continue.
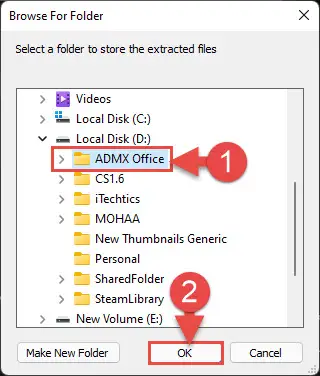
- You will then be asked for a location to extract the contents. Select an empty folder and click Ok.
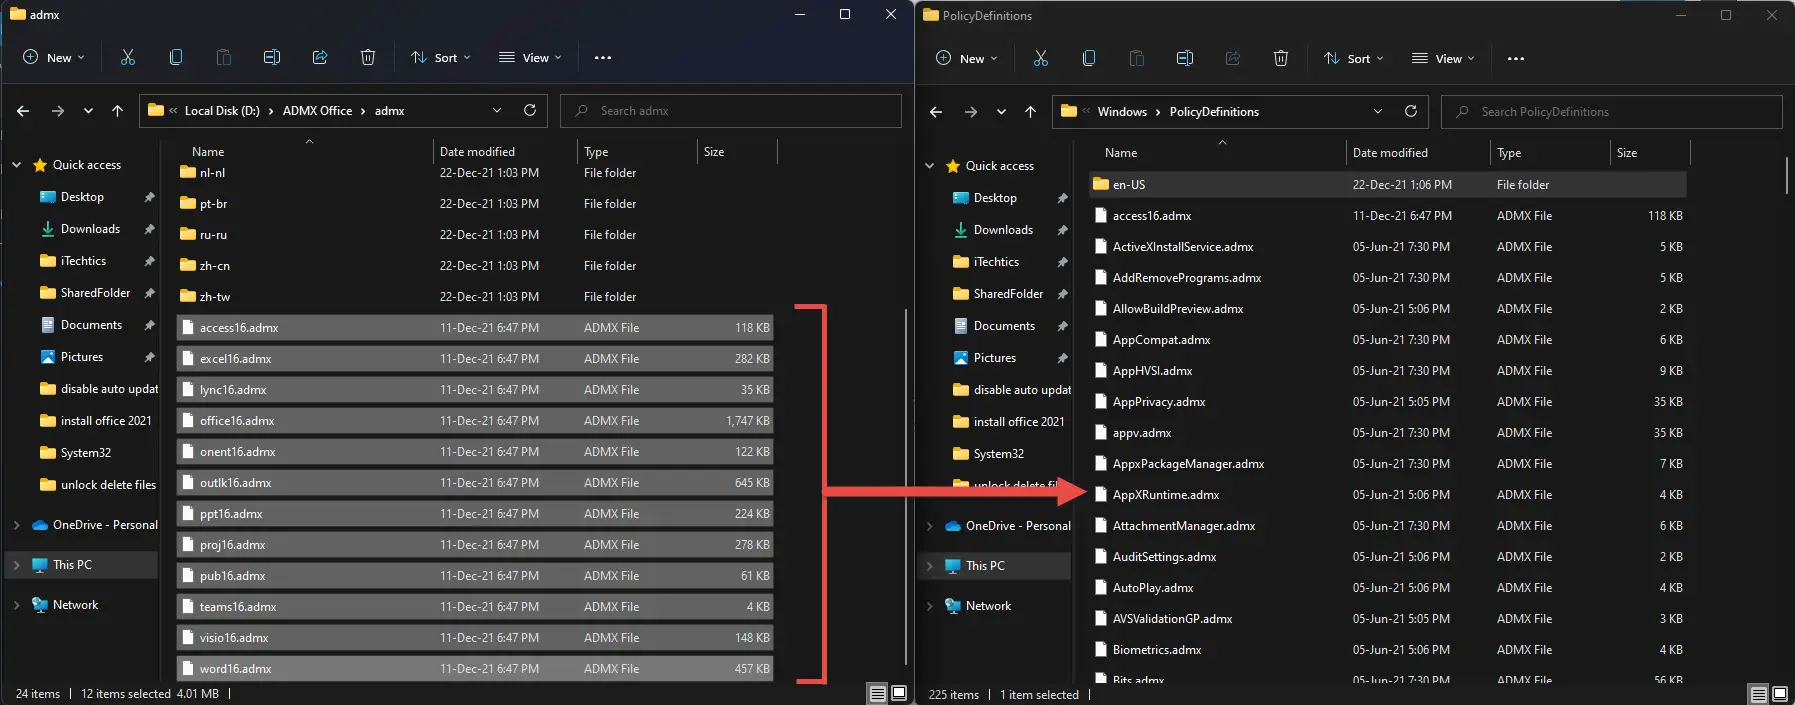
- Once the contents are extracted, it is time to copy the files into the respective location where the .admx and .adml files are stored. By default, the Administrative Templates can be found at C:\Windows\PolicyDefinitions in Windows. Use File Explorer to navigate to this location. Also, open the extracted ADMX files in another Explorer window.
- Now copy the ADMX files extracted to your local repository of the ADMX files, as in the image below.
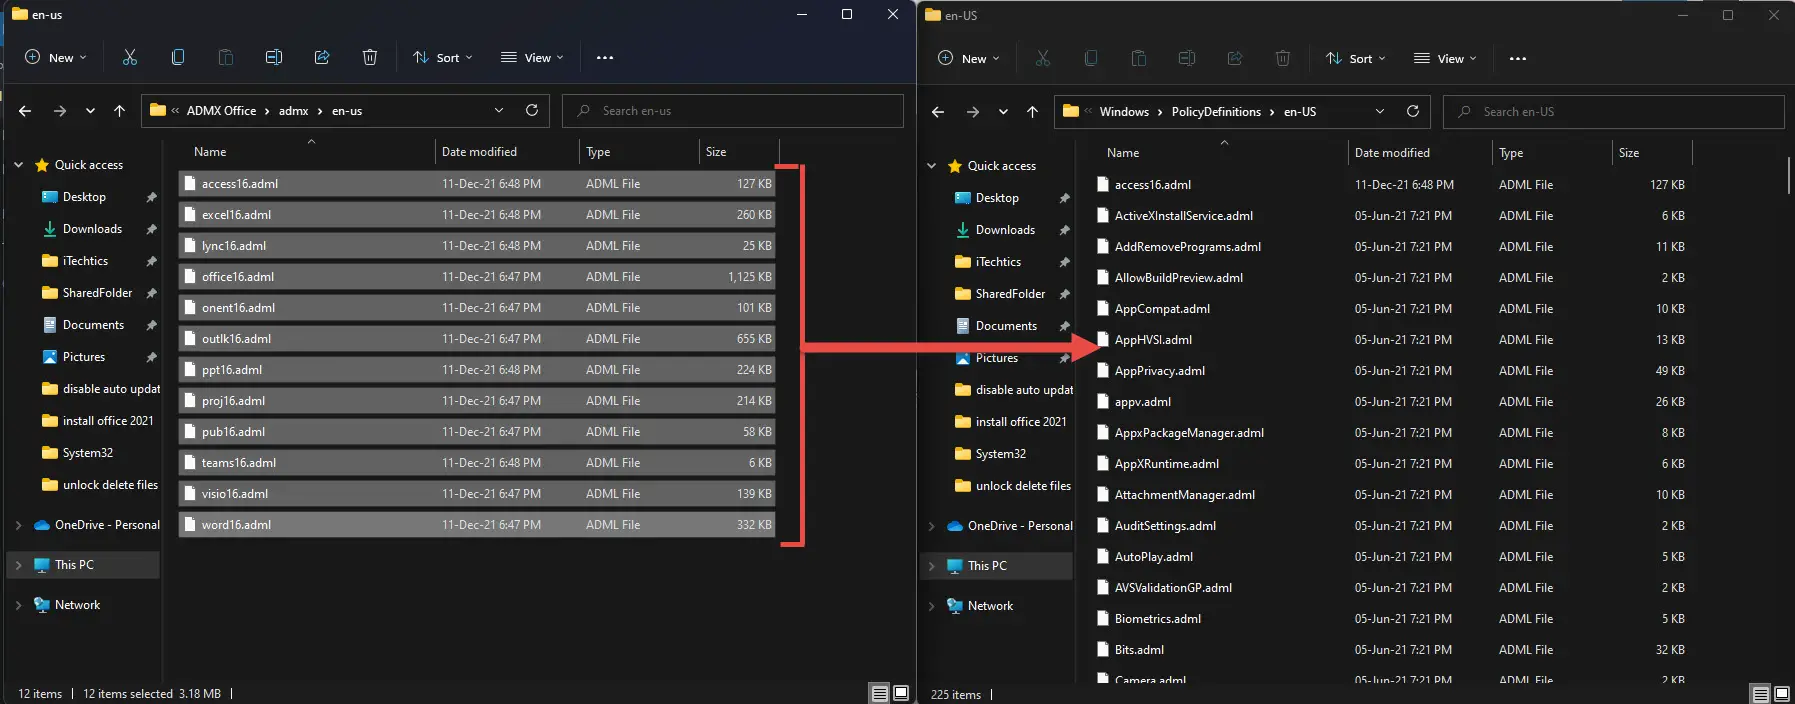
- Next, open your language-specific folders (example: en-US) from the extracted content as well as the local PC’s repository, and copy the ADML files.
You have now successfully installed Administrative Templates for Microsoft Office. Continue down to the next phase to disable Office updates using these templates.
Disable Microsoft Office Automatic Updates using Group Policy
- Open the Group Policy Editor by typing in gpedit.msc in Run. It will automatically pick up the newly added templates.
- Navigate to the following using the left pane:
Local Computer Policy >> Administrative Templates >> Microsoft Office 2016 (Machine) >> Updates
The path states “Office 2016”, but also works for Office 2021, 2019, and 365. - From the right pane, double-click Enable Automatic Updates.
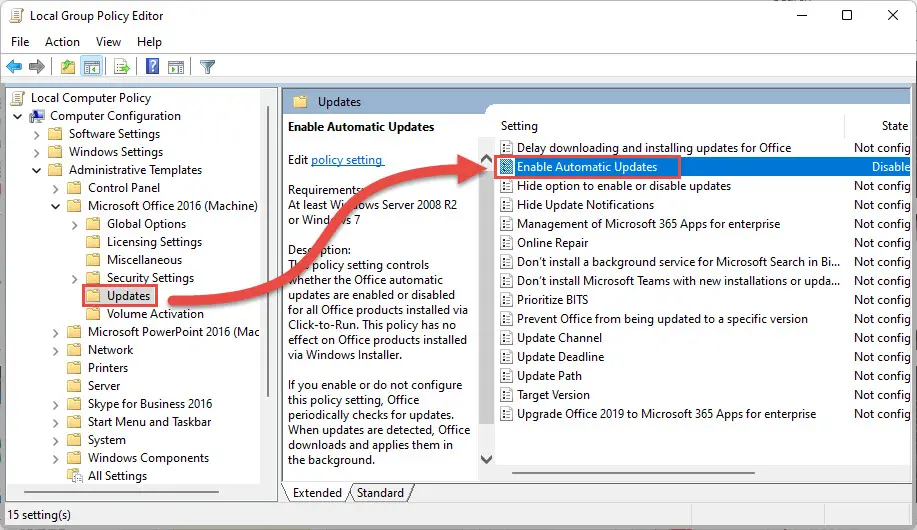
- From the pop-up window, select the Disabled radio button, and then click Apply and Ok.

- For the changes to take effect, launch the Command Prompt with administrative privileges and run the following command:
gpupdate /force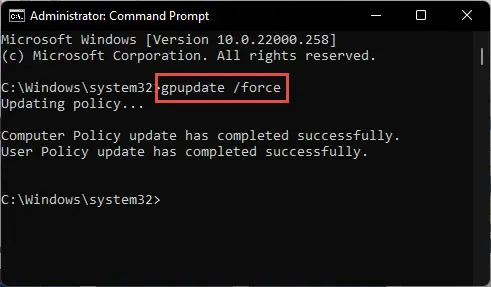
Automatic updates will now be turned off for all Office products. You can confirm this by navigating to the Account page in any Office app and seeing the “This product will not be updated” written under Office Updates.
Note that making changes to automatic updates through the Office app will no longer take effect as long as the Group Policy is configured and will now take precedence.
To enable automatic updates for the Office suite, return to the Enable Automatic Updates Group Policy Object and select the Not Configured radio button. This will give control to the Office apps for automatic updates.
Through Windows Registry
Misconfiguration of critical values in the system’s registry could be fatal for your operating system. Therefore, we insist that you create a system restore point before proceeding forward with the process. This will help you restore your OS in case any issues are discovered or fail entirely.
The same can be achieved through Windows Registry. If you are using the Home edition of Windows, then this method would be more suitable as it does not have the Group Policy Editor installed.
Learn how to enable Group Policy Editor in Windows 11 Home or Windows 10 Home.
Follow the steps below to disable Office 2021 automatic updates using the Registry Editor:
- Launch the Registry Editor by typing in regedit in Run, then paste the following into the address bar at the top for quick navigation:
Computer\HKEY_LOCAL_MACHINE\SOFTWARE\Policies\Microsoft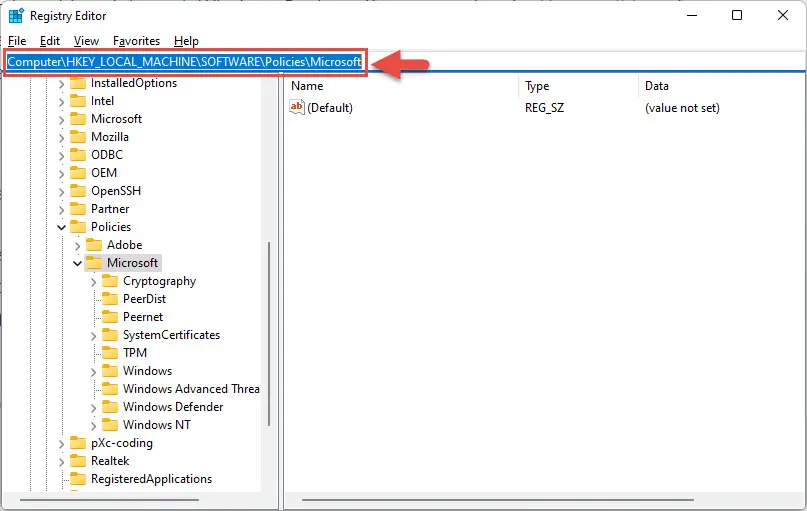
- Now right-click Microsoft, expand New from the context menu, and then click Key.
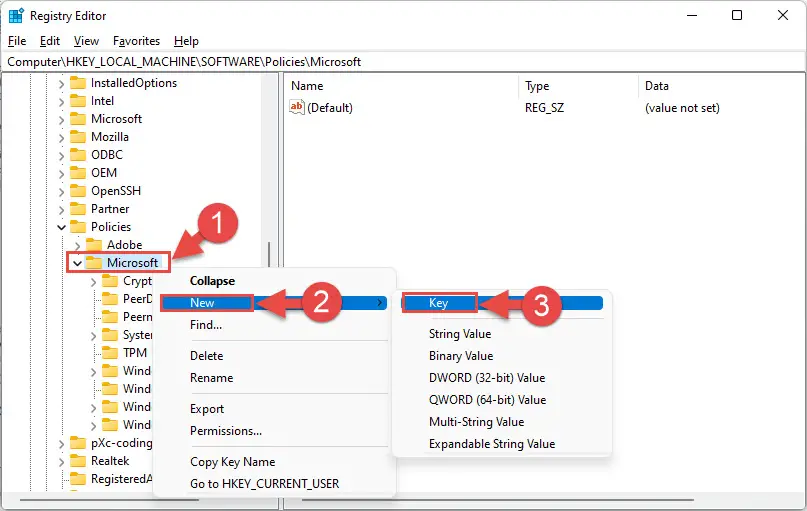
- Name this new key “office.”
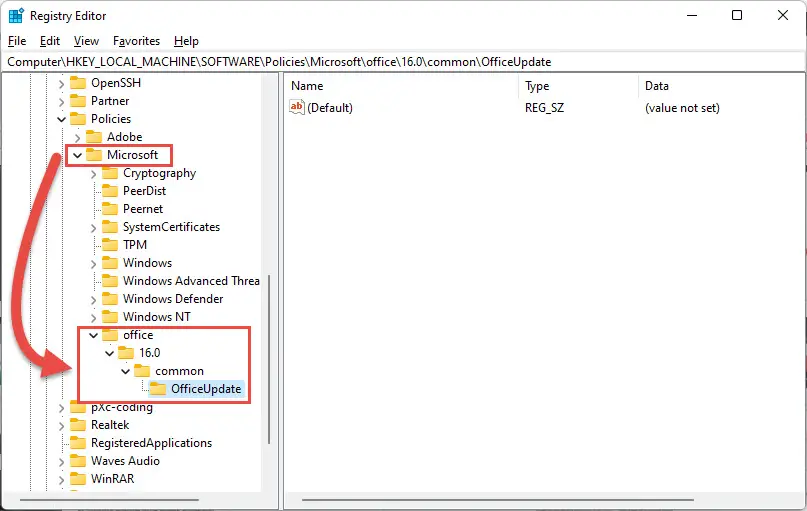
- Repeat step 2 to create new keys until you obtain the complete following path:
Computer\HKEY_LOCAL_MACHINE\software\policies\microsoft\office\16.0\common\OfficeUpdate
You will need to create the following keys:- 16.0
- common
- OfficeUpdate
- Now right-click OfficeUpdate key, expand New from the context menu, and then click DWORD (32-bit) Value.
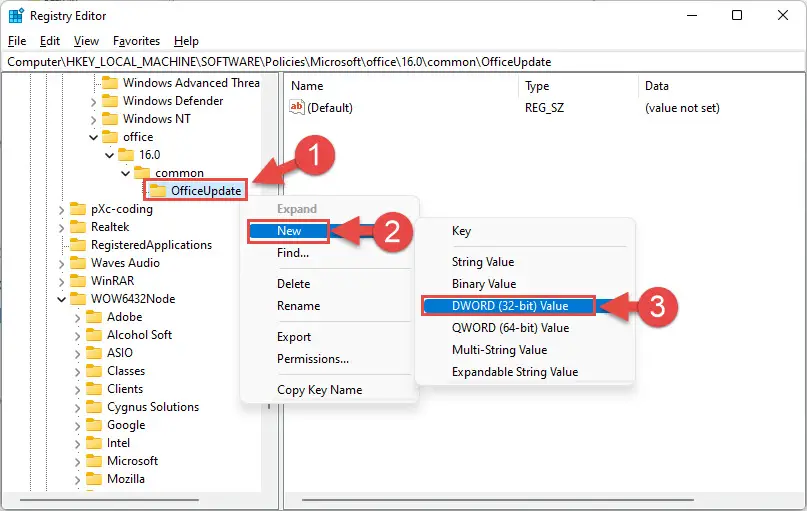
- Name this new DWORD “EnableAutomaticUpdates.”
- Double-click EnableAutomaticUpdates and set its Value Data to 0, then click Ok.
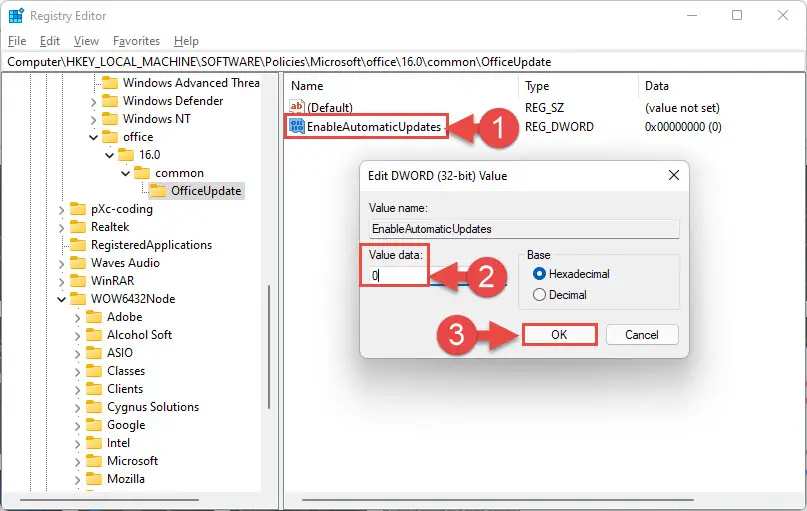
- Now restart your computer for the changes to take place.
As soon as you reboot, you will see that automatic updates for Office will be disabled and you will no longer have control over how to activate it with an Office app.
If you want to re-enable automatic updates, return to the OfficeUpdate key with the Registry Editor and change the value data for EnableAutomaticUpdates to 1 and then restart the computer.
However, if you want to control automatic updates through the Office apps only, delete the EnableAutomaticUpdates value using the Registry Editor.
By Disabling Windows Update Entirely
One way to disable Microsoft Office 2021 automatic updates is by completely disabling Windows updates. This is not the recommended method, but gets the job done nonetheless. We have separate methods to disable Windows Updates for Windows 11 and Windows 10. Click on the respective link below to learn how:
Disable automatic updates for Windows 10
Disable automatic updates for Windows 11
Closing Words
We noticed that enabling Metered Connection for different internet connections also stops Microsoft Office updates from being installed. However, we did not add this method to our list, because a Metered Connection needs to be enabled for each Wi-Fi and Ethernet connection.
Therefore, if you unknowingly connect to a new network, the chances are that Office updates will start downloading and installing in the background.
However, we suggest that you resume Office updates when it is no longer required to disable them. This is because Office updates not only bring new features, but also install security patches, significantly reducing the risk of hackers exploiting threats.


