Key Points
- To set your PIN to expire, open Group Policy Editor, go to Computer Configuration > Administrative Templates > System > PIN Complexity, open “Expiration,” enable it, and enter the number of days for the PIN to expire.
- To prevent the reuse of PINs, set up the “History” policy within the Pin Complexity settings using the Group Policy Editor.
Keeping your systems secure is one of everyone’s top priorities, with increasing cyber threats and attacks. However, we often feel that setting up a PIN or a password to lock away your computer account is sufficient for foolproof physical-level security. But that is not true.
Your PIN or password can be cracked or compromised without you knowing it. If someone has your PIN, regardless of the method they found it, they can log into your account, perform malicious actions, and then log out without you ever knowing about it. A compromised authentication method is one of the most dangerous kinds as it can go undetected for prolonged runs.
While increasing your PIN complexity increases security, setting an expiration date and configuring its history settings is another way to go about it.
In this guide, we are going to show you how to set your PIN to expire so you must change it, and how to set up its history usage so an older, same PIN cannot be reused.
How PIN expiry and reuse history improves cyber security
A PIN is a combination of numbers, or alphanumeric characters that you use to authenticate yourself. PINs are seen all around us today; on computers, safes, mobile phones, etc. If a PIN is compromised, then an attacker can gain access to your device physically, log into your account, and perform their malicious actions. But that is not all.
The unauthorized login will go undetected as you’ll barely notice a change, and the attacker will have the benefit of using the same compromised PIN to gain access to your device for as long as the PIN is not changed.
Therefore, changing your PIN occasionally keeps the authentication combination in rotation and improves security in case your PIN is ever compromised. This is why we suggest configuring your PIN to expire automatically after a set number of days, which allows you to change it now and then.
Similarly, reusing an old PIN that you once used also compromises your security. For example, a previously used PIN combination may have already been compromised without you knowing it. Reusing it will increase the chances for the attacker to gain unauthorized access to your account.
Set Windows PIN to expire and manage reuse history
To set your computer account’s PIN to expire in a set number of days, you can use the following steps. Before you do, note that the maximum number of days you can configure is 730, and the maximum number of old PINs that you cannot reuse is 50.
Note: The process involves using the Group Policy Editor. If you are using the Windows Home edition, then this management console will not be available. Learn how to install gpedit.msc on Windows Home.
-
Press the Windows Key + R to open the Run Command box.
-
Type in “gpedit.msc” and press Enter to launch the Group Policy Editor.
-
Navigate to the following path from the left pane:
Computer Configuration > Administrative Templates > System > PIN Complexity
-
Double-click the policy “Expiration” in the right pane.
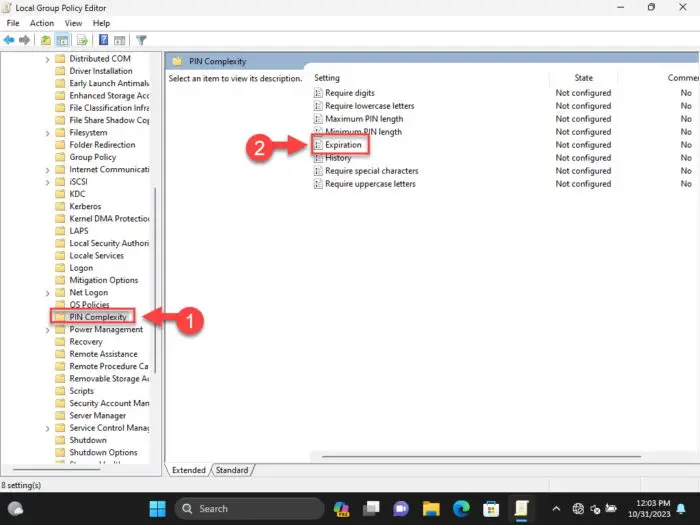
Open PIN expiration policy -
Select Enabled, and then add the number of days in the text field in the Options section for the PIN to expire.
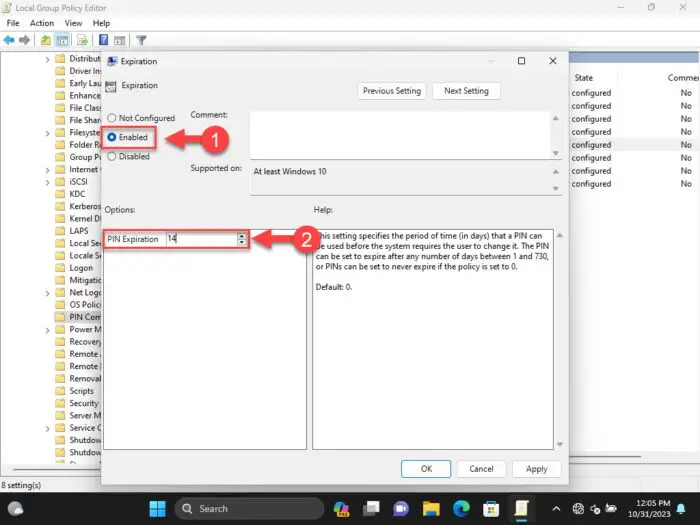
Set PIN expiration days -
Click Apply and OK.
-
Now double-click the policy “History.”
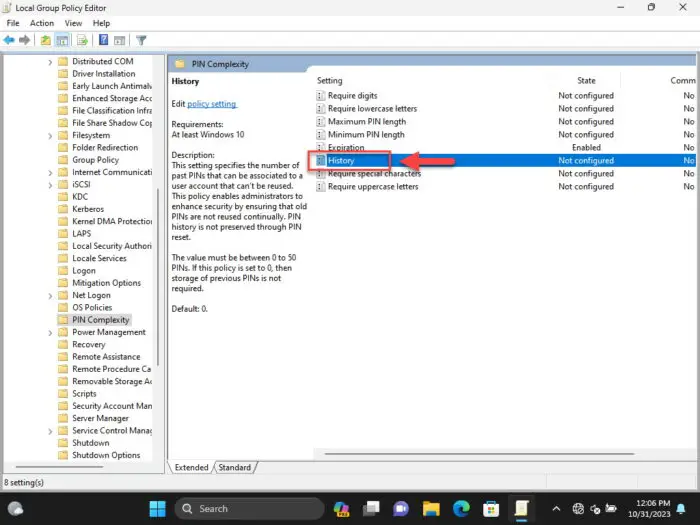
Open the PIN history policy -
Select Enabled, and then add the number of last PINs that cannot be reused in the text field in the Options section.
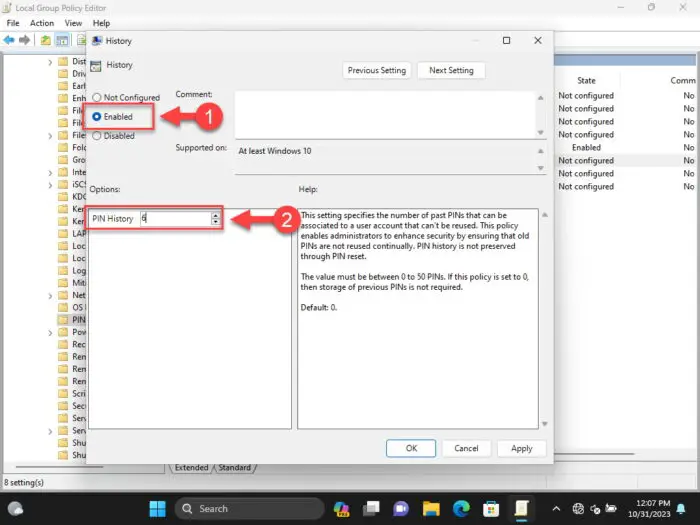
Set PIN history on Windows -
Click Apply and OK.
-
Press the Windows Key + R again.
-
Type in “cmd” and press CTRL + Shift + Enter to open an elevated Command Prompt.
-
Run this command to enforce the changes:
GPUpdate /Force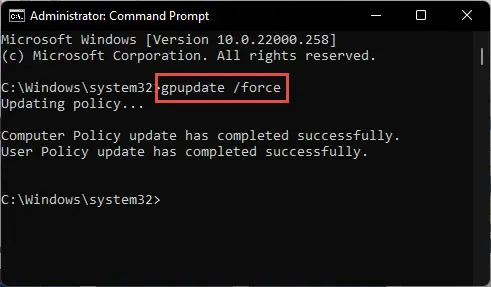
Enforce group policies
You have now successfully configured PIN expiration and history usage. Your current PIN will now automatically expire after the set number of days and force you to change it. Moreover, you will not be allowed to reuse the same PIN you used in the past, depending on what number you configured in the “History” policy.
In case you ever feel like reverting these changes, return to the “PIN complexity” folder with the Group Policy Editor, and change the setting to “Not configured” for both “Expiration” and “History” policies.
What happens when PIN expires on Windows
If the day comes when your PIN automatically expires after configuring the policy, then you will be prompted to change right from the lock screen. You will see the following screen that says “Your organization requires that you change your PIN.” Click OK and then continue to set up a new pin.

While setting up the PIN, if you reuse a PIN that has been recently used before and the “History” group policy does not allow it to be reused at the time, then you will see a screen saying “Provide a PIN that you haven’t used before.”

Takeaway
By default, the Windows OS does not expire the PIN, or any passwords, unless explicitly configured. this guide shows you how to set your PIN to expire automatically and force you to create a new one.
PIN expiry ensures that you change your PIN every few days, so even if it is compromised, it won’t be for long.

