The Windows operating systems, both client and servers, come with built-in Microsoft Management Consoles (MMC). These are used to manage the different software as well as hardware components of the system, including Windows services, devices and peripherals, and such. Some of these consoles can be used to connect to another computer remotely to manage their components.
The parent Microsoft Management Console can be used as the default console for all sub-consoles. You can add a snap-in of the sub-consoles into the parent console and then use it to connect remotely with other PCs.
Using the parent MMC in Windows eliminates the long hassles of configuring and setting up a Remote Desktop Connection, and you get all consoles under one roof.
Before we show you how to set up the Microsoft Management Console and connect to a remote PC, there are some prerequisites you should consider for a successful connection.
Table of contents
Prerequisites for Remote Management using Microsoft Management Console
Before you can use the MMC to connect to a remote PC, there are a few things you must ensure:
- The remote PC must be on the same network as yours, or the same domain.
- You need to use an administrative computer account to manage the remote computer’s services and processes, complete with a username and password.
- The MMC must use the provided credentials for the particular remote PC.
- Remote connection should be enabled and allowed through the firewall, or the firewall must be turned off (not recommended).
- The User Access Control (UAC) Remote Restrictions must be turned off.
- The Windows Remote Management (WS-Management) service is running on the target PC.
If these conditions are not met, you will not be able to use the Microsoft Management Console to connect with a remote PC. Instead, you will meet the following (or similar) error messages:
Error 5: Access is denied
Connection to the remote server [server name] failed with the following error message: The WinRM client cannot process the request.
Here we have shared the steps to ensure that these conditions are met.
Enable Remote Desktop on Remote PC
Use the following steps on the remote computer to enable Remote Desktop:
Note: To enable the remote desktop connection remotely, refer to this guide.
-
Go to the following:
Settings app >> System >> Remote Desktop
-
Toggle the slider in front of “Remote Desktop” into the On position.
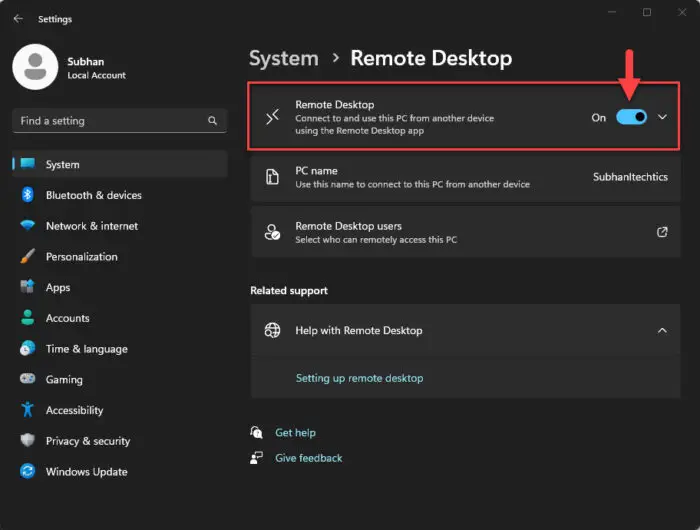
Enable Remote Desktop Connection
Allow Remote Connection through Windows Firewall
Use the following steps to allow remote connection through the firewall, if not already enabled:
-
Open the Windows Firewall applet by typing in “firewall.cpl” in the Run Command box.

Open the Windows Firewall applet -
Click “Allow an app or feature through Windows Defender Firewall” on the left.
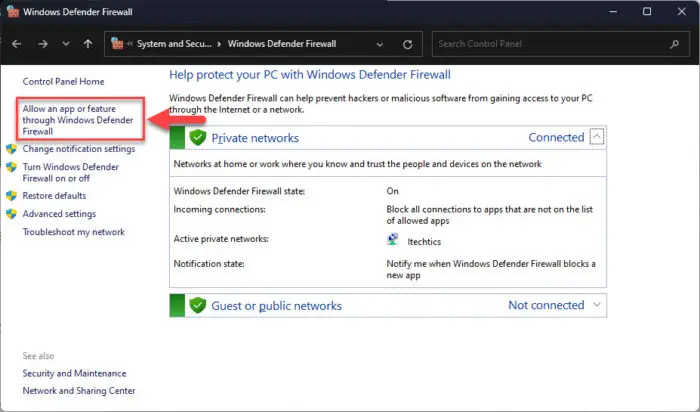
Allow app or feature through the Firewall -
Click “Change settings.”
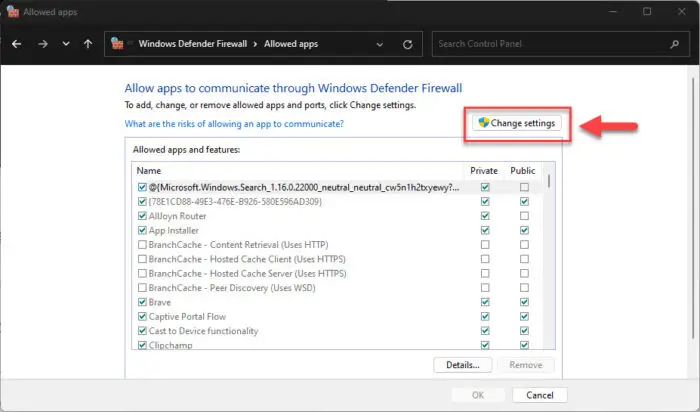
Change firewall settings -
Scroll down and allow “Remote Desktop” through the available network profiles, and then click “Ok.”

Allow remote desktop through Windows Firewall
Disable UAC Remote Restrictions
The UAC Remote Restrictions can be removed both remotely and physically on the computer as well. Below are the steps used to disable the feature and allow a remote connection if you are physically preset on the PC. Note that this method involves manual changes to the Windows Registry.
Note: Misconfiguration of critical values in the system’s registry could be fatal for your operating system. Therefore, we insist that you create a system restore point before proceeding forward with the process.
You can also use our top selection of disk imaging and backup software so you never lose your data or operating system again.
-
Open the Registry Editor by typing in “regedit” in the Run Command box.

Open the Registry Editor -
Paste the following in the navigation bar for quick navigation:
Computer\HKEY_LOCAL_MACHINE\SOFTWARE\Microsoft\Windows\CurrentVersion\Policies\System
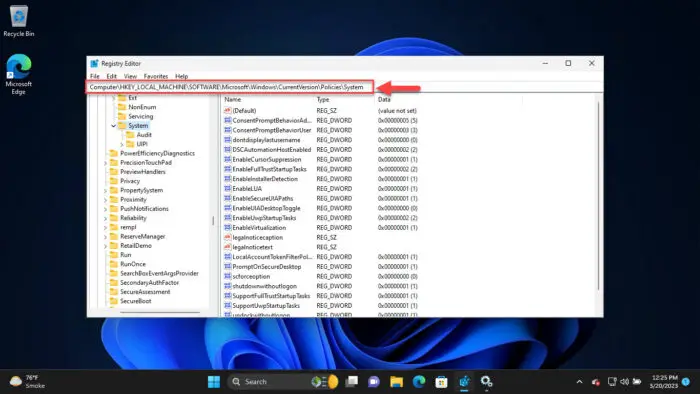
Navigate to the System key -
Right-click the System key, expand New, and click “DWORD (32-bit Value).” Name the DWORD “LocalAccountTokenFilterPolicy.”
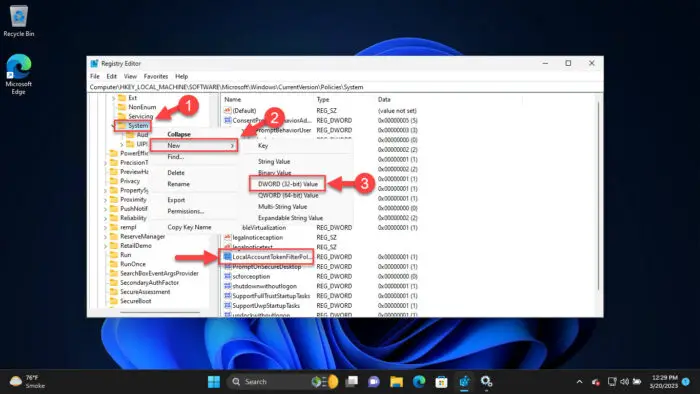
Create the DWORD LocalAccountTokenFilterPolicy -
Set the “LocalAccountTokenFilterPolicy” Value Data to “1.”
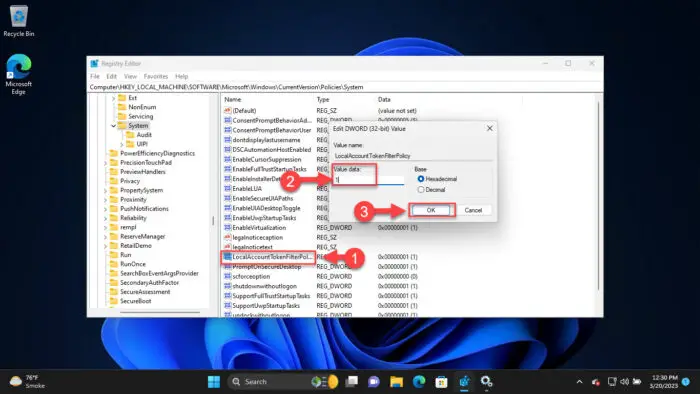
Set LocalAccountTokenFilterPilicy Value Data to 1 -
Close the Registry Editor.
Start the Windows Remote Management Service
Now, you must make sure that the Windows Remote Management service (WS-Management) is always running on the target PC. For that, perform the following steps on the remote computer:
-
On the target computer, open the Services console by typing in “services.msc” in the Run Command box.

Open the Services console -
Right-click the service “Windows Remote Management (WS-Management)” service and click “Properties.”
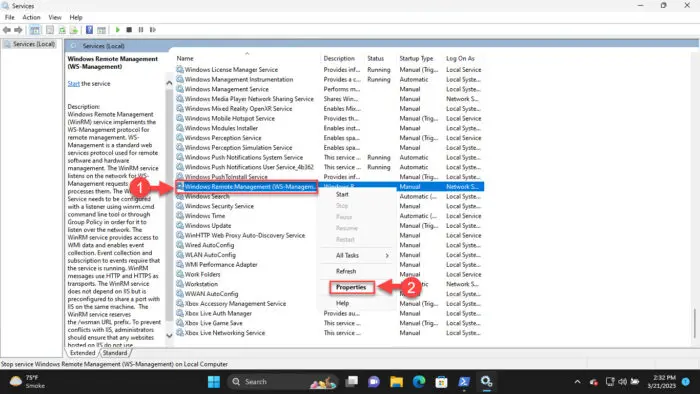
Open Windows Remote Management service properties -
Select “Automatic” from the drop-down menu in front of Startup Type, and then click “Start.” When the service starts, click Apply and Ok.
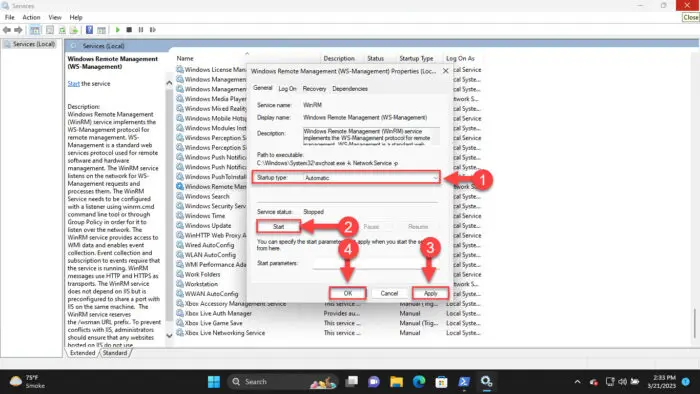
Set Windows Remote Management service to start automatically
Set User Account for Remote Connection
Speaking from personal experience; you do not want to miss this requisite.
When attempting to make a remote connection using the Microsoft Management Console, you need to use a user account with administrative access. It may work otherwise if the PC you are accessing is joined to the same domain as yours. However, if it is on the same network but a different domain, you may see the “Access is denied (Error 5)” more often than you think.
Using the given steps below, you will be configuring a user account along with its password for all remote connections to that particular computer, and these credentials will be used by default.
Use these steps to configure a user account for a remote MMC connection. Note that these steps need to be performed on the local/source computer.
-
Launch an elevated PowerShell instance.
-
Use the following command to set up a user account and password for the remote computer:
Replace [ComputerName] with the remote PC’s name, [Username] with the account name you will be using to access it (must be from the remote computer), and [Password] with the account’s password.
net use \\[ComputerName]\IPC$ [Password] /USER:[Username]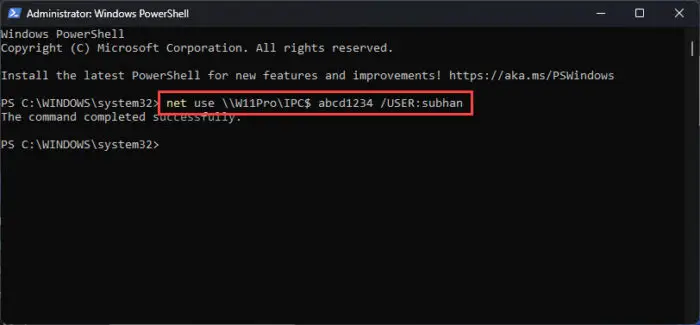
Set username and password for remote connection
The provided username and password will now be used by the Microsoft Management Console to access the information from the remote PC.
This concludes the prerequisites that are needed to manage remote Windows computers using the MMC.
Run Microsoft Management Console (MMC) on Remote Computer
Now that we have ensured that everything is in order for a successful MMC connection, you can now use the following steps to access a remote PC on your network or domain using the MMC and manage it accordingly.
-
Open the Run Command box by pressing the “Windows Key + R” shortcut keys.
-
Type in “mmc” and then use the “CTRL + Shift + Enter” keys to run it with administrative privileges.

Open the Microsoft Management Console If prompted with a UAC, click “Yes.”
-
Click “File” from the ribbon menu and then click “Add/Remove Snap-in.”
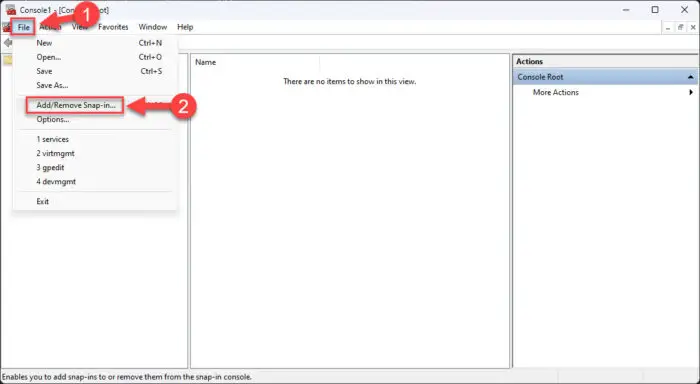
Add or remove snap-ins in MMC -
From the snap-in window, select the sub-console you want to use and click “Add.”
Note: The snap-in must support remote connection to other devices (discussed in the next section of this article).
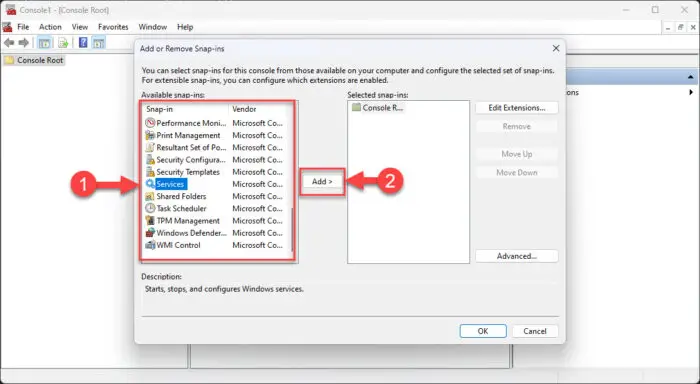
Add the snap-in -
Now select “Another computer,” enter the name of the remote computer, and click “Finish.”
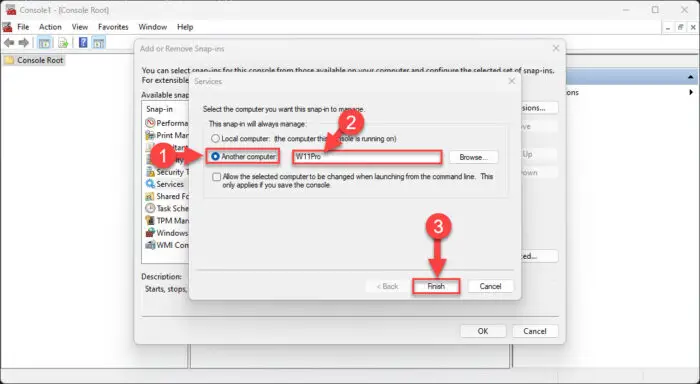
Enter the details of the remote computer -
Now back on the snap-in window, click Ok.
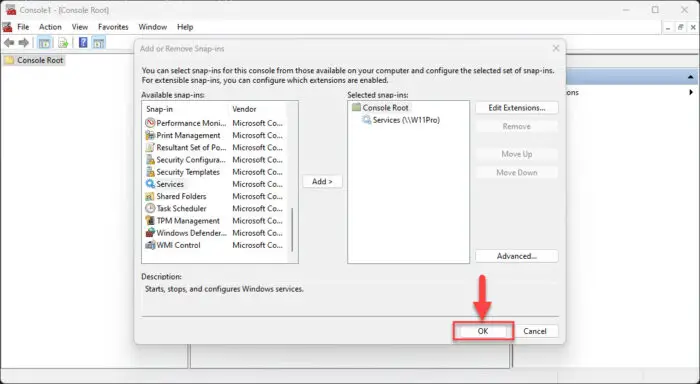
Save changes and proceed
The Microsoft Management Console will now be connected to the remote PC, as you can see in the image below.
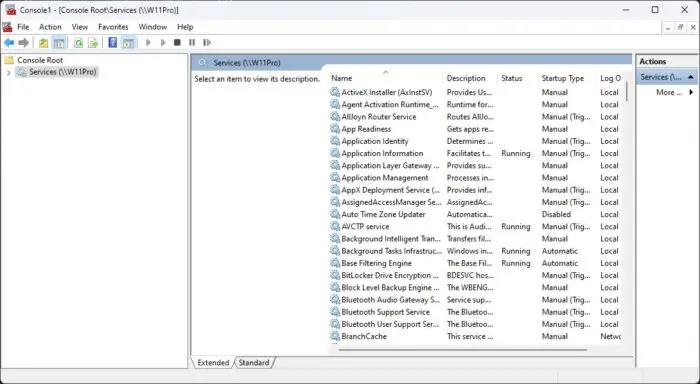
You may now use the MMC to manage the remote computer. In this case, you can manage the remote PC’s services.
It is important to understand that the method above will only work for the sub-consoles that have the ability to connect to remote computers. Not every MMC can connect remotely. Continue down to the next section to learn which consoles can connect remotely.
Which MMC Support Remote Connection
Not every Microsoft Management Console has the ability to connect to remote computers. Only the following list of consoles can be used to manage computers remotely:
View the list of all Microsoft Management Consoles.
- Local Computer Certificates (certlm.msc)
- Computer Management (compmgmt.msc)
- Event Viewer (eventvwr.msc)
- Shared Folders (fsmgmt.msc)
- Performance Monitor (perfmon.msc)
- Services Manager (services.msc)
- Task Scheduler (taskschd.msc)
- WMI Management (wmimgmt.msc)
You can open up these Management consoles directly, or use the parent MMC to connect to a remote PC and manage it.
Takeaway
Connecting the Microsoft Management Console to a remote PC isn’t a problem, as you may have learned in this post. However, it is the requisites and the prerequisites that need to be satisfied for a successful connection.
That said, once you have gained access to a remote PC, using the right MMC snap-in, you can manage and configure different operating system components, which include certificates, shared files and folders, services and tasks, and much more.

