While multitasking on a Windows computer, some applications and programs go into the background while other windows are in the foreground. The apps and programs running in the background are then left with minimum system resources, including the CPU, to run their operations, while the majority of the resources are reserved for the apps running in the foreground.
By default, the Windows operating system reserves only 20% of CPU resources for low-priority tasks, which means that are running in the background. If you are experiencing issues with apps that perform well when on top of other apps, but slow down performance when shifted to the background, then you can benefit by increasing the reserved CPU resources for low-priority tasks.
In this article, we show you how to increase the reserved CPU sources for the background apps and programs on a Windows computer.
Reserved CPU Resources for Low-Priority Tasks
The Windows Registry is where all the policies, rules, and parameters for OS operating are written. In simpler words, it is a large database that tells the Windows OS how to function, along with other key values.
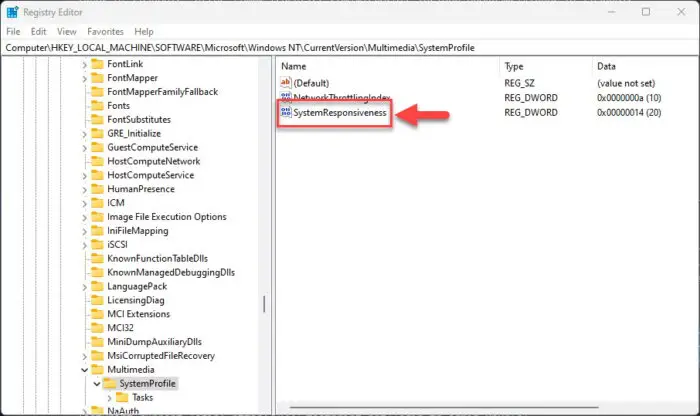
One of the values inside the registry is “SystemResponsiveness,” which is a DWORD. This DWORD is responsible for controlling the reserved CPU percentage for low-priority tasks on a Windows computer. You can change its value to control how much percentage should be allowed for background tasks.
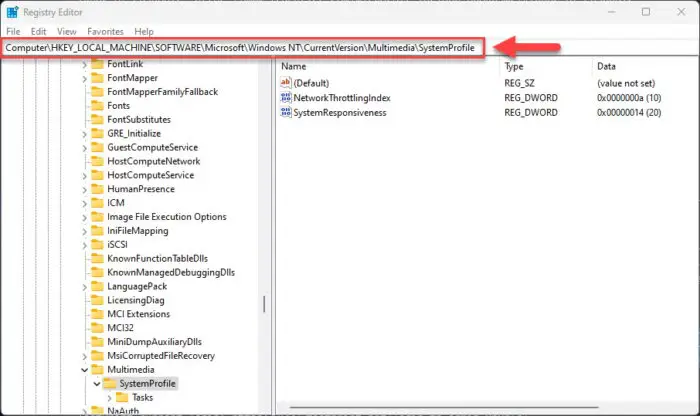
The “SystemResponsiveness” DWORD can be found at the following path inside the Windows Registry:
Computer\HKEY_LOCAL_MACHINE\SOFTWARE\Microsoft\Windows NT\CurrentVersion\Multimedia\SystemProfile
If you leave the Registry settings at their default value, you will find that all low-priority and background apps and programs are affected if their combined CPU consumption exceeds 20 percent. This will result in slower operating speeds.
In the next step below, we will show you how to modify this registry to allow more CPU resources for background and low-priority tasks.
Increase Reserved CPU Resources for Background and Low-Priority Tasks
By increasing the reserved limit for low-priority and background tasks, you can ensure that when an app or program goes into the background, its operation is not affected because of CPU utilization. Now, it is up to you whether you want to allow 100 percent utilization of the CPU by the background apps, or only increase it a certain amount.
Either way, use the following steps to increase the reserved CPU limit in the Windows Registry to whatever percentage seems best for you:
Note: You can also skip the given steps below and use the Registry file (.REG) given below to increase the CPU utilization cap to 100% directly.
Note: Misconfiguration of critical values in the system’s registry could be fatal for your operating system. Therefore, we insist that you create a system restore point or a complete system image backup before proceeding forward with the process.
You can also use our top selection of disk imaging and backup software so you never lose your data or operating system again.
-
Open the Registry Editor by typing in “regedit” in the Run Command box.

Open the Registry Editor -
Paste the following in the address bar and hit Enter for quick navigation:
Computer\HKEY_LOCAL_MACHINE\SOFTWARE\Microsoft\Windows NT\CurrentVersion\Multimedia\SystemProfile

Navigate to the SystemProfile key -
Double-click the DWORD “SystemResponsiveness“.

Open SystemResponsiveness DWORD -
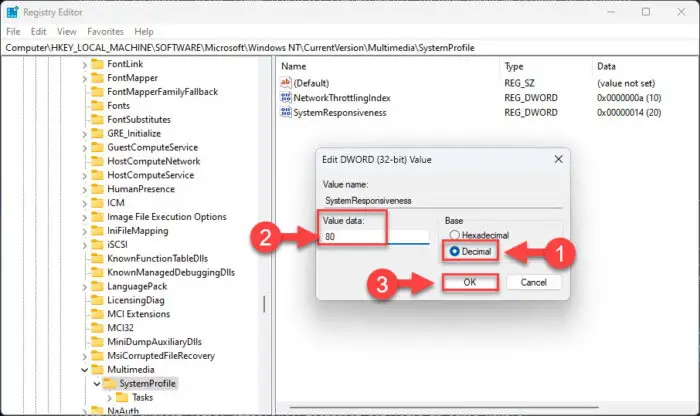
Change the Base to “Decimal,” and then enter a value between 1 and 100 in the Value Data text field. Then click Ok.

Change the reserved CPU utilization percentage for low-priority and background apps -
Now restart the computer.
Once the computer restarts, the changes to the Windows Registry will be applied. You should now notice that the background apps are functioning rather quickly. This is because they now have access to more CPU resources for computing.
Alternative to the methods given above, you can use the following .REG file which will increase the reserved CPU limit to 100 percent.
 Allow 100 Percent CPU Utilization To Background Apps (410 bytes, 80 hits)
This is the text inside the .REG file:
Windows Registry Editor Version 5.00

[HKEY_LOCAL_MACHINE\SOFTWARE\Microsoft\Windows NT\CurrentVersion\Multimedia\SystemProfile]
"SystemResponsiveness"=dword:64
The DWORD value “64” is in hexadecimal, which is equivalent to “100” in decimal. You can change the value within the Registry file (in hexadecimal) and then run it to change the reserved CPU resources accordingly.
Frequently Asked Questions (FAQs)
It is safe to change the reserved CPU resources on Windows?
The short answer is Yes, it is safe to change the reserved CPU resources from the Windows Registry, as long as you handle the Registry values with caution.
Should you change the reserved CPU utilization value in the Windows Registry?
Changing the reserved CPU consumption value has no direct effect on your computer. However, if you are running multiple apps in the background with low priority, they will start consuming more of the CPOU resources, leaving little room for the apps and programs running in the foreground. Therefore, it is not advisable to increase the cap for low-priority apps to the maximum, as it could slow the operations of the important apps running in the foreground.


