The Windows operating system allows you to delete a file or folder by using either the “Delete” button on your keyboard or from the context menu by right-clicking on the subject. Either way, the deleted item is moved to the Recycle Bin and still consumes space on your hard drive.
It can be frustrating to first remove an item and then have to remove it again from the Recycle Bin, just so you can create some free space.
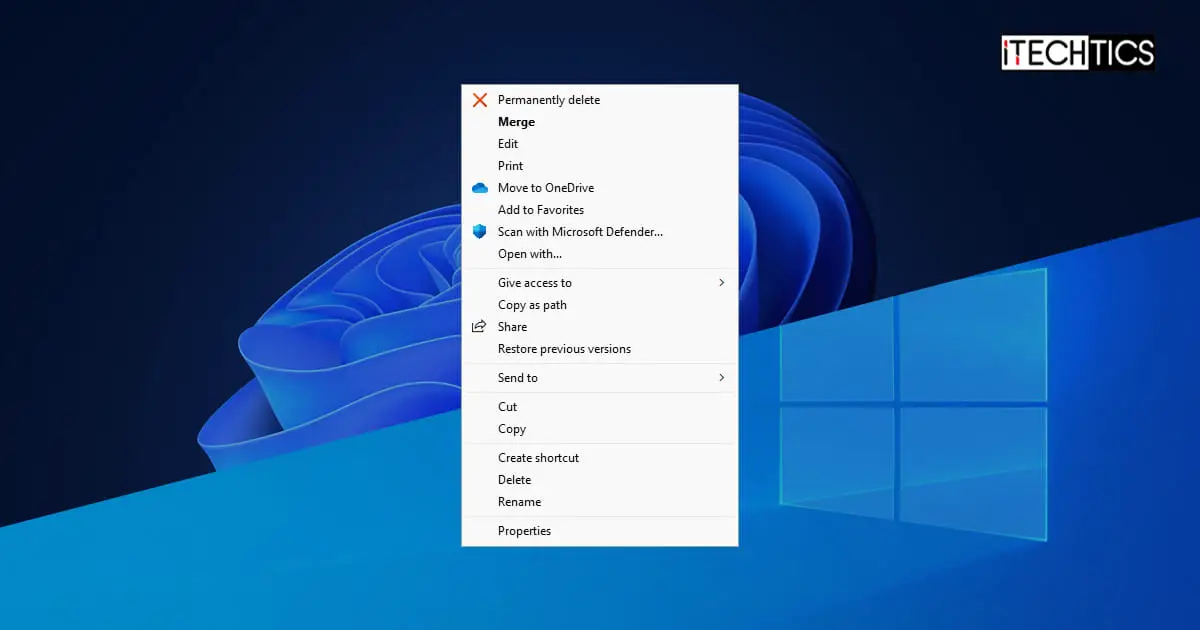
To avoid this, you can permanently delete an item. Of course, the items that are permanently deleted are unrecoverable, but we are usually aware that certain items will never be needed again. Thus, permanently removing them won’t be an issue.
One way of permanently deleting an item on a Windows PC is by pressing the Shift + Delete hotkeys simultaneously, which will permanently delete a selected item. Another way is through the context menu, where you will only need to use the mouse and a single hand (in case you are busy eating with the other one).
However, you must manually add the option of “Permanently Deleting” an item into the context menu by tweaking the Windows Registry. In this post, we are going to show you 2 methods to add the “Permanently Delete” option in the context menu. These methods are valid for both Windows 10 and Windows 11.
Note: On a Windows 11 PC, you first see a compressed context menu when right-clicking, and to be able to see the full menu, you need to click Show more options. Adding the “Permanently Delete” option will only make it appear in the expanded (full) menu.
You can either be good with it or disable the “Show more options” in the context menu and restore the old one to be able to directly access the “Permanently Delete” option.
Before we begin learning how to add the “Permanently Delete” option in the context menu, we would like to bring to your attention that you will still be prompted with a confirmation dialog box stating the following:
Are you sure you want to permanently delete these/this file/folder/item?

Using .REG Files
The first method is rather easy. All you need to do is download the Windows Registry file to add the “Permanently Delete” option to the context menu and run it on your PC. This .REG file will automatically make the necessary changes to the system registries.
We have also shared a file in case you want to remove the option in the future.
Click on the respective links below to download the .REG files.
 Add Permanently Delete To Context Menu Top.reg (247 bytes, 161 hits)
Add Permanently Delete To Context Menu Bottom.reg (256 bytes, 162 hits)
Remove Permanently Delete From Context Menu.reg (115 bytes, 146 hits)
The “Add Permanently Delete To Context Menu Top” will add the option to the top of the context menu, whereas the “Add Permanently Delete To Context Menu Bottom” will add it towards the bottom of the menu.
To remove the option from the context menu, download the “Remove Permanently Delete From Context Menu” .REG file.
Once downloaded, follow these steps to execute the file:
-
Double-click on the .REG file to run it.
-
If prompted with a UAC, click Yes.

UAC -
You will now be asked for confirmation. Click Yes again.

Confirm action 1 -
You will now be prompted of a successful operation. Click Ok to close the dialog box.

Changes to registry successful
A system restart will not be required.
You can now check that the “Permanently delete” option will now be added or removed from the context menu, depending upon which file you executed.

Using Registry Editor
If you would rather go through the manual process of making changes to the Windows Registry, this is the way to go. Although, the steps below perform the same task as the .REG files above.
Note: Misconfiguration of critical values in the system’s registry could be fatal for your operating system. Therefore, we insist that you create a system restore point before proceeding forward with the process.
-
Open the Registry Editor by typing in regedit in the Run Command box.

Open Registry Editor -
Now, paste the following path in the navigation for quick navigation:
Computer\HKEY_CLASSES_ROOT\AllFilesystemObjects\shell

Quick registry navigation -
Now right-click the Shell key, expand New from the context menu, and click Key.
Name this new key Windows.PermanentDelete.

Create Windows.PermanentDelete key -
Now right-click the newly-created Windows.PermanentDelete key, expand New, and now click String Value.
Name this string CommandStateSync and do not enter a value for this string.

Create CommandStateSync string -
Now right-click the Windows.PermanentDelete key again, expand New, and click String Value.
Name this string ExplorerCommandHandler and enter its Value Data {E9571AB2-AD92-4ec6-8924-4E5AD33790F5}.

Set ExplorerCommandHandlet Value data -
Again, create a new string under Windows.PermanentDelete key and name it Icon. Set its Value Data to shell32.dll,-240.

Set Icon Value data -
Again, create a new string under Windows.PermanentDelete key and name it Position. Set its Value Data to either Top or Bottom, depending on whether you want the “Permanently Delete” option at the top of the context menu or the bottom.

Set Position Value data -
Now close the Registry Editor.


You do now need to restart the computer to implement the changes.
You can now check that the “Permanently delete” option will now be added to the context menu.
In the case you want to remove this option in the future, you can either run the respective .REG file shared above, or delete the Windows.PermanentDelete key from the Windows Registry.

Closing Words
The option to permanently delete an item from the context menu makes our lives easier, as we now only need one hand to perform the task, and does not require a keyboard. Adding this option to the context menu is especially beneficial in removing unwanted databases from servers with no keyboards, and all the support engineer needs to do is connect a mouse.
Additionally, permanently deleting items will save space on your hard drive.
That said, we recommend that you only permanently remove the items you know for a fact will not be needed later, or that you already have a backup of.


