When Windows 11 was first launched on 5th October 2021, it lacked some basic features that were available in Windows 10. However, recently, some new features were shipped to the stable release in KB5019509 such as File Explorer tabs, taskbar overflow, Suggested Actions, and the ability to open the Task Manager from the taskbar’s context menu.
Microsoft had finally heard the cries of its users and included these new features. However, even after installing the update, some Windows 11 devices lacked the option to open Task Manager from the taskbar context menu. This is because the feature is still gradually rolling out.
That said, you can enable this option forcefully today and benefit from having quick and convenient access to the Task Manager. Without further ado, let us show you how to enable this feature.
Before we dive into the methods of activating the Task Manager option in the taskbar’s context menu, we would like to inform our readers that it is mentioned in some places that you install KB5019509 before applying the techniques given below.
After having tested these methods ourselves, we concluded having KB5019509 is not necessary to add the Task Manager option. You can still enable it by having only October’s Patch Tuesday update installed (KB5018427 – Build 22621.674).
From Windows Registry
You can make manual changes to the Windows Registry to enable the Task Manager option in the taskbar’s context menu. Follow these steps to do so:
Note: Misconfiguration of critical values in the system’s registry could be fatal for your operating system. Therefore, we insist that you create a system restore point before proceeding forward with the process.
-
Open the Registry Editor by typing in regedit in the Run Command box.

Open Registry Editor -
Now, paste the following path in the navigation for quick navigation:
Computer\HKEY_LOCAL_MACHINE\SYSTEM\CurrentControlSet\Control\FeatureManagement\Overrides\4
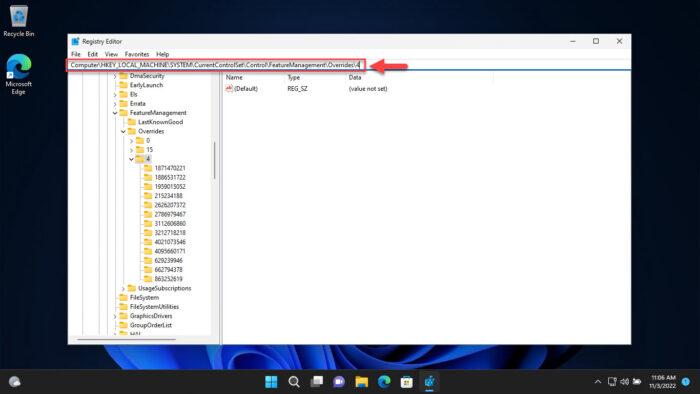
Enter path for quick navigation -
Now right-click the 4 key, expand New from the context menu, and then click Key.
Name this key 1887869580.
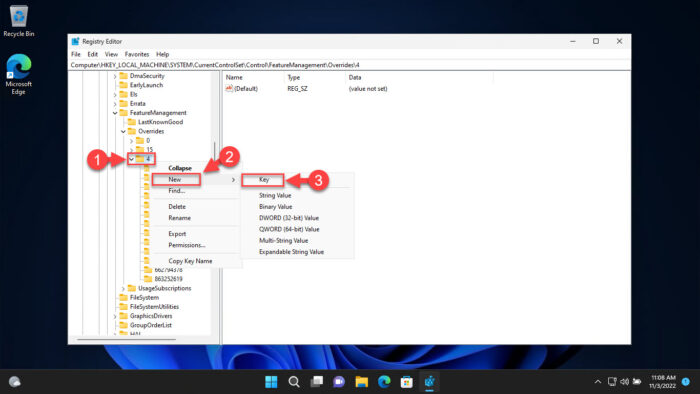
Create 1887869580 key -
Now right-click the 1887869580 key, expand New from the context menu, and click DWORD (32-bit) Value.
Name this DWORD EnabledState.
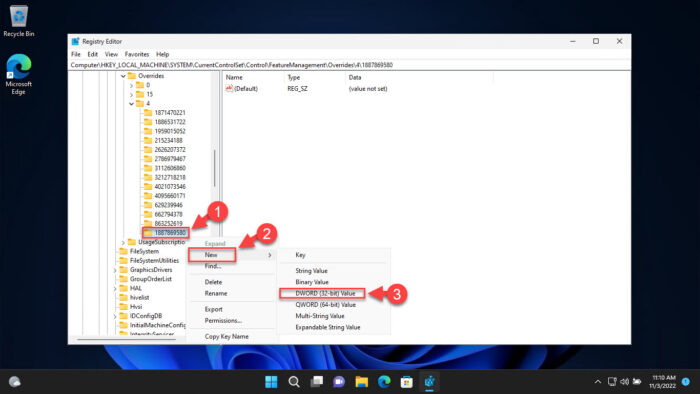
Create EnabledState DWORD -
Now double-click EnabledState DWORD and set its Value Data to 2.
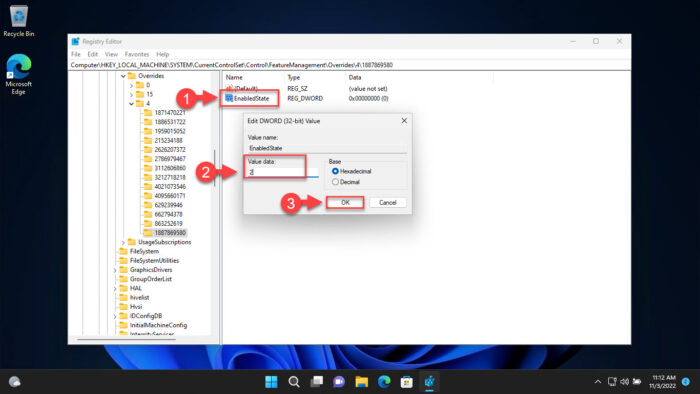
Set EnabledState Value Data -
Now right-click the 1887869580 key again, expand New, and then click DWORD (32-bit) Value.
Name this DWORD EnabledStateOptions.
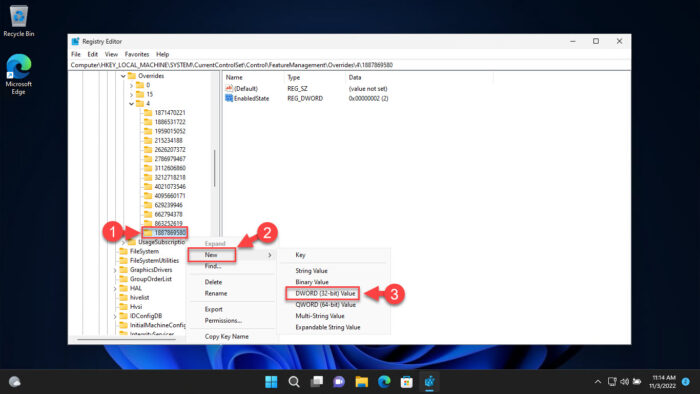
Create EnabledStateOptions DWORD -
Leave the EnabledStateOptions DWORD Value Data in its default value (0), and the configuration should look like this:
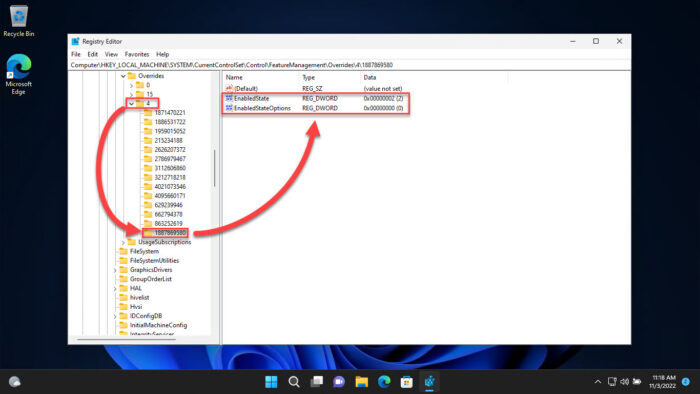
Changes to Windows Registry Now restart the computer for the changes to take effect.
Once the computer reboots, right-click the taskbar to see the “Task Manager” option in the context menu.
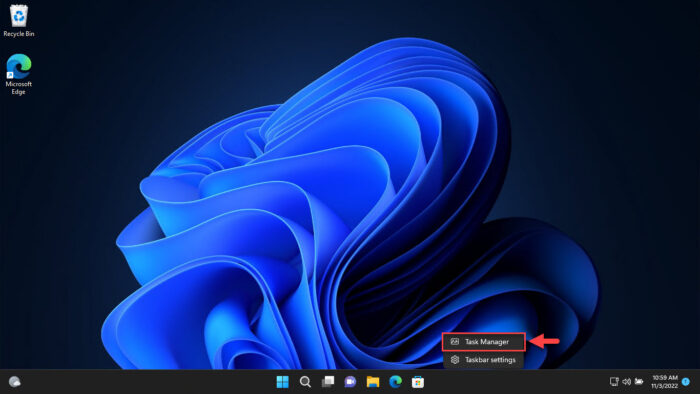
In case you want to remove the option in the future, all you need to do is return to the 4 Registry key and delete the 1887869580 key, and then restart the computer.
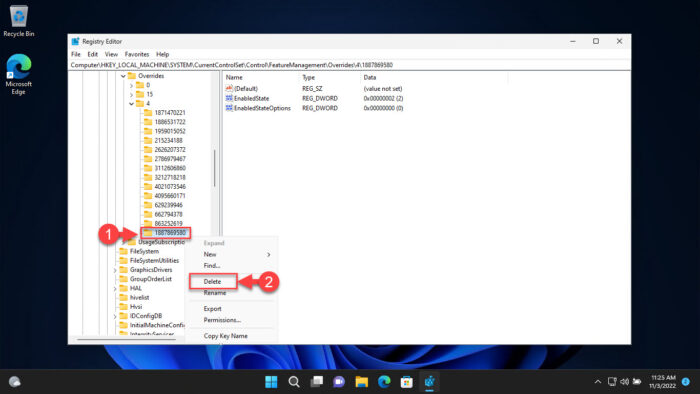
Alternative to this method, you can use the .REG files given below that automatically make the necessary changes to Windows Registry without having to make so many manual changes.
Using Registry Files
To save the time and hassle of making manual changes to the Windows Registry, you can use the .REG files given below to enable (or disable) the Task Manager option from the taskbar’s context menu. Click on the links to download the respective registry file:
 Enable Task Manager in taskbar context menu.reg (416 bytes, 156 hits)
 Disable Task Manager in taskbar context menu.reg (356 bytes, 144 hits)
Once downloaded, follow these steps to execute the file:
-
Double-click on the .REG file to run it.
-
If prompted with a UAC, click Yes.

UAC -
You will now be asked for confirmation. Click Yes again.

Confirm action -
You will now be prompted of a successful operation. Click Ok to close the dialog box.

Registries have been successfully altered -
Now restart the computer for the changes to take effect.
If you executed the “Enable Task Manager in taskbar context menu” file, then the Task Manager option will be added to the taskbar’s context menu.
However, if you want to remove the option in the future, simply execute the “Disable Task Manager in taskbar context menu” file.
Using ViveTool
You can also enable the Task Manager option inside the taskbar’s context menu using ViveTool. ViveTool is a small utility designed to enable hidden features in the Windows operating system that have not been activated by Microsoft by default.
Follow these steps to download ViveTool and enable the Task Manager option:
-
Open GitHub and download the ViveTool Zip file by clicking on it.
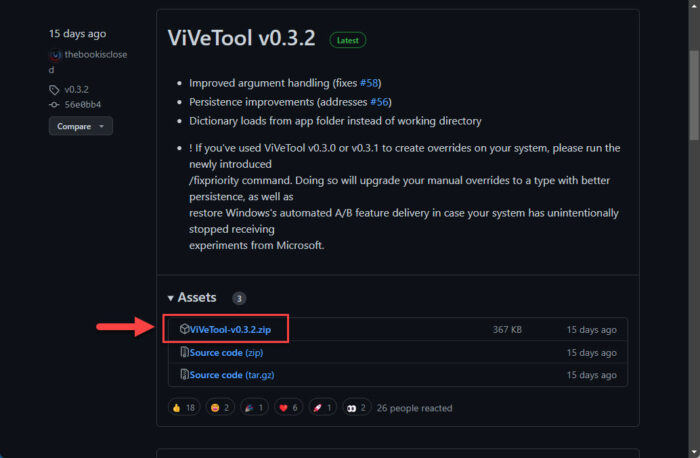
Download ViveTool -
Now extract the contents of the compressed, downloaded ZIP file.
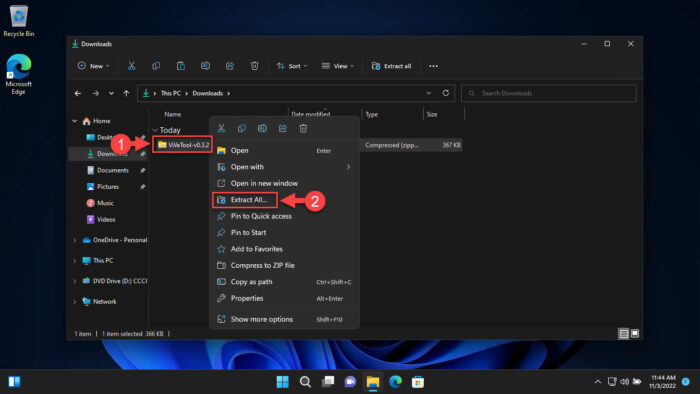
Extract ViveTool -
Now run Command Prompt with elevated privileges and change the directory to the extracted ViveTool folder using the “CD /d” cmdlet followed by the complete path.
CD /d [PathToExtractedViveToolFolder]
Change directory -
Now run the following command to enable the Task Manager option in the taskbar’s context menu.
ViveTool.exe /enable /id:36860984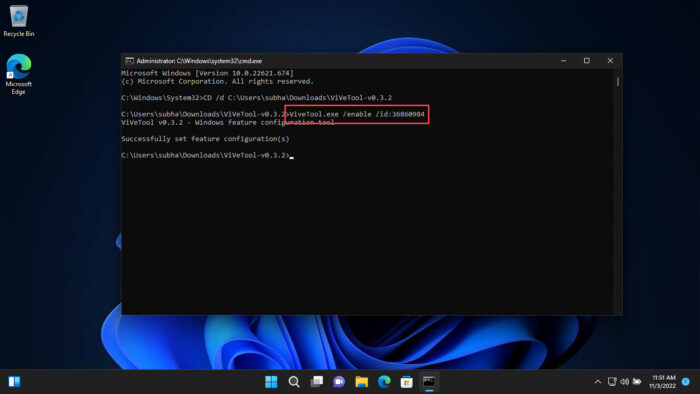
Enable Task Manager in taskbar context menu using ViveTool -
Now restart your computer for the changes to take effect.
When it reboots, you will find that the Task Manager option is now available when you right-click on the taskbar.
In case you wish to disable the feature in the future, simply run the following cmdlet in an elevated Command Prompt in ViveTool’s directory:
ViveTool.exe /disable /id:36860984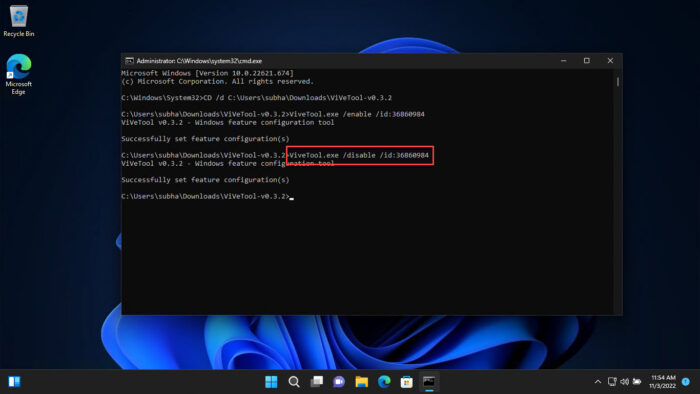
Closing Words
For those who want to enable the Task Manager option in the taskbar’s context menu right away; the guide above is for you. This is a much-anticipated feature for most users since they were used to this method for accessing the Task Manager since the launch of Windows 10.
That said, Microsoft will likely ship this feature to everyone in November’s Patch Tuesday update through Windows Update.


