If your Windows computer is acting up, or you’re getting rid of this one, it is in your best interest to reset your computer. You may want to reset it simply to repair the Windows installation or to make sure that there are no personal files left on the PC before handing it over to someone else.
For whatever reason, Windows allows you to restore your OS to factory-default settings with fresh Windows files that are downloaded from the official Microsoft servers using the “Cloud download” option. Additionally, you also have the option to keep or remove all of your personal files, like documents, music, gallery, etc.
In this article, we show you how to reset your Windows 10 or 11 PC to default settings with fresh Windows files.
Table of contents
What is Cloud Download in Windows Recovery
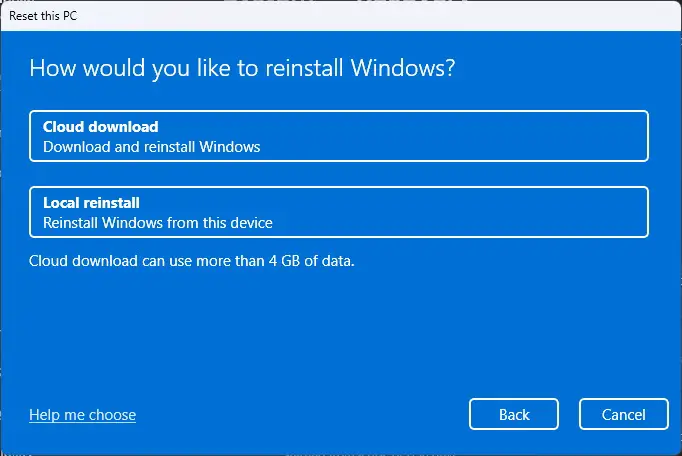
Before we show you how to reset your computer, let us divert your attention to the two possible reset mechanisms of Windows.
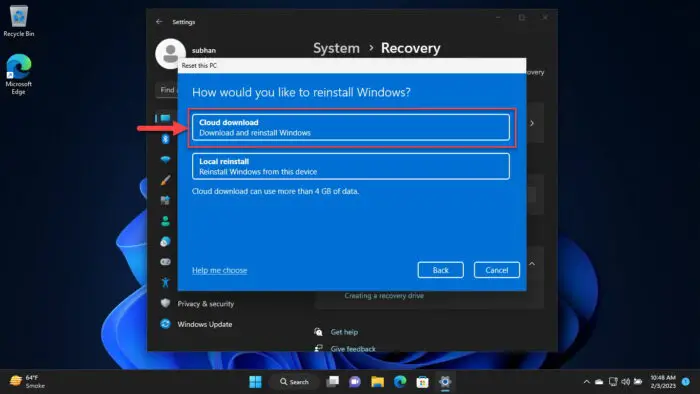
When performing a factory reset of the Windows OS, you are given two options; “Cloud download” and “Local reinstall.”
If you select “Local reinstall,” then Windows resets itself to factory-default settings while using the same system files currently available on your computer. This process is relatively faster and does not require an active internet connection.
However, the caveat of selecting “Local reinstall” is that the reset process can fail due to corrupted system files. If you are resetting your Windows PC to fix an error, then it may not be fixed since it will be using the already-corrupted system files.
In comparison, selecting “Cloud download” downloads fresh files of Windows from official Microsoft servers and performs a reset while replacing all system-critical files with fresh new copies.
Selecting “Cloud download” requires more time and an active internet connection, and may use significant bandwidth.
Note that this option downloads fresh copies from Microsoft servers of the same Windows version, build, and edition you currently have. It does not download the latest Windows build, or an older one.
When to Perform a Windows Reset using Cloud Download
You may want to perform a Windows reset using Coud download mainly because of two specific reasons:
- You are changing your system and want to get rid of all data on your computer before recycling/selling it.
- In an attempt to fix the Windows image.
For the latter reason, it is preferred that you opt for “Cloud download” instead of a “Local reinstall,” since any corrupted system files causing an issue with the image are more likely to be repaired/replaced with fresh system files from Microsoft servers.
Additionally, apart from the two options discussed above, you are also given the option to retain your personal files and data or delete them too, during the reset process. If you are keeping your computer after the reset, then we advise you to keep your files and data.
However, if you are performing a reset for the former reason given above, then you may want to delete all your data.
You will find the methods to reset your Windows PC using Cloud download for both retaining your personal data and deleting your footprint in the sections below.
Reset PC using Cloud Download and Keep Files
As mentioned earlier, you can opt to keep your files and data while resetting your computer with new system files using “Cloud download.”
If you are skeptical about your data, then we suggest using our top selection of disk imaging and backup software so you never lose your data again.
When ready, perform the following steps to reset your computer while retaining your data:
-
Navigate to:
Settings app >> System >> Recovery
-
Click “Reset PC.”
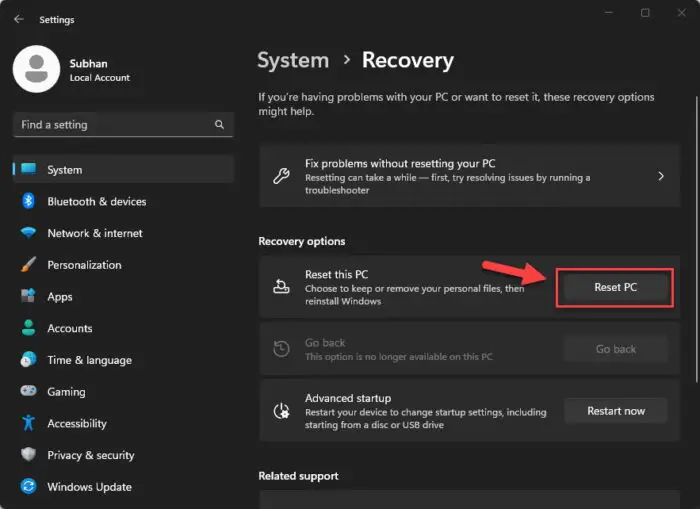
Reset PC The reset PC wizard will now open.
-
Select “Keep my files.”
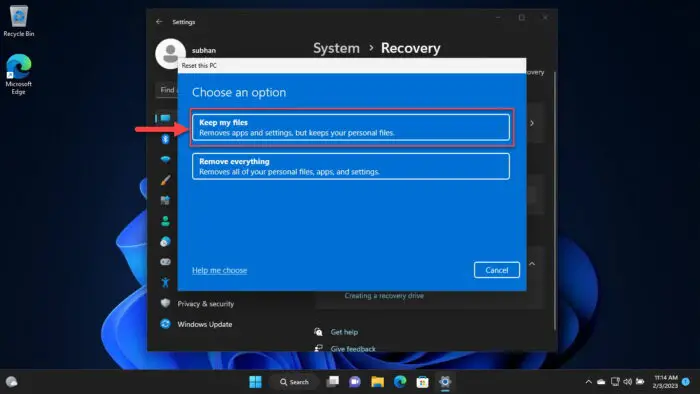
Keep files and data -
Select “Cloud download.”
Cloud download -
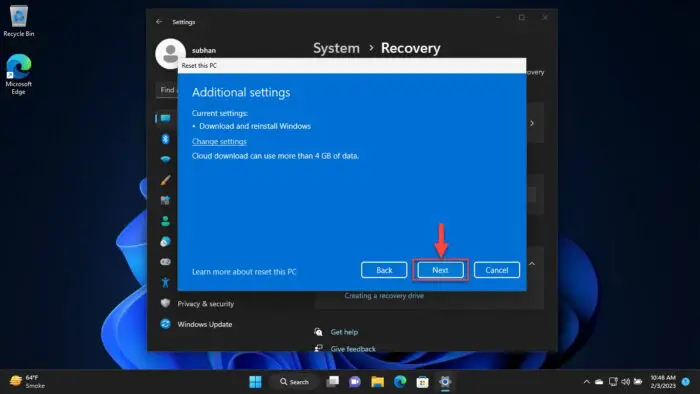
Click Next.
proceed with resetting Windows -
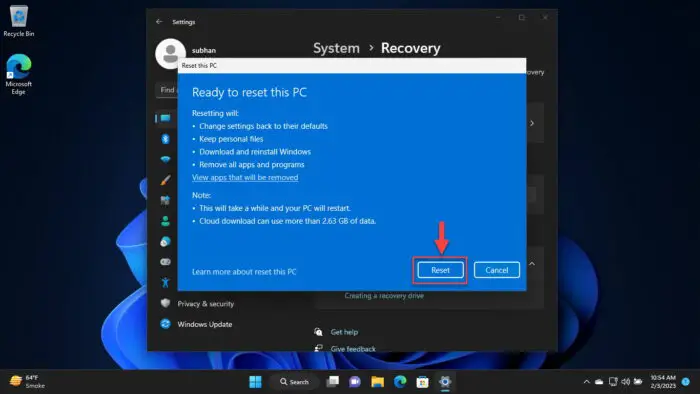
Click Reset.
Reset Windows from Cloud while keeping files
The wizard will now begin downloading fresh files from Microsoft servers and then reset your computer. This step can take a while depending upon your internet connection, and your PC may restart.
Reset PC using Cloud Download and Remove Everything
Alternatively, if you want to remove every little data from your computer and reset it, follow these steps:
-
Navigate to:
Settings app >> System >> Recovery
-
Click “Reset PC.”

Reset PC The reset PC wizard will now open.
-
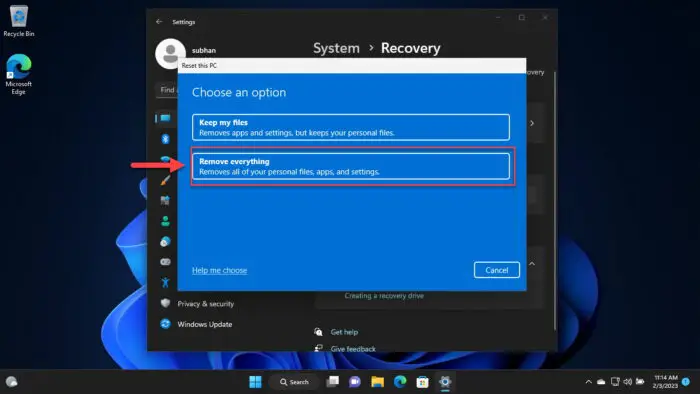
Select “Remove everything.”
Remove everything -
Select “Cloud download.”

Cloud download -
Click “Change settings.”
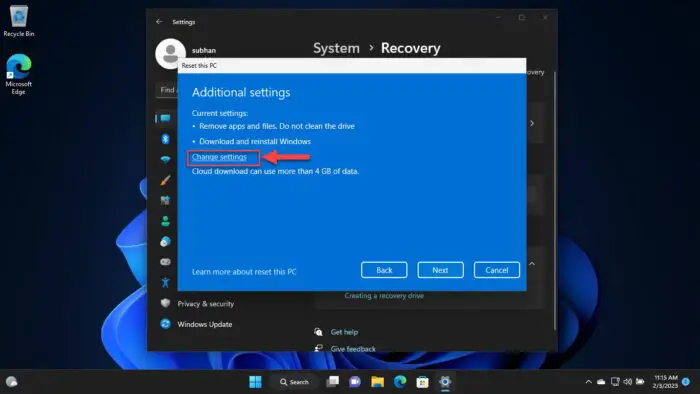
Change settings -
Toggle the slider under “Clean data” into either the On or Off position, depending upon your preference.
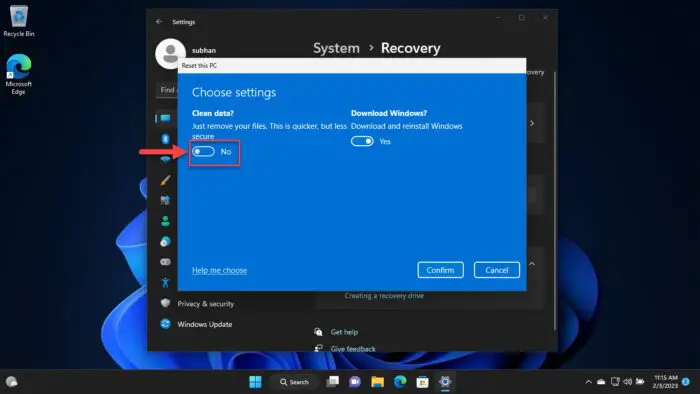
Toggle Clean data Turning off “Clean data” will remove your files and folders relatively quickly, whereas enabling it will also remove any hidden files and data, but will take longer.
It is recommended that you enable it if you are getting rid of this device for good.
-
Click Confirm.
-
Click Next.

Proceed with resetting Windows -
Click Reset.

Reset Windows from Cloud while keeping files
The wizard will now download fresh Windows files from Microsoft servers and reset your computer and remove all data. Your PC may also restart during the process.
Cloud Download VS. Local Download: Which One to Use
If you are experiencing issues with your Windows OS and nothing has fixed it so far, then we recommend that you use the “Cloud download” option as it has a better chance of fixing it.
However, if you are experiencing only minor issues and do not want to consume your internet bandwidth, then a “Local reinstall” should do the trick.
Final Verdict
We would like to remind our readers that resetting your computer with the “Cloud download” version does not change your operating system’s build or its edition. It only downloads fresh Windows files for the same version and edition that you are already running and uses them to reset your computer.
We recommend that you always reset your computer and remove all data if you are getting rid of it. If you are planning on keeping your computer even after the reset, then it is advised to take a backup of your data even if you are opting to “Keep my files” during the reset process, just to be safe.

