Previously, we had talked about setting up a Windows 11 computer as a public VPN server. In this article, we are going to talk about how to manually set up a VPN connection on a Windows 11 computer to connect to a VPN server.
When you talk about VPNs for a Windows PC, your mind immediately goes to the third-party VPN services that have their own servers as well as VPN clients that you install on your computer, and then establish a connection in a few easy steps. However, the Windows operating system comes with a preinstalled VPN client that you can set up in case the third-party client isn’t working as it is supposed to.
Additionally, you may also want to manually configure a VPN connection on your computer if you have set up a Windows computer as a public VPN server and want to access it.
Table of contents
Before we continue to show you how to set up a VPN connection on a Windows computer, there are two things that you will need before that.
Prerequisites to Configure a VPN Connection on Windows
VPN Server or Service
A Virtual Private Network (VPN) connects to a remote server making your internet connection secure, as if the server was on the local network. For that to happen, you must first have a server to connect to.
You can either create a VPN server or use a third-party VPN service.
When you subscribe to or purchase a VPN service that does not come with a client, the service provider gives you the details to connect to their server(s). This information usually includes the domain name or the public IP address of their server, the protocol that they are using for communication, and a username and password you will need for successful authentication with the server.
Make sure you have a VPN server to connect to before proceeding.
Know the Protocol
A network communication protocol defines how the end devices establish and maintain the connection. In other words, the protocol will define how secure the connection is.
When setting up a VPN connection using the built-in VPN client, you will be required to select a protocol. This can be left on “Automatic” for the client to determine which protocol is used, but it is best to provide the correct information regarding the protocol, which should be provided to you by the VPN service.
The 4 common VPN protocols are:
- PPTP
- L2TP/IPSec
- SSTP
- OpenVPN
In our reference article where we set up a public VPN server on a Windows PC, we configured it to use the PPTP protocol.
When you have a complete understanding of what will be required during the VPN setup process, let us continue to show you how it’s done.
Manually Configure VPN on Windows 11
As mentioned earlier, when we say “manual configuration” of a VPN, it means that we are not using a third-party client software and using the Windows-native VPN client. Before you can connect to a VPN server, you must first create a VPN profile and configure the VPN. Therefore, the process is divided into three phases:
- Creating a VPN profile
- Change network properties
- Connecting to the VPN
Create a VPN Profile on Windows
Use the following steps to create a VPN profile on a Windows 11 computer:
-
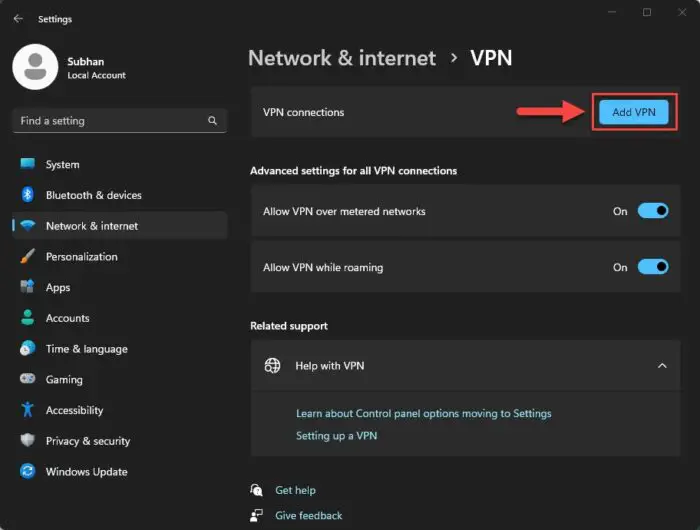
Go to the following:
Settings app >> Network & internet >> VPN
-
Click “Add VPN.”
Add a new VPN profile -
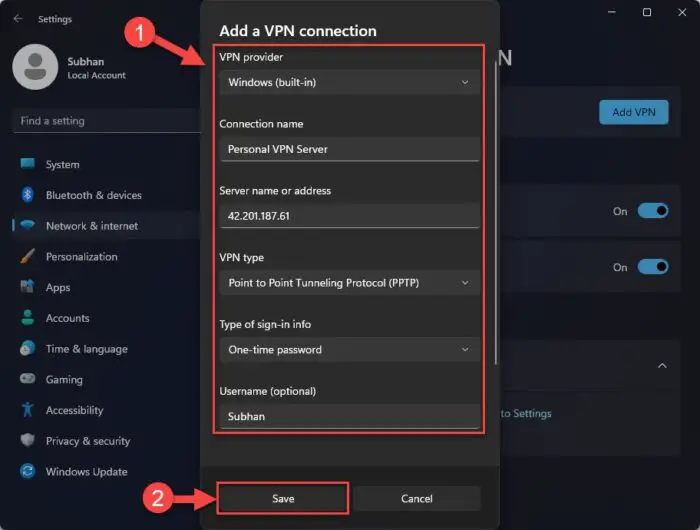
Now enter the following configurations and click Save.
- VPN Provider: Windows (built-in)
- Connection name: Any name of your choice
- Server name or address: Public IP address of the VPN server or its server name
- VPN type: Select the protocol type as discussed above or leave it on “Automatic”
- Type of sign-in info: Select whether you are going to be authenticating with a username and password, a digital certificate, or any other method. This is usually provided by the VPN service provider. In case you have configured a VPN server yourself, then you will select “Username and password”
- Username: Enter the user account name provided by the VPN service. In case you configured a VPN server, then the username will be of the computer account selected during the configuration process.
- Password: Enter the password associated with the username
Note: If you select the “Type of sign-in” to be a certificate, then you will need to add a digital certificate signed by the VPN service. You can learn how to import a digital certificate further down this post.
Create a VPN profile on Windows
This completes the process of creating a VPN profile on your PC. The next step is to change the network properties so that a VPN connection is successful.
Change Network Properties
After creating a VPN profile, your computer will have a virtual network adapter solely for establishing a VPN. You must now change some of its properties so that a smooth VPN connection can be established. Performing the following steps will allow you to change your DNS server while connected to a VPN server.
-
Open the Network Connections applet by typing in “ncpa.cpl” in the Run Command box.

Open the Network Connection applet -
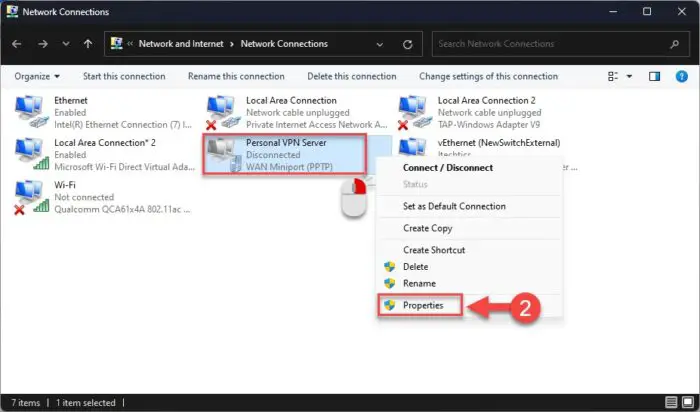
Right-click on the network adapter displayed by the name that you set for the “Connection name” when creating the VPN profile, and then click “Properties.”
Open VPN adapter properties -
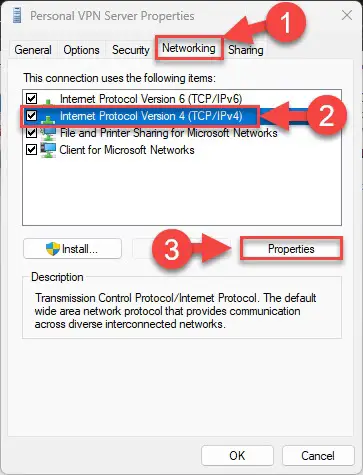
Switch to the Networking tab, select “Internet Protocol Version 4 (TCP/IPv4)” and then click “Properties.”
Open IPv4 properties -
Select “Use the following DNS server addresses” and enter the preferred DNS server’s IP addresses. Click Ok when done.
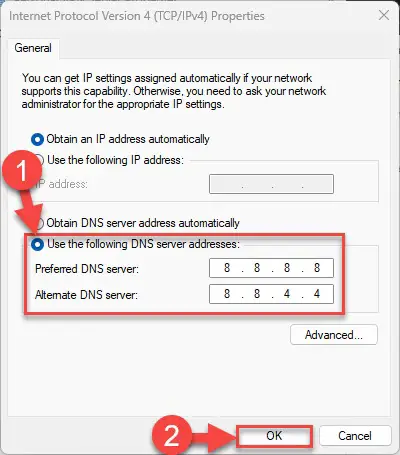
Set DNS addresses for IPv4
Connect to a VPN on Windows
Now that you have created a VPN profile, it is time to use that profile to connect to the VPN server.
-
Go to the following:
Settings app >> Network & internet >> VPN
-
Click “Connect” in front of the VPN profile.
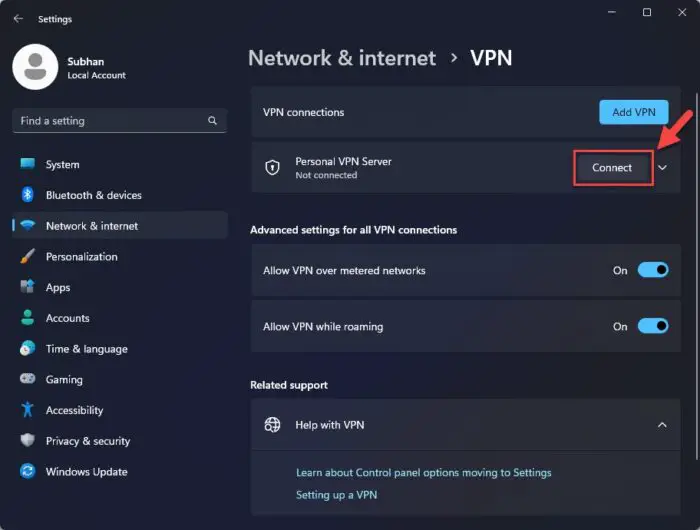
Connect to a VPN Your computer will now attempt to connect to the remote VPN server using the details that you have provided while setting up the profile
-
(Conditional) If you did not provide a username and password during the setup, you will be asked for it now. Enter the credentials and proceed with the VPN connection.
Learn how to check the VPN connection status from the command line.
In case the connection fails, you have likely misconfigured the VPN profile. You can change the settings of an existing VPN profile by clicking “Advanced options” under the profile and then clicking “Edit.”
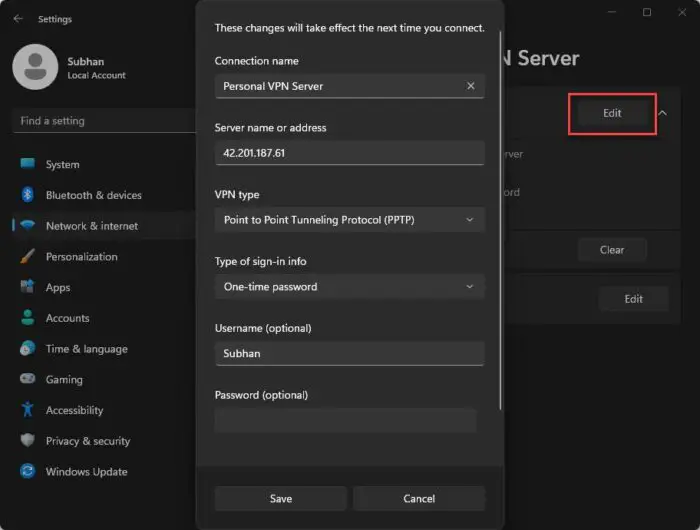
When you no longer need to be connected to the VPN server, you can go to the VPN settings page and click “Disconnect” in front of the VPN profile.
How to Import a VPN Certificate
If you are using a third-party VPN service, and they gave you a digital certificate to use for authentication instead of a username and password, then you must add that certificate to your computer before establishing a VPN connection.
A digital certificate authenticates your device, after adding it, to the remote VPN server and establishes a secure connection after verifying that you are who you say you are.
Perform the following steps to install a VPN certificate on your computer:
-
Open the Microsoft Management Console by typing in “mmc” in the Run Command box.

Open the Microsoft Management Console -
Click “File” from the ribbon menu and then click “Add/Remove snap-in…“

Add a new snap-in -
Select “Certificates” and then click “Add.”
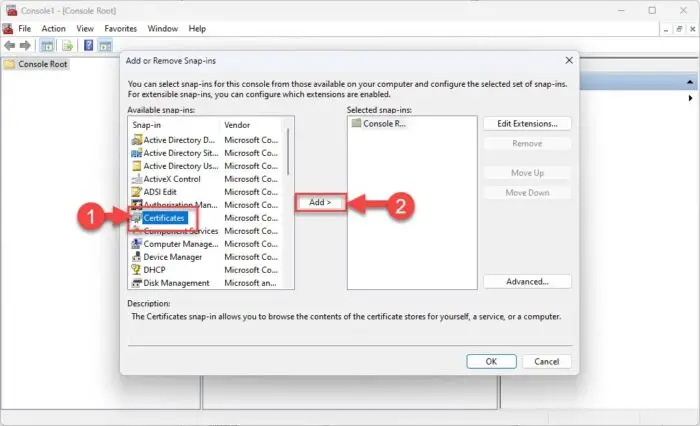
Add the certificates snap-in -
Select “Computer account” and then click Next.
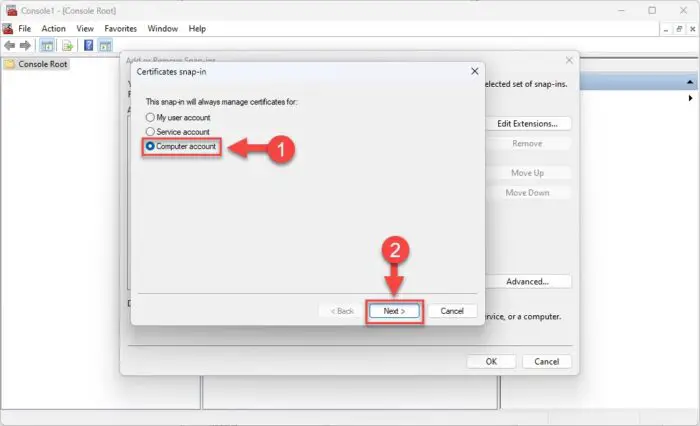
Manage certificates for computer account -
Select “Local computer” and click Finish.
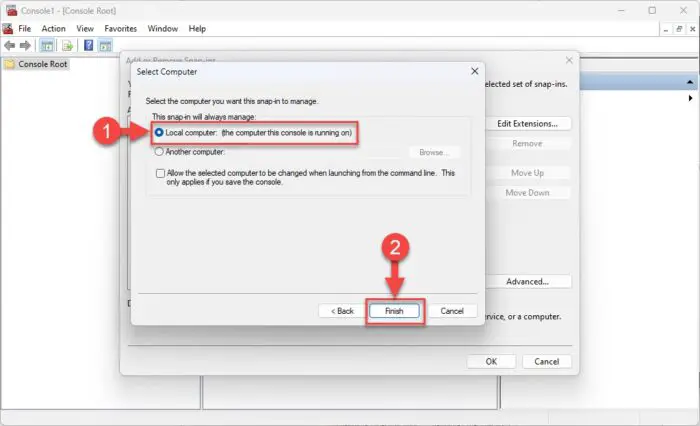
Manage certificates for the local computer -
Click “Ok” on the add or Remote Snap-in window.
-
Expand the following from the left pane:
Certificates (Local Computer)>> Trusted Root Certification Authorities >> Certificates
-
Right-click “Certificates,” expand “All Tasks,” and then click “Import.”
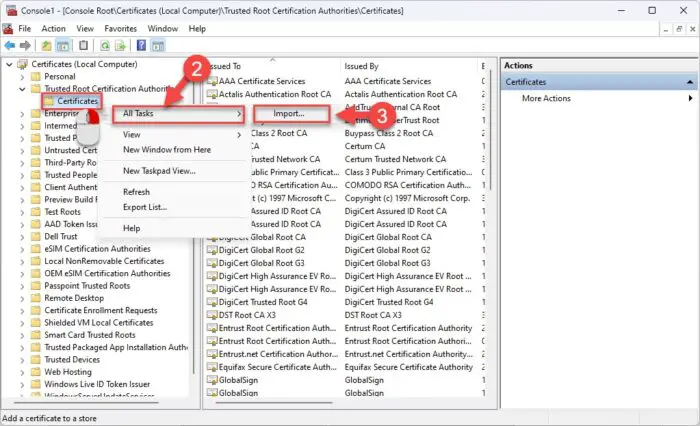
Import a certificate The certificate import wizard will now open.
-
Click “Next.”
-
Click “Browse” and select the VPN certificate. Click “Next” when done.
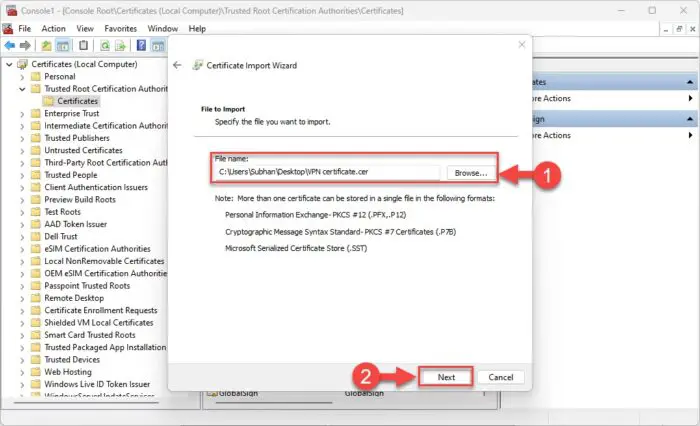
Browse and select the certificate -
Enter the password for the certificate and click Next.
The password will be provided by the VPN service provider.
-
Leave the default selection on this page and click Next.
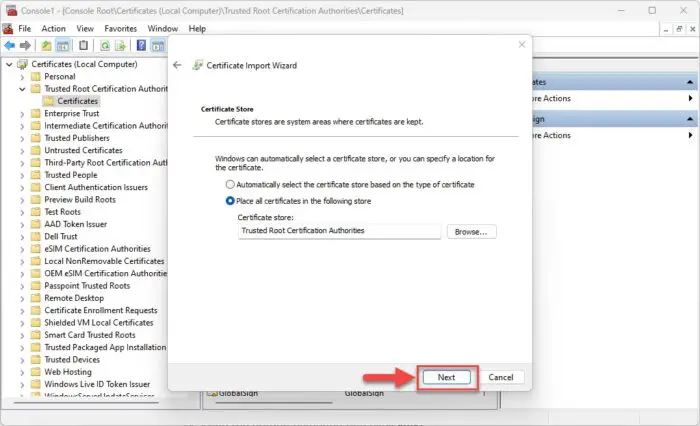
Define storage location for certificate and proceed -
Now click Finish.
You will now be prompted that the import has been successful. You can now proceed to connect to the VPN server, provided that you have already set up the VPN profile and made the necessary changes to the virtual VPN network adapter, as discussed above.
How to Delete or Remove a VPN Profile
In case you have unused VPN profiles configured on your computer, you can delete them permanently. Removing a VPN profile is easy.
-
Go to the following:
Settings app >> Network & internet >> VPN
-
Click on the VPN profile to expand its options.
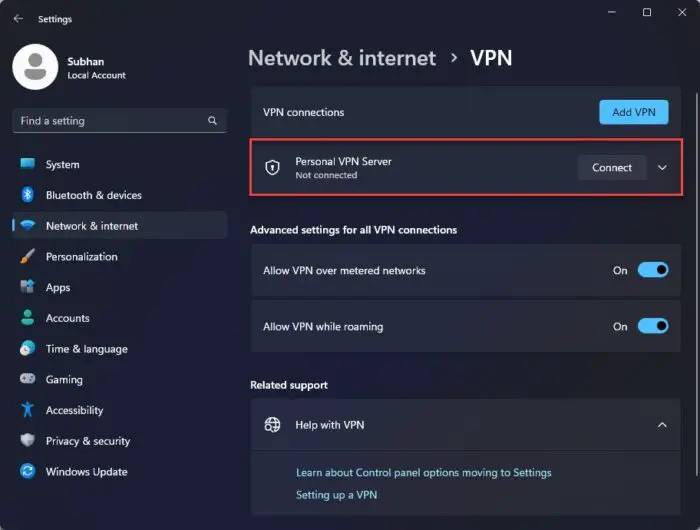
Expand the VPN profile -
Click “Remove.”
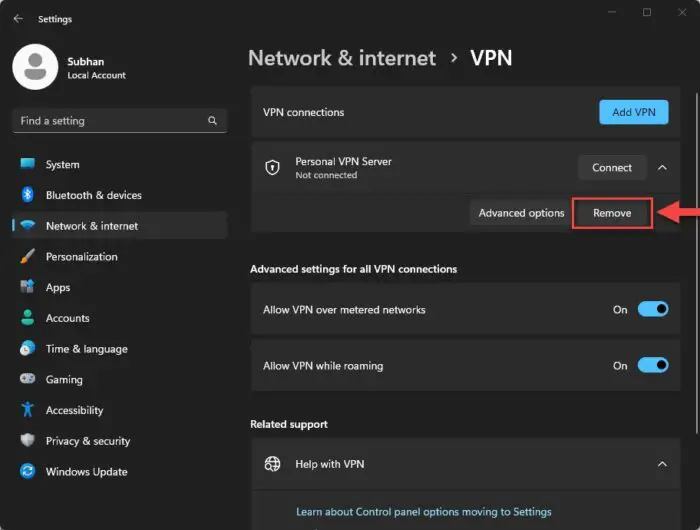
Remove the network profile -
Click “Confirm.”
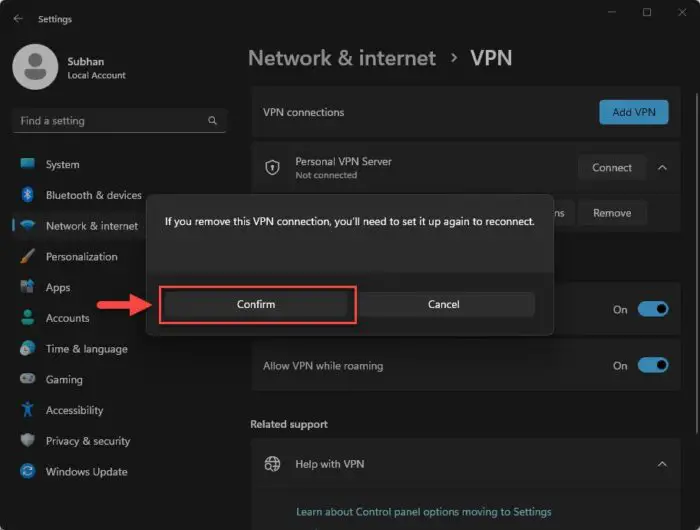
Confirm VPN profile removal
The VPN profile will now be removed.
Takeaway
The easiest way to connect a VPN is using the VPN service provider’s client software. It does not require much input or any significant configurations. All you must do is install the software, select a region to connect to the server, and click the “Connect” button.
However, in the case of a self-created VPN server, you have no client software. The only method to connect to it is using the built-in VPN client in the Windows OS. You can also use this approach if the actual third-party client software is not functioning as it should.
Setting up a manual VPN connection on a Windows computer can be tricky, especially if you do not know the technologies and protocols used during the process. Which is why we have compiled this detailed guide.


