Windows 10 forcefully installs Windows updates by default. This includes all updates including Windows device drivers. This article is about disabling automatic driver updates from Windows Update. This setting can be disabled due to several reasons. Some drivers from Microsoft may not be fully compatible with the device driver you have installed. Or the driver which the manufacturer provides can have more features than the basic Microsoft drivers.
In this article, we will share three different ways to disable automatic driver updates in Windows 10. While the focus and screenshots are from Windows 10, the same configurations can be used for Windows 7, Windows 8, and Windows 8.1.
Table of contents
Disable Automatic Driver Updates
1- Using Device Settings
For changing the device driver’s automatic installation setting in Windows 10, you will need to dig deep into the Control Panel. Just follow the steps below:
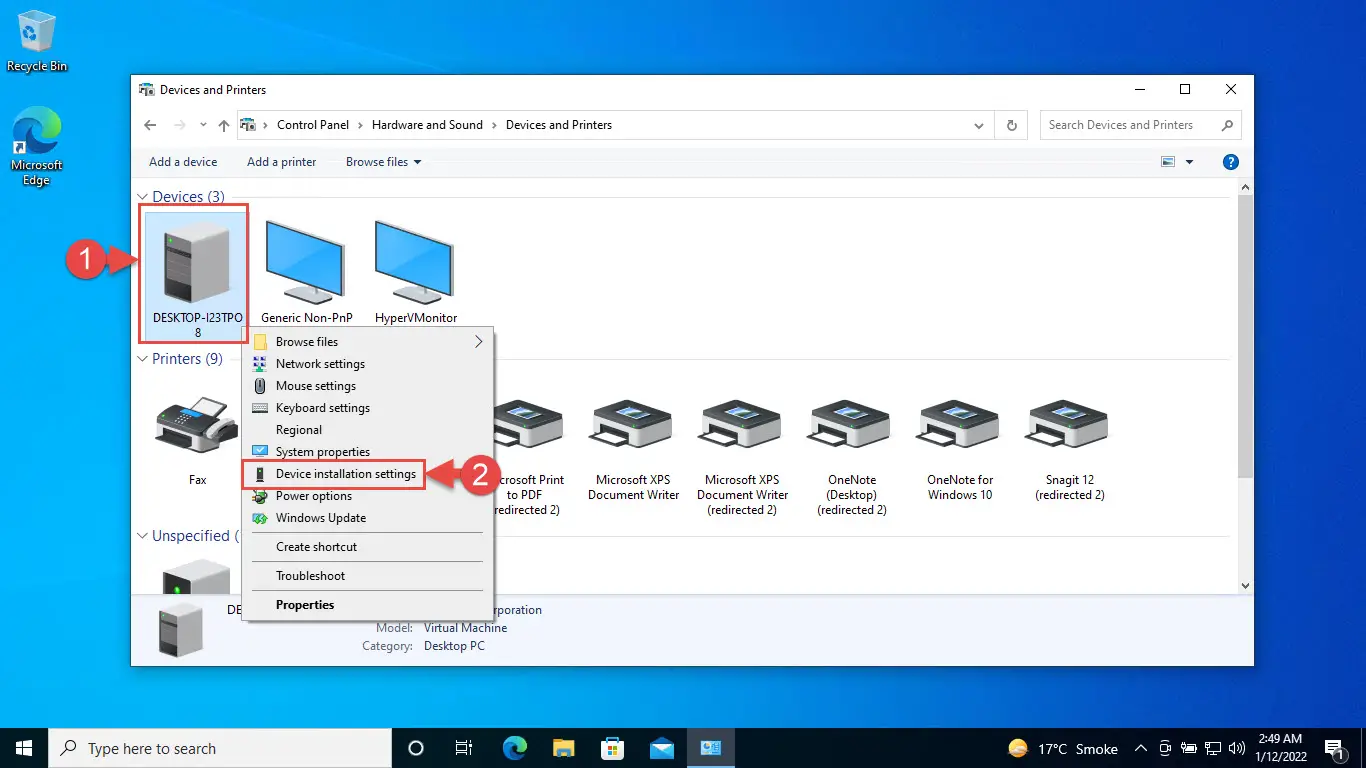
- Open Control Panel (Run -> control), click Hardware and Sound, and then click Devices and Printers.
- Right-click the computer icon under Devices and click “Device installation settings” from the context menu.
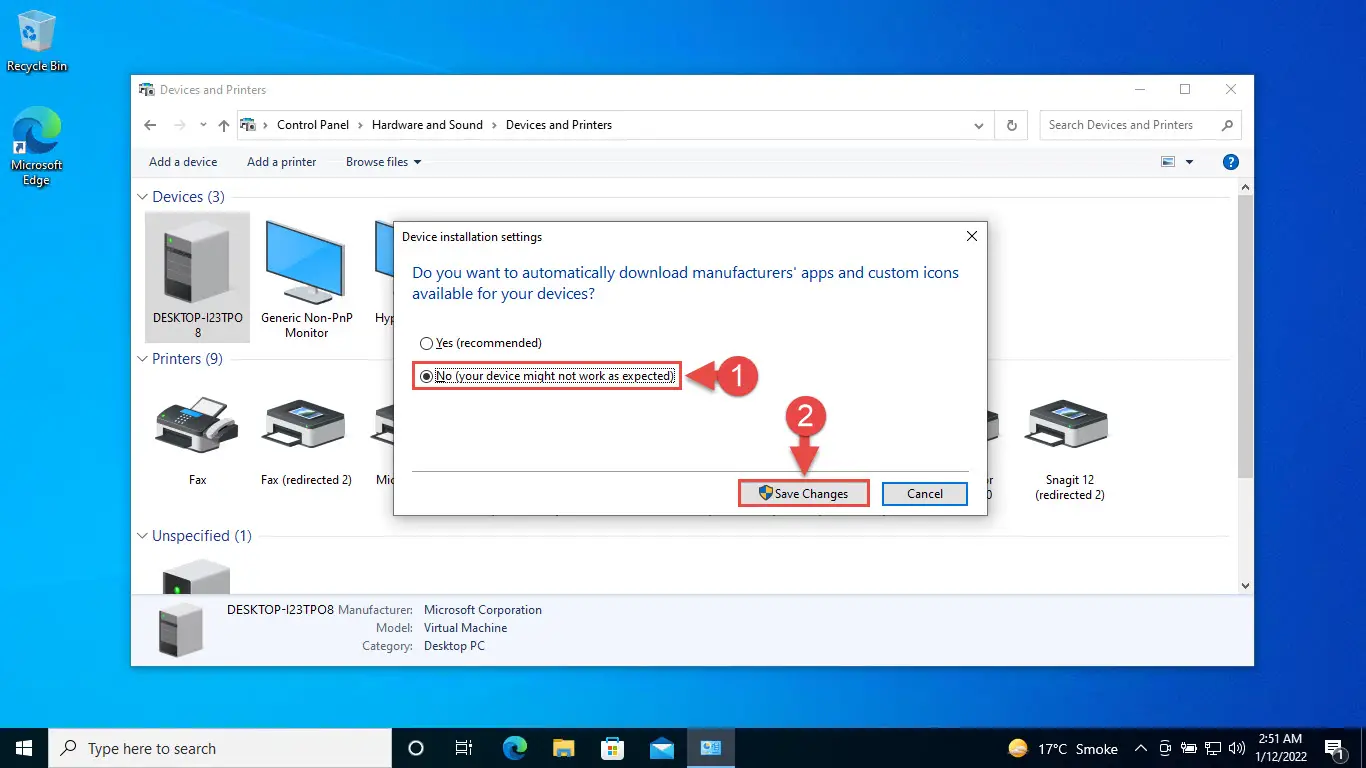
- Windows will now ask you the following question: “Do you want to automatically download manufacturers’ apps and custom icons available for your devices?” Select “No (your device might not work as expected),” then click Save Changes.
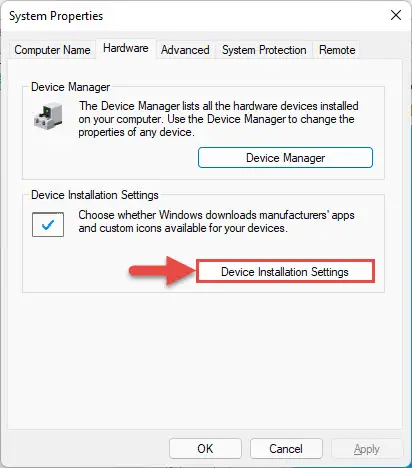
Alternatively, you can also reach the same window and select “No” (as in step 3 above) by typing in sysdm.cpl in Run, switching to the Hardware tab, and then clicking Device Installation Settings.
This should stop Windows from automatically downloading and installing device drivers from Windows Update.
2- Using Group Policy
Windows Group Policy can be a handy tool to change device drivers’ settings. This can be useful especially when you are doing it for multiple systems in the network. Follow the instructions below to disable device driver updates from Windows Updates using Group Policy:
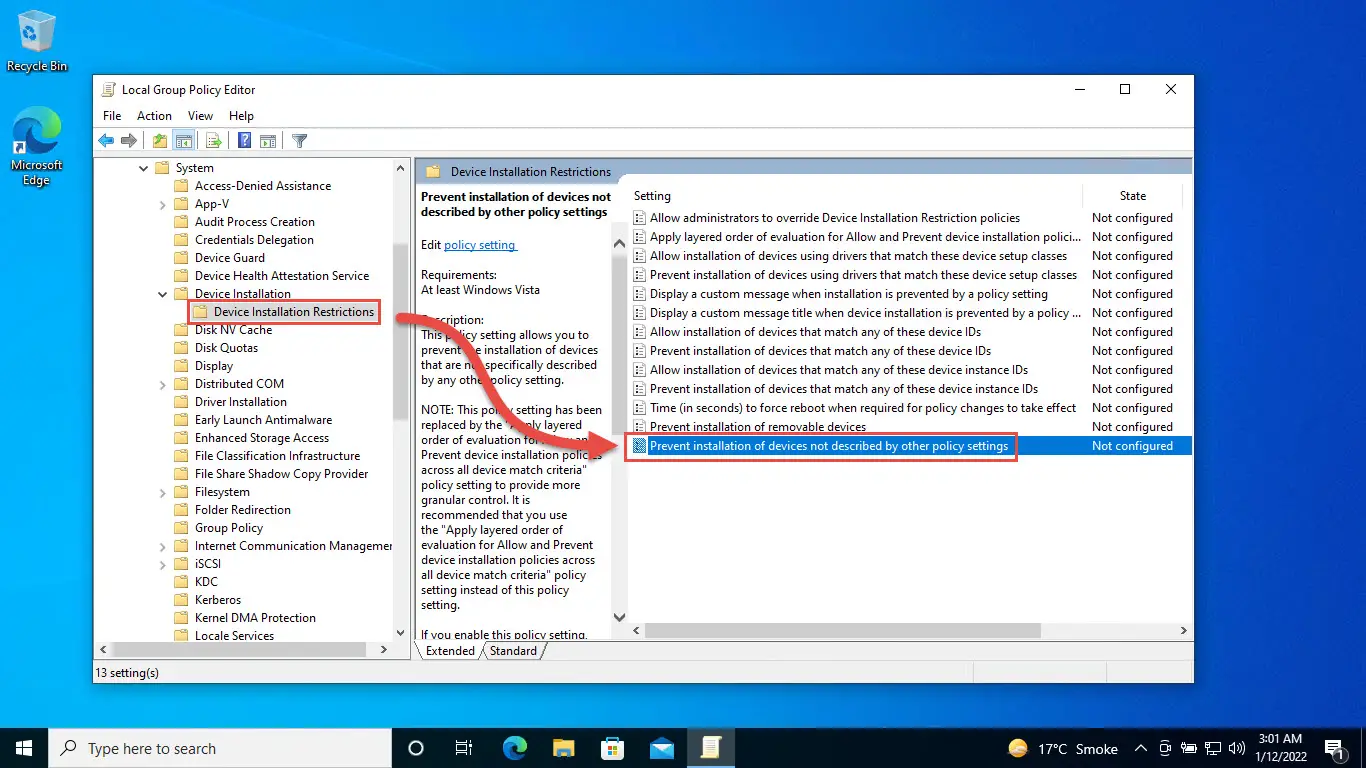
- Opem the Group Policy Editor by typing in gpedit.msc in Run.

- Now navigate to the following from the left pane:
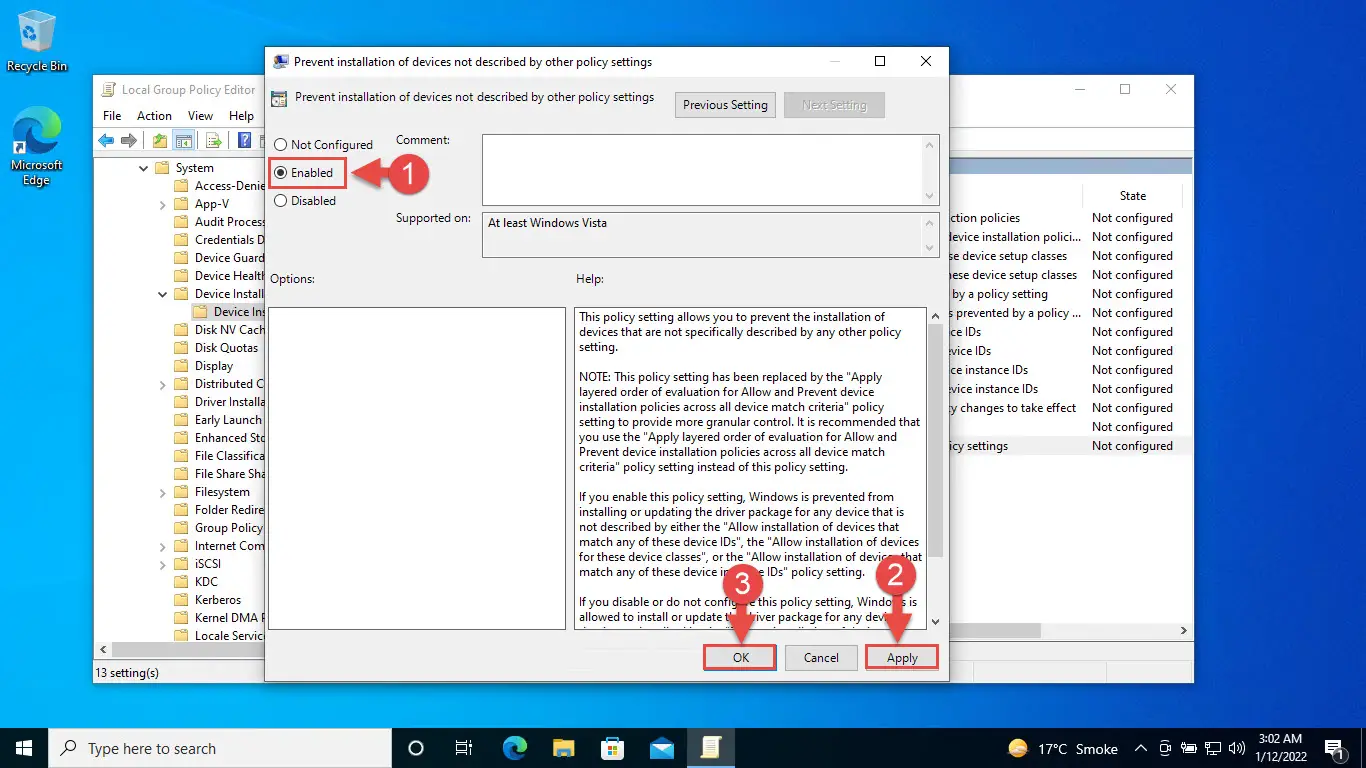
Computer Configuration >> Administrative Templates >> System >> Device Installation >> Device Installation Restrictions - In the right hand pane, double-click “Prevent installation of devices not described by other policy settings.”
- Now select Enabled and then click Apply and Ok.
- Now, for the changes to take effect, type in the following in Command Prompt with administrative rights:
gpupdate /force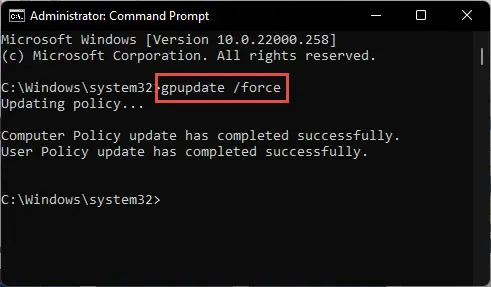
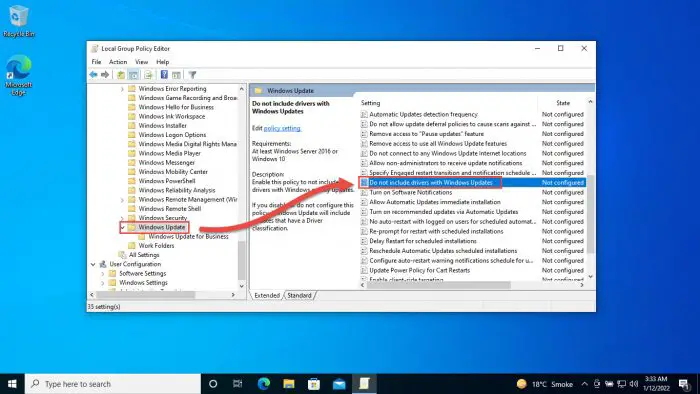
You can also Enable the Group Policy “Do not include drivers with Windows Update” from the following path in the Group Policy Editor to disable automatic driver updates:
Local Computer Policy >> Computer Configuration >> Administrative Templates >> Windows Components >> Windows Update
If you want to dig deeper into controlling every aspect of device driver installation through group policy, read this wonderful TechNet article.
3- Using Windows Registry
You can also disable device driver installation from Windows Update using Windows Registry. It is always recommended to backup your Registry before making changes to the registry.
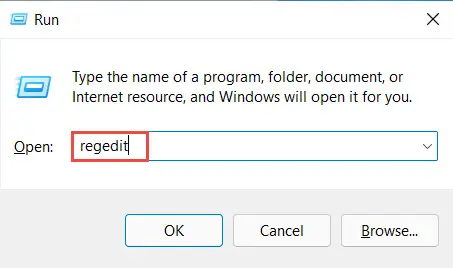
- Open the Registry Editor by typing in regedit in Run.
- Now paste the following in the address bar for quick navihation:
Computer\HKEY_LOCAL_MACHINE\SOFTWARE\Microsoft\Windows\CurrentVersion\DriverSearching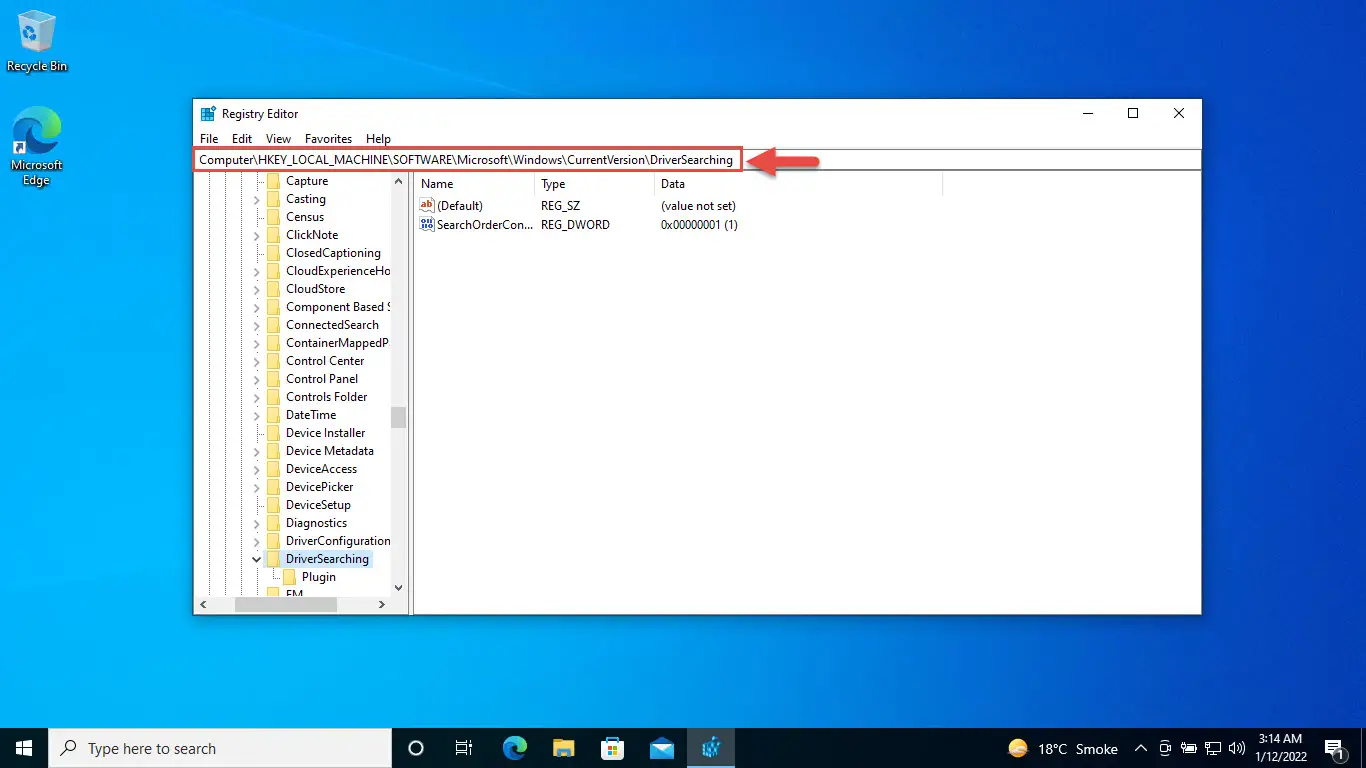
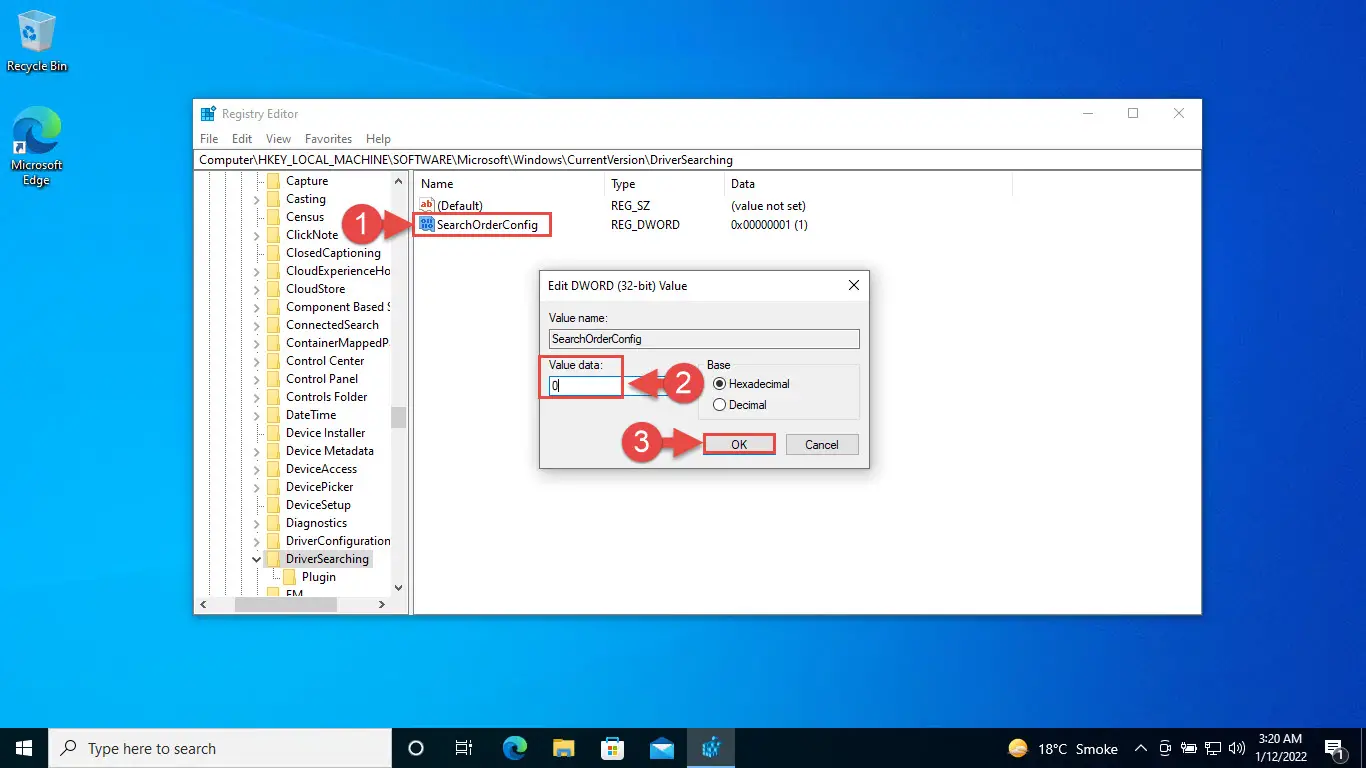
- Double-click “SearchOrderConfig” in the right hand pane and change its Value Data to 0. Then click Ok.
- Now reboot your computer for the changes to take effect.
Finding and Installing Device Drivers Manually
While there are quite a few software to detect unknown devices and automatically download and install their drivers from their respective manufacturers, you can always go to the device manufacturer’s website to download the latest compatible device drivers of your choice.
If you don’t want to take the headache of finding the right device driver, I would highly recommend 3 DP Chip software which automatically downloads the latest compatible device drivers for your basic system devices, like motherboard, graphics card, sound card, and network drivers.
SlimDrivers is another wonderful program that will keep your device drivers updated and the drivers will come from their respective manufacturers.



15 comments
Doug Fuoco
First and Second method did not work for me but the Third method did
thank you very much!
ADSPNTR
is this work if using windows 10? windows upgrade assistant always check everything to upgrade.
David Smith
First method is not working for me. Second worked though. Thanks
Anonymous
Don’t waste your time on the first method. It does not work.
KT.Jim
Besides this, there are two other ways you can do to disable the Windows 10 auto-updates. You can set up a metered network connection for your Windows 10 and disable automatic device installation.
DebbieD
There’s no longer a “sub section”. And it never says “drivers”. They are now called “manufacturer apps” and “icons”.
*PLEASE* update this old article.
Kevin
Yes, Debbie. It no longer exists. Thanks for writing this comment. I searched a lot and then thankfully I read your comment.
Great work, really appreciated.
Cheers,
Kevin
Shawn
The actual registry value name is “SearchOrderConfig” not “ChangeOrderConfig”.
Alex
According to https://social.technet.microsoft.com/Forums/windows/en-US/10bf1813-4c28-4bc7-87d2-5cb200183e22/could-not-turn-off-the-driver-software-download-settings-using-registry-value-driversearching?forum=win10itprogeneral and https://superuser.com/questions/541826/registry-key-setting-to-enable-windows-to-download-driver-from-windows-update the value for the registry key “SearchOrderConfig” to disable automatic updates is 3 not 0.
Usman Khurshid
Thanks a lot for pointing out. I have corrected the value to SearchOrderConfig in the article.
Scott
For me I can set option one but that alone will not stop auto updating. I don’t have goes it available as running Home version. So I must also set registry key. Also, every time there is a major Windows update I must change all this manually again. Very painful because my computer auto shuts down with the display driver the OS tries to force on it.
Susan
In method #1… there’s no longer the sub-choices option.
Ugh.
Kristen
This site is very good. It saying about a few software which detect the other devices and drivers. It says about slim driver software. Which update device drivers. Thanking you.
aimee
I use another one driver doctor, it is also a professional drivers update tool find the latest drivers for computer hardware. And you can get it from here: https://www.driverdr.com
Usman Khurshid
Is it free or paid?