Root Certificates are embedded within our operating system all around. These are also known as Trusted Root Certificates, created by the Certificate Authority (CA), accrediting that a website or software is who they claim they are. It is more like a digital certificate of authentication
By default, Windows 11 updates its root certificate over the internet through Windows Update at least once a week through a Trusted Root Certificate List (CTL). However, if your device is not connected to the internet, certificates will likely expire over time, thus causing certain scripts and applications to not function properly, or experience problems while browsing the internet.
Let us help you avoid this problem by showing you how to update your system’s Root Certificates.
Before we begin, let us guide you on how to see and manage the Root Certificates on Windows 11 and find out which certificates are expired or about to expire.
View trusted root certificates using the Certificate MMC
Windows comes with various Management Consoles that are used for managing different aspects of the operating system. One of these consoles is the Certificate Management Console.
This is a convenient way to view and manage Root Certificates if you prefer the Graphical User Interface (GUI). Otherwise, you can also obtain the relevant information through Windows PowerShell, which we have discussed in the next section.
Follow the steps below to launch the Certificate Management Console:
- Start by typing in mmc.exe in Run to launch Microsoft Management Console.
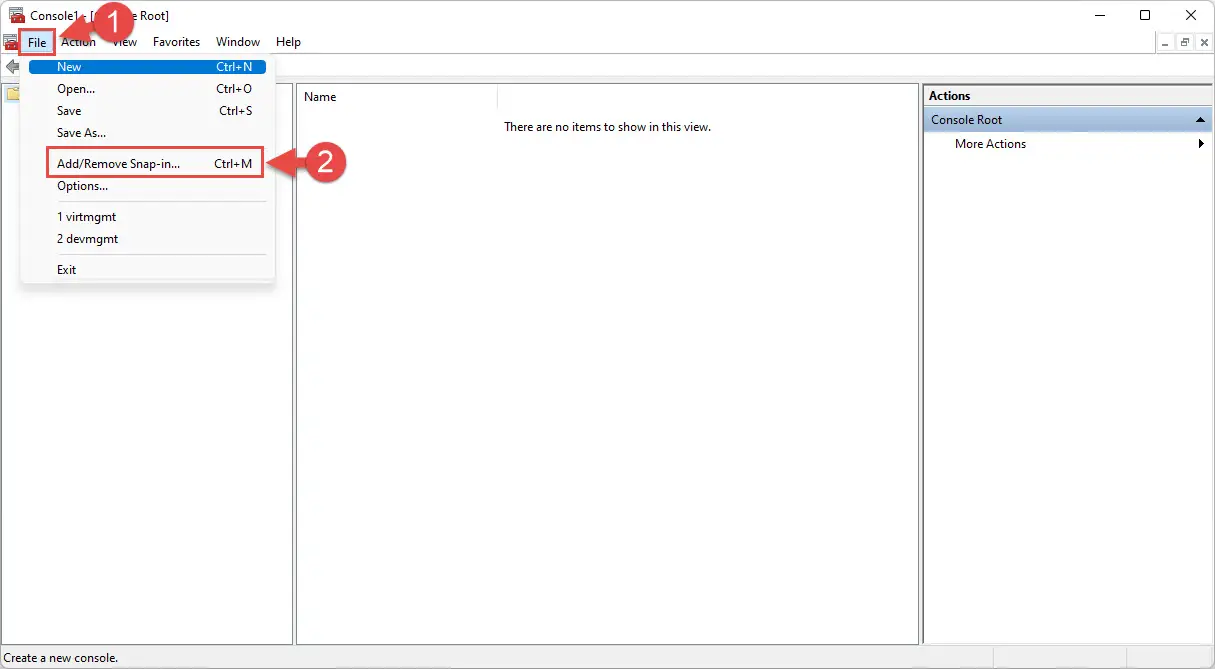
- From the top menu, click File and then click Add/remove snap-in.
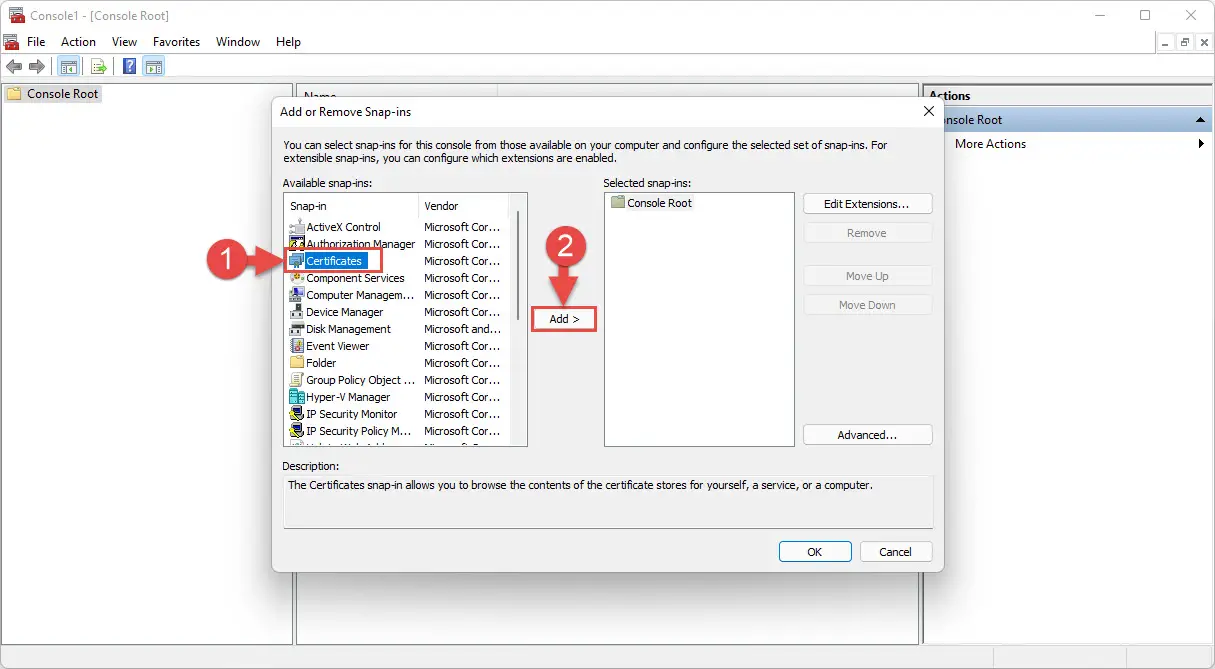
- From the pop-up window, select Certificates under “Available Snap-ins” and then click Add.
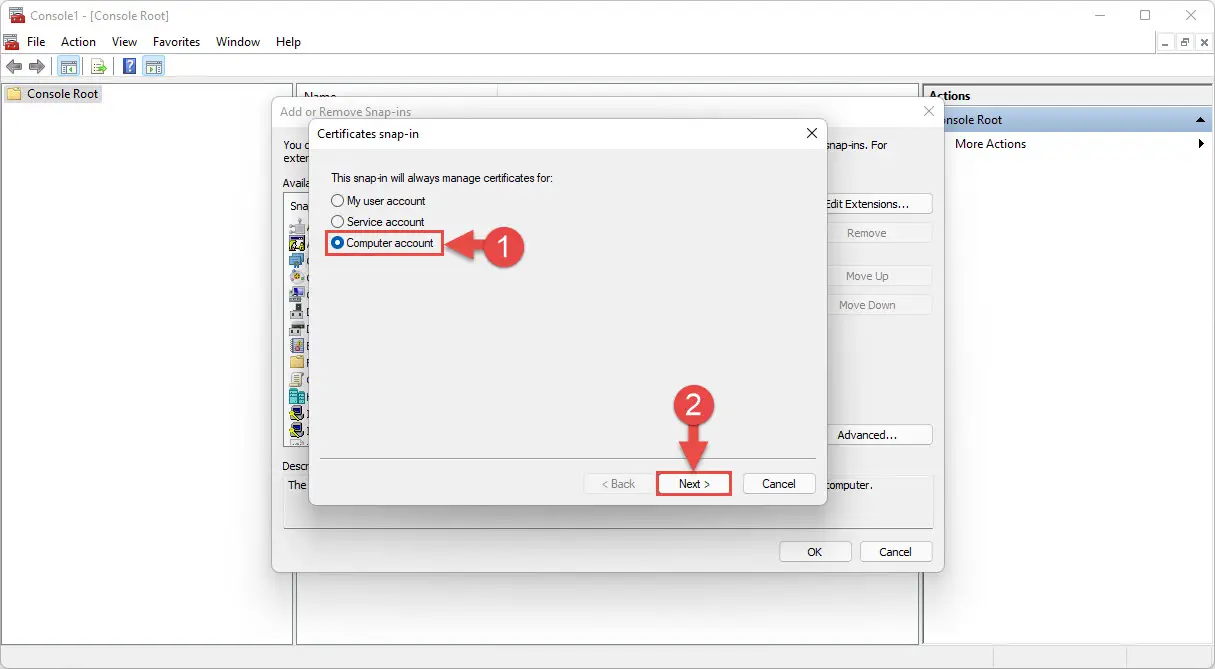
- In the next window, select Computer account and click Next.
- Leave the default setting on the next page and click Finish.

- Back in the Add/Remove Snap-in window, click OK.
- Now, on the console, navigate to the following using the left pane:
Certificates (Local Computer) >> Trusted Root Certification Authorities >> Certificates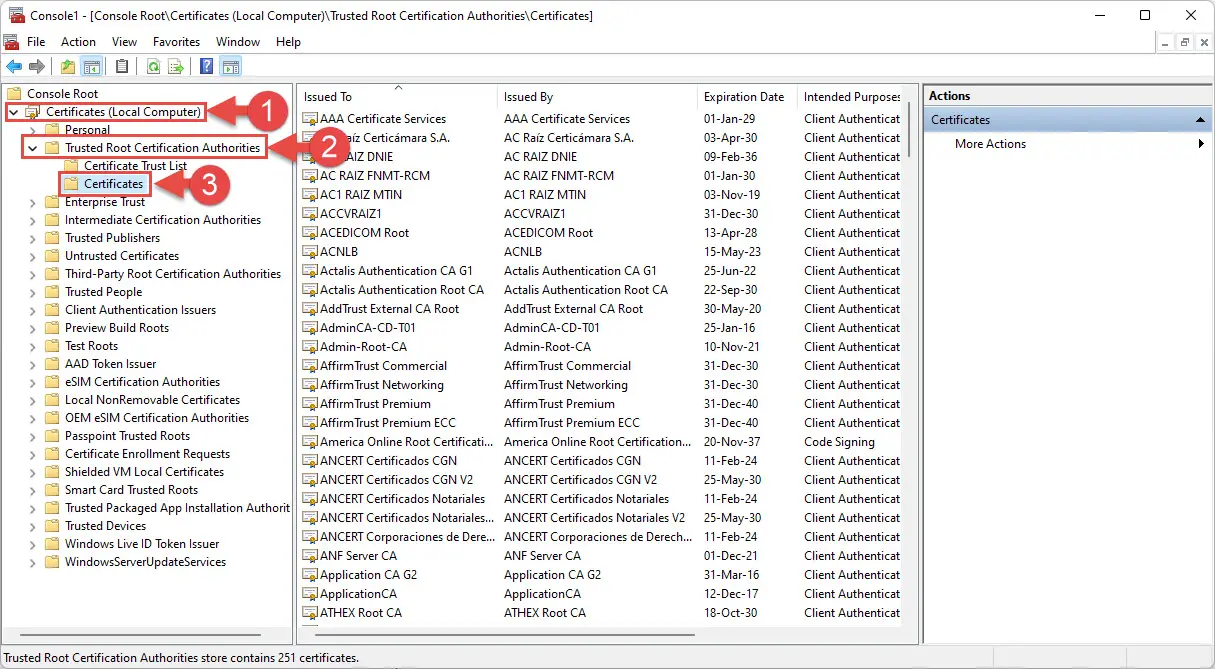
Here, you can view all the active and expired Root Certificates on your machine in the middle pane. It also states CA under the “Issued by” column, as well as the expiry date in another column.
View trusted root certificates using Windows PowerShell
Another way to obtain the information on the Root Certificates is through PowerShell. Run the following command in Windows PowerShell with administrative privileges to obtain the details:
Get-Childitem cert:\LocalMachine\root |format-list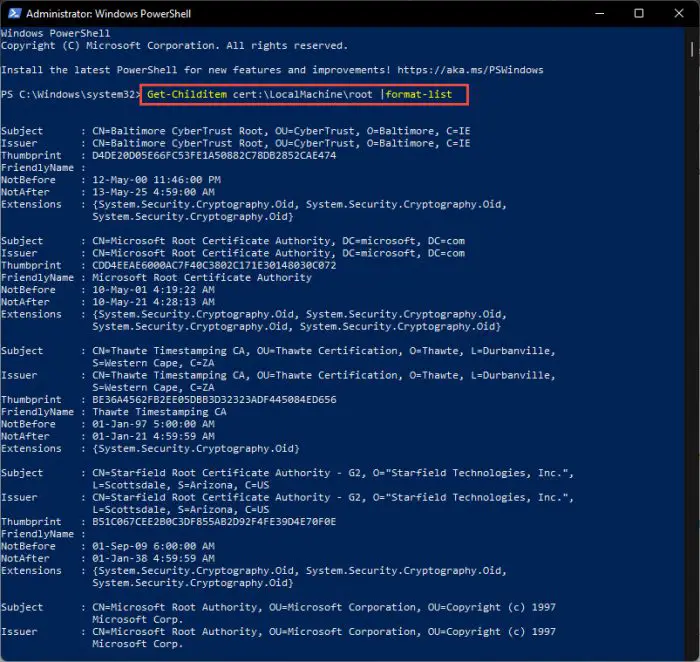
As you may notice, this command provides the details on all Root Certificates, which may be a bit overwhelming for some. If you want the details on the expired certificates, use the following command:
Get-ChildItem cert:\LocalMachine\root | Where {$_.NotAfter -lt (Get-Date).AddDays(40)}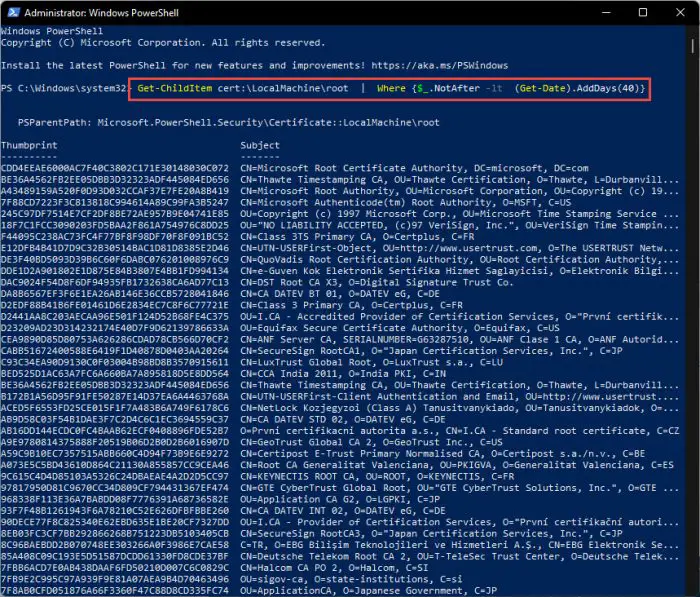
Now that you know how to manage the Root Certificates, let us update them.
Update root certificates from a remote computer
One way to update the Root Certificate(s) is to copy a valid certificate from another computer that is already installed, and then re-install it on your device. The process is simple as Windows is already equipped to export and import Root Certificates. However, to do this, make sure that both the source and the destination operating systems are the same.
We have divided this method into “Exporting a Root Certificate” and “Importing a Root Certificate” for your convenience.
Export Root Certificates
You need to begin by identifying the certificate that you need to update. Once done, follow the steps below to export the certificate:
- Open the Certificate Management Console on the source computer (as discussed earlier in this post).
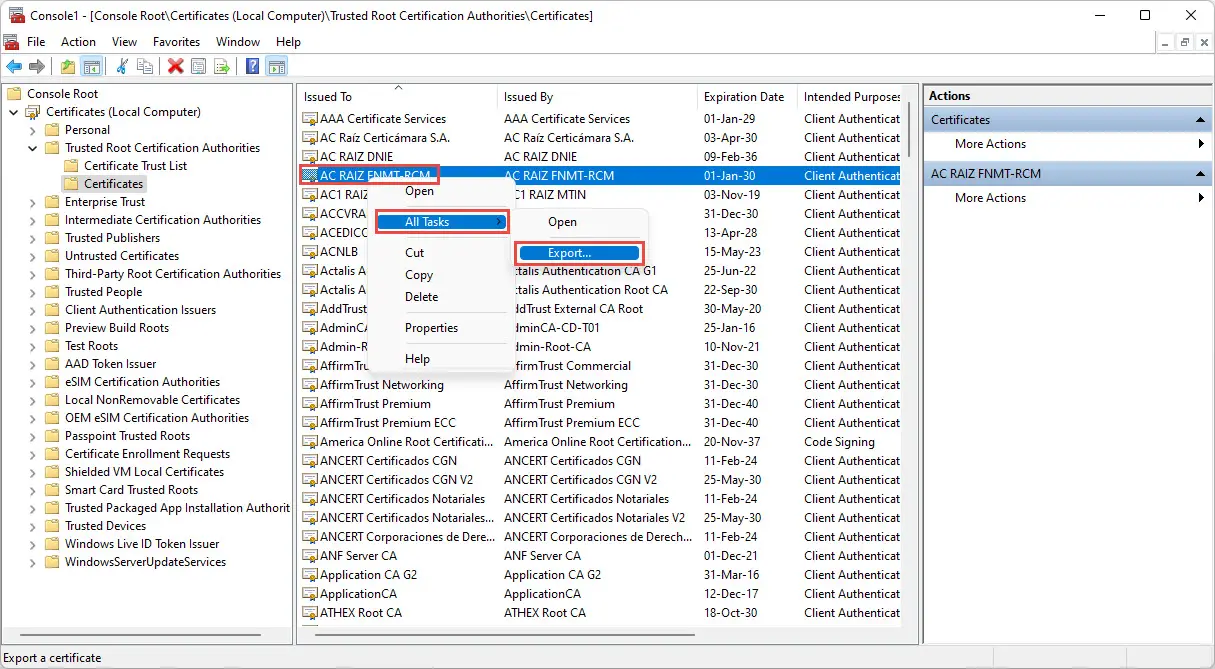
- From there, right-click on the certificate that you want to move to another device, expand All Tasks from the context menu, and then click Export.
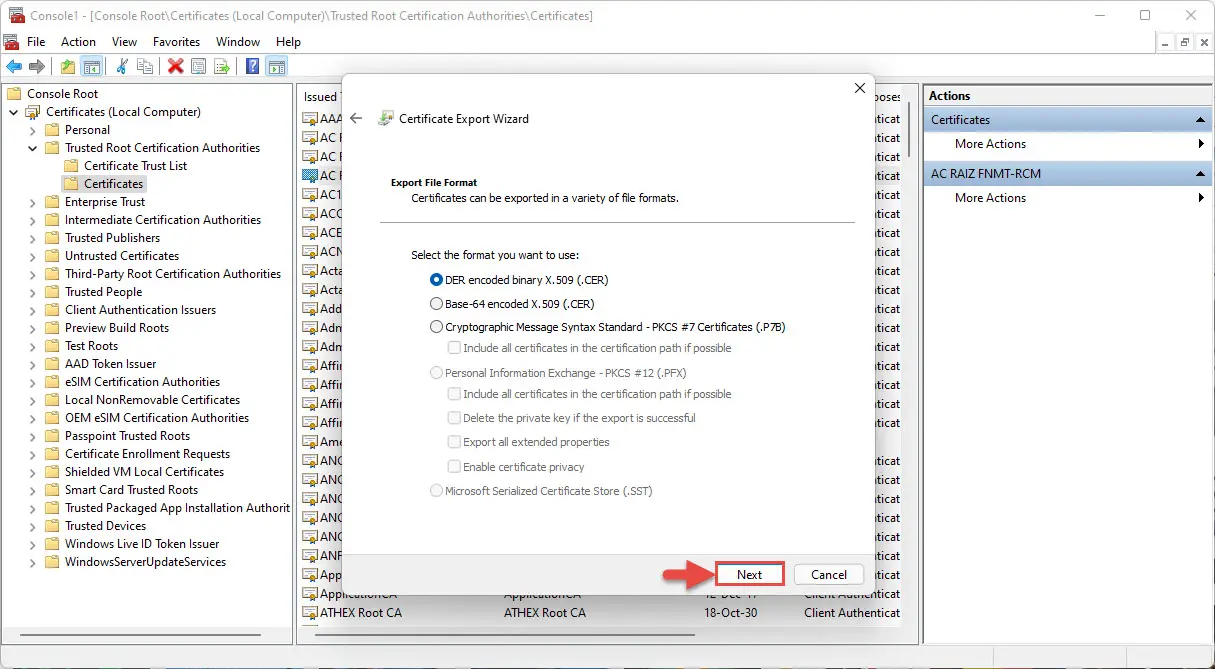
- The Certificate Export Wizard will now be open. On the welcome screen, click Next.
- Click Next on the next screen while leaving the default settings.
- On the next screen, click Browse and save the .cer file with a name of your choice, then click Next.
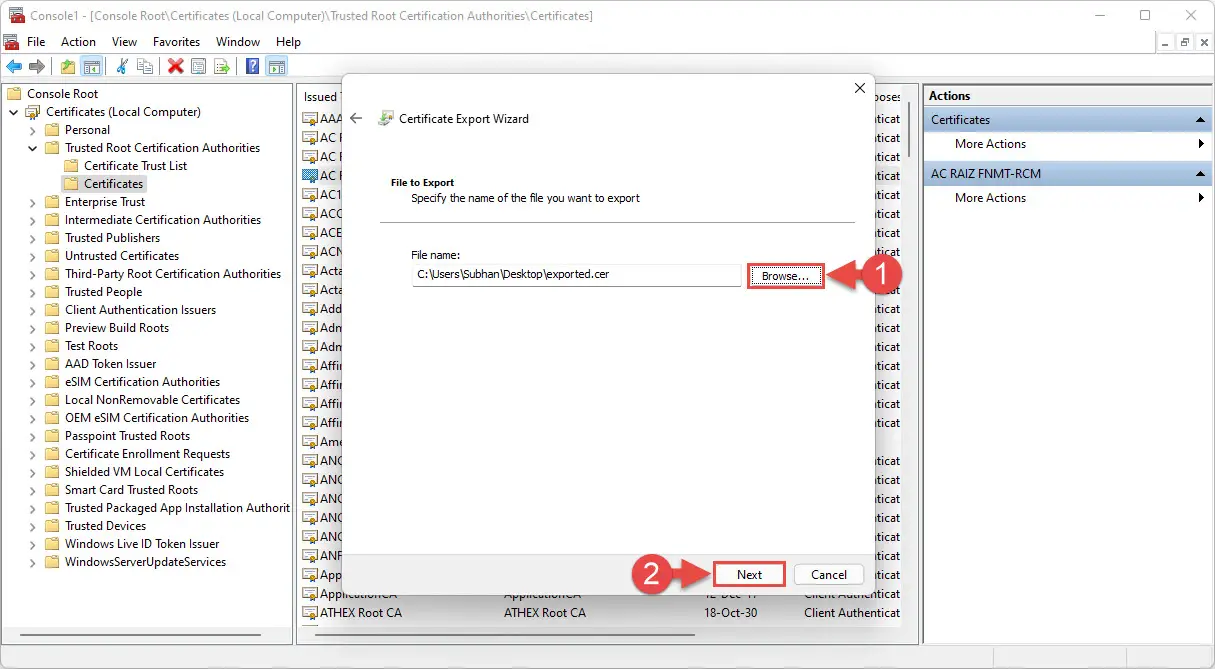
- On the final screen, confirm the settings and click Finish. Then click Ok on the confirmation dialog box.
You will now see the exported .cer file at the destination you chose in step 5. Copy this file onto a USB flash drive and plug it into the target system for the Root Certificate to be installed.
Import Root Certificates
Now paste the .cer file from the flash drive to anywhere with the OS and follow the steps below to import it.
- Open the Certificate Management Console on the source computer and navigate to the Certificates folder from the left pane.
- Right-click Certificates, expand All Tasks, and click Import from the context menu.
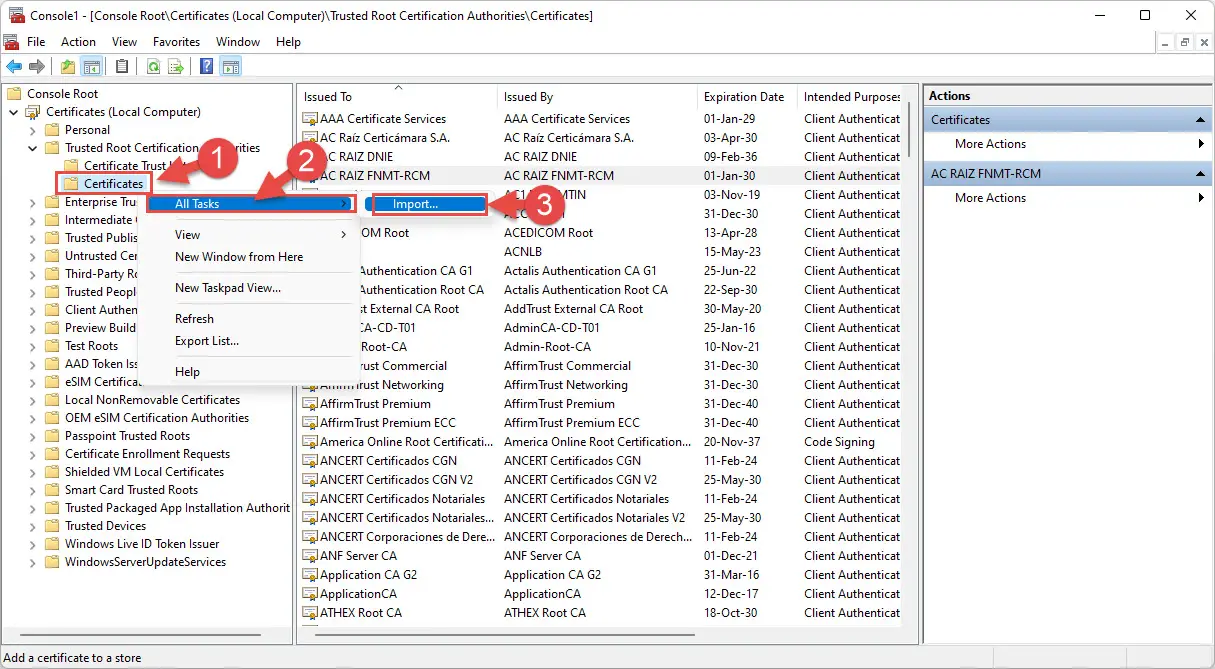
- On the welcome screen of Certificate Import Wizard, click Next.
- Click Browse on the next screen and select the .cer file which has been exported from another computer, then click Next.
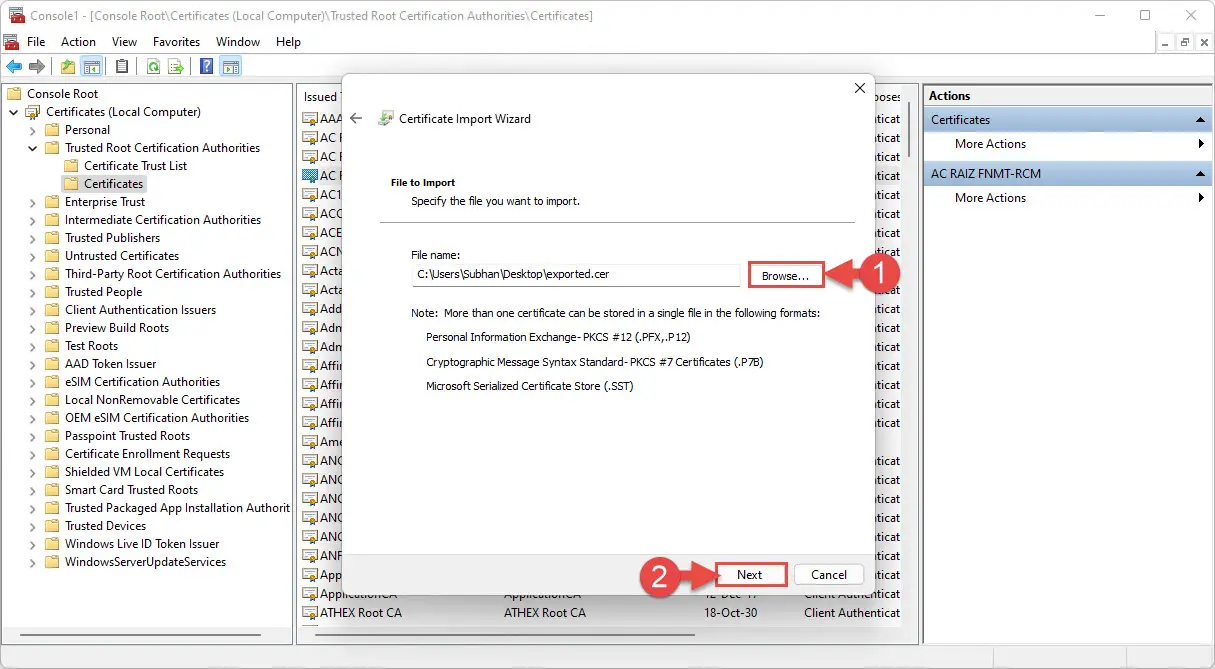
- Now select “Automatically select the certificate store based on the type of certificate” and click Next.
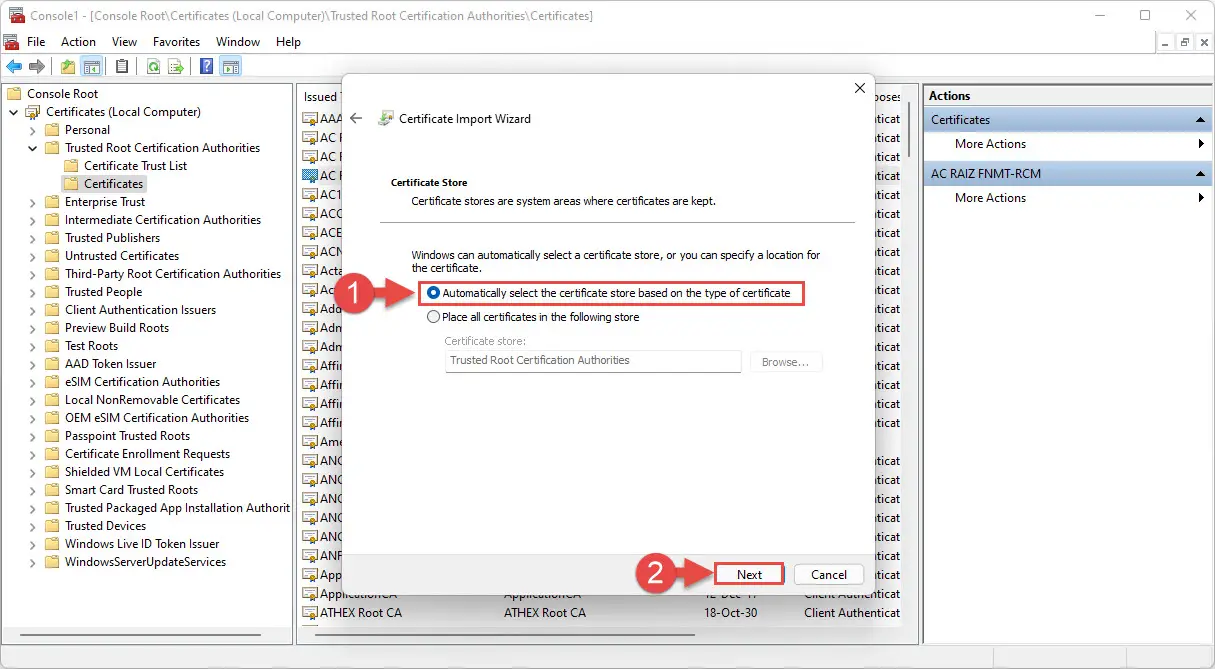
- On the final screen of the wizard, click Finish.
The certificate will now be updated on your computer which you can see through the Certificate Management Console.
Another way to install this exported certificate is directly through the .cer file. Double-click the .cer file to launch it. From the certificate, click Install Certificate.
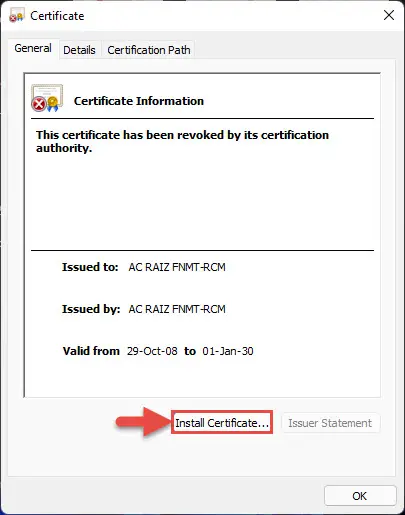
The Certificate Import Wizard will now be launched. From there, select Local Machine as the Store Location and then click Next.
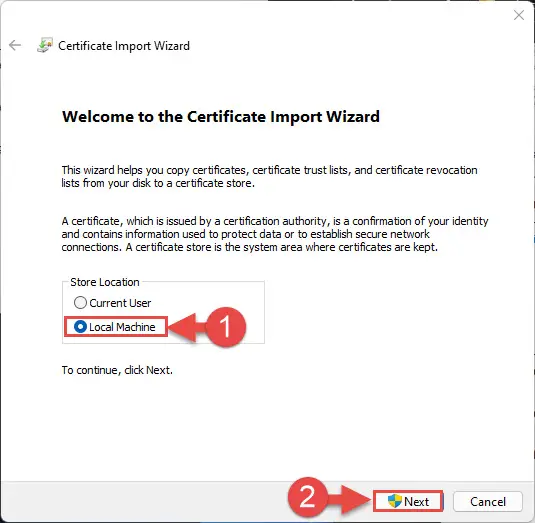
The remaining steps for importing the certificate are the same as we had discussed above.
From an SST File
Serialized Certificate Store Format (SST) files are certificates created directly from a CA. An SST file contains certificates used to authenticate the identities of websites, apps, and programs.
The SST file can be downloaded on demand from Microsoft using Windows Update so you may have all the latest certificates at once.
Let us show you how to download the file, and then discuss different methods to install it.
Download Latest Root Certificates for Windows
Downloading the latest SST file with the latest Root Certificates is easy. Begin by creating a new folder using File Explorer where the SST file will be stored. Then, launch the Command prompt with administrative privileges and navigate to the empty folder you have created using the command below.
cd /d "PathToFolder"This is where the SST file will be downloaded. Replace PathToFolder with the complete path of the empty folder, as in the example below.

Now run the following command to download the latest certificates in an SST file:
certutil.exe -generateSSTFromWU roots.sst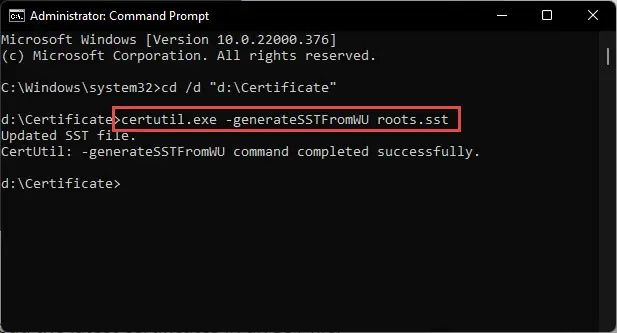
You will now find that the SST file has been downloaded. This file contains all the latest Root Certificates. You can now install them all at once, or one-by-one (only the ones that are required).
Install All Certificates using SST File
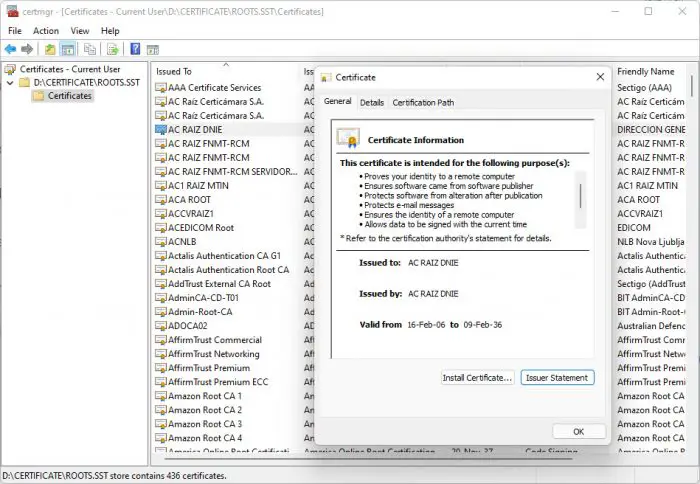
Once you open the downloaded roots.sst file, you will see that it holds many certificates. In our case, it holds 436 files. These can all be installed instantly using Windows PowerShell. Here is how:
- Open PowerShell with administrative privileges.
- Now run the following command while replacing CertPath with the complete path to the downloaded SST file:
$sstStore = ( Get-ChildItem -Path <em>CertPath</em>\roots.sst) - Next, paste the following command to import all the certificates on your PC:
$sstStore | Import-Certificate -CertStoreLocation Cert:\LocalMachine\Root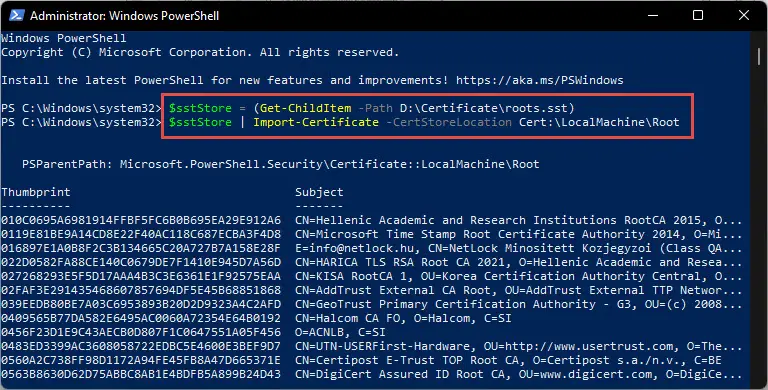
You will now find that the certificates have been imported to your machine from the downloaded SST file. You can verify this through the Certificate Management Console.
Install Individual Root Certificates using SST File
Another method to install the Root Certificates from an SST file is one-by-one. This may take a while, but the method can only be used when you wish to install specific certificates.
To do so, run the SST file by double-clicking on it. It will open in an identical console to MMC. From there, you can export a certificate and then import it on the local machine using the method we have already discussed above.
Alternatively, you can also double-click on the certificate and install it directly.
From an STL File
Serialized Certificate Trust List (STL) files also contain Root Certificates, but the file formatting is different than an SST file. Microsoft maintains an STL file you can download to obtain the latest Root Certificates for your Windows. The STL is updated twice a month.
Once downloaded, extract its content using a third-party compression/decompression tool. The extracted folder should now contain only one STL file. You may then proceed to import the file using Command Line Interface (CLI).
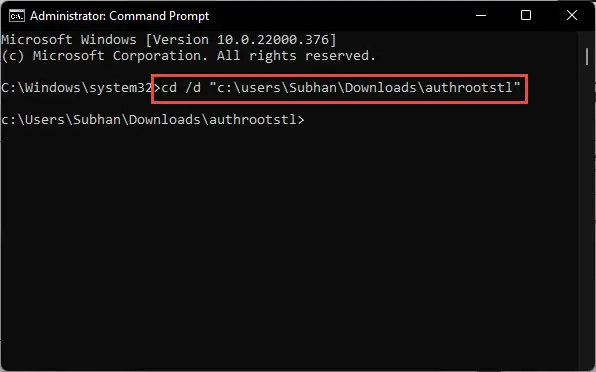
Launch the Command Prompt with administrative privileges and navigate to the extracted folder using the Change Directory command:
cd /d "PathToExtracted"Replace PathToExtracted with the complete path to the extracted folder, as in the following example:
Now paste the following command to import the certificates within the STL file.
certutil -addstore -f root authroot.stl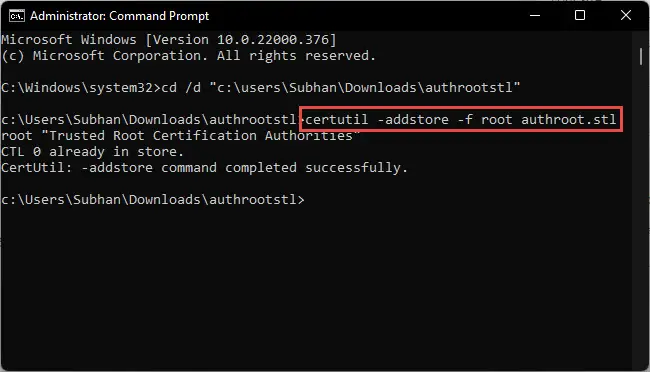
You can now confirm that the latest certificates have been installed using the Certificate Management Console.
Final Thoughts
Although it may not seem like it, a Root Certificate is essential for your daily work on a PC, as it is making authorization handshakes and trust with other components in the background while you continue with your work.
However, once a certificate has expired, it can be safely deleted, as it is no longer valid. That said, we recommend that you install a new, valid certificate in its place before removing the old one.


