The Windows operating system has different power modes for different scenarios. One of these modes is the “Hibernation Mode,” or “Hibernate.” This mode is usually available for laptops or battery-operated computers, and may not be available for desktops.
Hibernation is a state where the computer is asleep with near-to-none power consumption. When the computer wakes up from hibernation, it restores its last state so you can continue where you left off. Therefore, this state is useful if you are planning to return to your work but you know that you won’t be using our laptop for a few hours and won’t be able to charge it either.
The hibernate feature is available in both Windows 10 and Windows 11. This feature differs from the Sleep Mode and has pros and cons. This article gives detailes about the hibernation mode and how to enable it.
What is Hibernate in Windows
By definition, hibernate refers to the dormant state of a living creature. In the Windows world, it is more or less the same thing.
When you shut down your computer, any open windows and unsaved work is closed which does not resume when the computer is rebooted. However, if the computer is put to hibernate, all work is saved onto the hard drive and all hardware is switched off, saving maximum power.
When the computer is rebooted, the data stored on the hard drive is restored in an as-is condition, enabling you to continue your work where you last left it. You can put your computer to hibernate y closing the laptop’s lid, pressing the sleep or power button, or from the power menu in the Start menu. However, these need to be configured to perform this action.
Before we proceed forward to enable and configure hibernation mode, let us take a look at its advantages and disadvantages:
Advantages of Hibernation Mode
- Saves current state
When the computer is put to hibernate, all the current apps, functions, tasks, and windows are stored on the hard drive, including the data on the RAM. When the computer wakes up again, all the data is reverted to its respective locations, even if a file/folder was not saved. - Minimal power consumption
In hibernation mode, all the hardware, including the RAM and hard drive, are turned off. This saves your battery dissipation as if the computer was turned off.
Disadvantages of Hibernation Mode
- Takes longer to reboot
As compared to the sleeping state, the computer takes relatively longer to wake up from the hibernate state. - Associated issues
Users have often reported different kinds of issues associated with hibernation. Sometimes the hibernate mode does not save the state of the PC, or sometimes it does not wake up at all. However, depending upon the type of problem, there are solutions that you can try to address them. - Significant storage space
The hibernation mode creates a hiberfil.sys file on your hard drive, where the data is stored. This file can take up significant space on your PC.
Let us now take a look at how to enable hibernation on a Windows laptop.
Enable Hibernation Mode in Windows
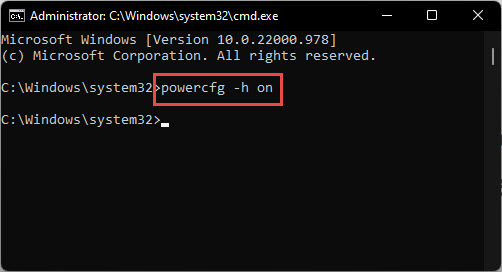
The hibernation mode is enabled in Windows by default, which is why you have a “hiberfil.sys” hidden file on your computers. However, if it has been disabled, you can re-enable it using these simple steps:
Hibernation will now be enabled on your computer. However, as we mentioned earlier, you must configure how and when to toggle it. We have discussed this in the sections below.
If you wish to check and confirm the state of hibernation on your computer, run this cmdlet:
powercfg /availablesleepstates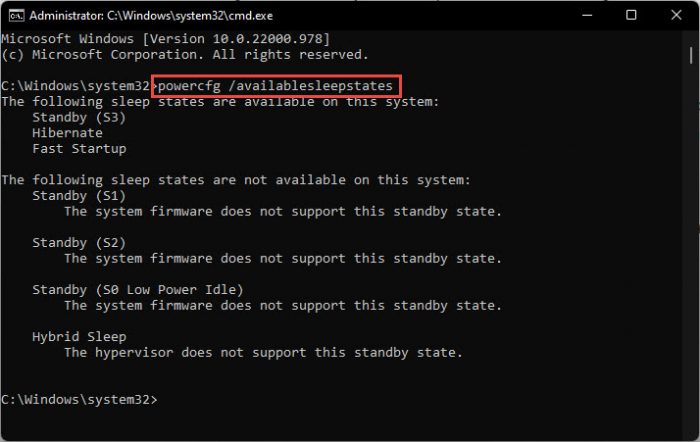
If you wish to disable hibernation in the future, simply run the following cmdlet in Command Prompt:
powercfg -h offOnce hibernation is enabled using the guide given above, you can now put your computer to hibernate from the power menu in the Start menu. However, you must first enable this option. Here is how to put the hibernate option in the Start menu:
-
Open the Power Options applet by typing in powercfg.cpl in the Run Command box.

Open Power Options applet -
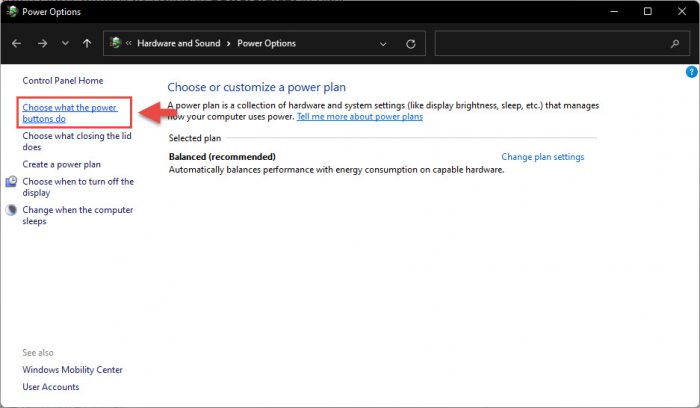
Now click “Choose what the power buttons do” on the left of the window.
Choose what the power buttons do -
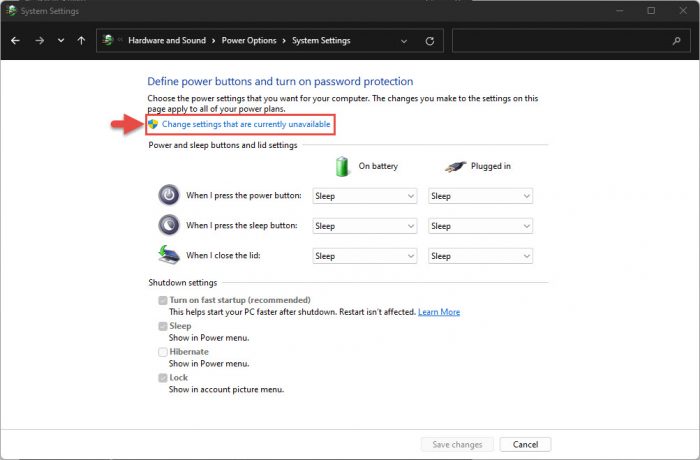
Now click “Change settings that are currently unavailable.”
Change unavailable settings -
Under Shutdown settings, check the box next to Hibernate and click Save changes.
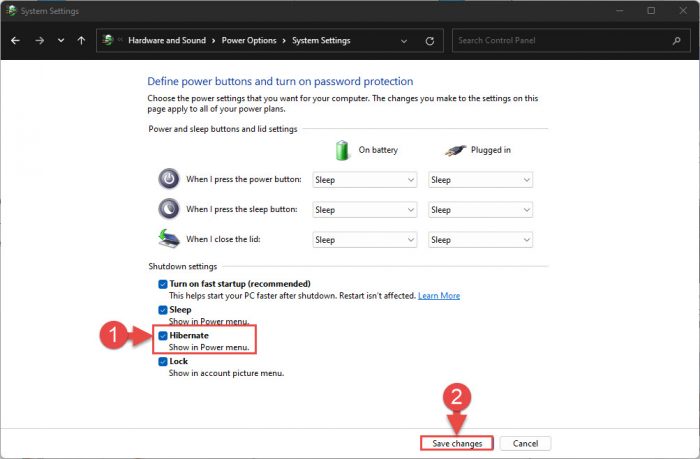
Add hibernate to Start menu
You shall now find the “Hibernate” option in the power menu inside the Start menu.

You can also configure your computer to enter hibernate mode by closing the laptop’s lid or by pressing the power or the sleep button. Not only that, you can change these actions for when the device is running on battery and when it is plugged in.
To configure these settings, perform these steps:
-
Open the Power Options applet by typing in powercfg.cpl in the Run Command box.

Open Power Options applet -
Now click “Choose what closing the lid does” on the left of the window.
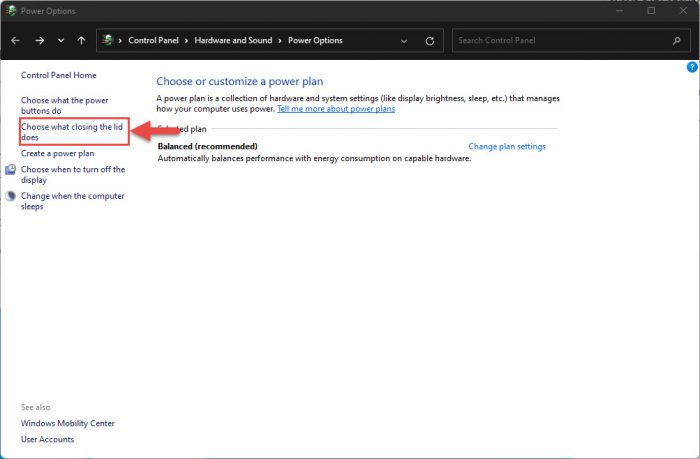
Choose what closing the lid does -
You will now see a bunch of drop-down menus in 2 columns (On battery, Plugged in) and 3 rows (Power button, Sleep button, and Closing the lid).
Expand the drop-down menu you want to toggle hibernation for and select Hibernate.

Select hibernate -
When done, click Save changes.
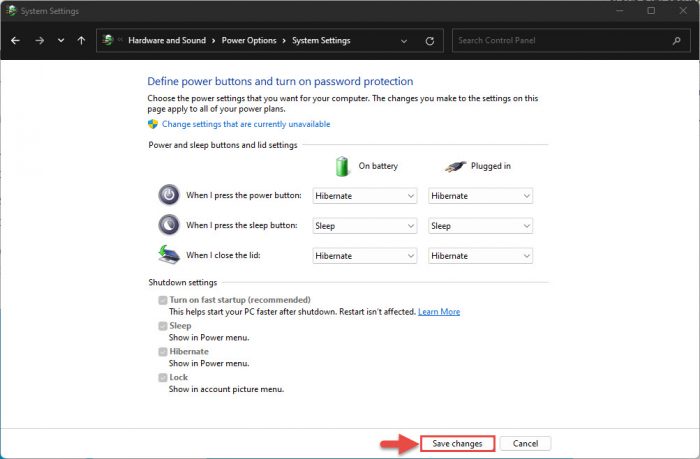
Apply changes
The computer will now hibernate when you perform the configured action, saving your battery and consuming less power.
When to Use Hibernate
With this information, we do not recommend that you use hibernation mode whenever you are about to leave your laptop.
This mode is idea for situations when you know that you are going to need to resume work later, won’t be accessing your laptop for several hours, and can’t charge it either.
However, if you do not need the opens tabs and windows later, you can simply shut it down. Or, if you plan on returning to your work in a few minutes, then putting the computer to sleep instead of hibernating would be a better choice, as it boots up significantly faster.


