Generally, when you install Windows 11, you do not worry about the output display settings right away. Both Windows 11 and Windows 10 are programmed to adjust these automatically according to your screen’s specifications and capabilities. You can manually adjust these settings according to your preferences to enhance your overall experience.
In this post, we will guide you on how to adjust your screen display resolution and scaling in Windows 11, and what each of these does.
Modern display screens can be segmented into millions of tiny dots. When combined, these dots give you entire screens that emit light in different colors, giving you all forms of shapes, images, text, and slideshows that move so fast that they are called videos! The density of these dots is defined by Dots Per Inch (DPI). This means, the higher the DPI, the sharper an image would be.
According to Microsoft, most modern displays have a DPI range from 75 to 110. The dots on the screen define the screen’s resolution. Meaning, the greater the screen resolution, the more the DPI value will be.
Another setting that can be managed in Windows is DPI scaling. In easier words, scaling is the zoom factor (in percentage) that enlarges your display. By default, the scaling is set to 100 percent. However, Windows adjusts these settings automatically by detecting external displays (if any) and the size of your display screen(s).
Adjusting the DPI scaling will keep your screen resolution unaffected. However, the elements on the screen will be enlarged by the scale factor. Having said that, not all applications adhere to the system’s default DPI scaling. For example, applications such as Adobe keep a static scaling factor at 100 percent, completely disregarding the scaling factor.
Let us now see how you can adjust these display settings according to your preferences.
How to Change Display Resolution in Windows 11
You can adjust the display resolution according to your preferences. It is not always necessary to keep the resolution at the maximum, rather at what your eyes are comfortable with. Maximum resolution means maximum sharpness and quality, but it might not be worth it if you strain your eyes.
Also, it may be possible that you have multiple display devices connected to your PC. In this case, you can adjust the resolution for each of them simultaneously. Let us show you how:
- Navigate to the following:
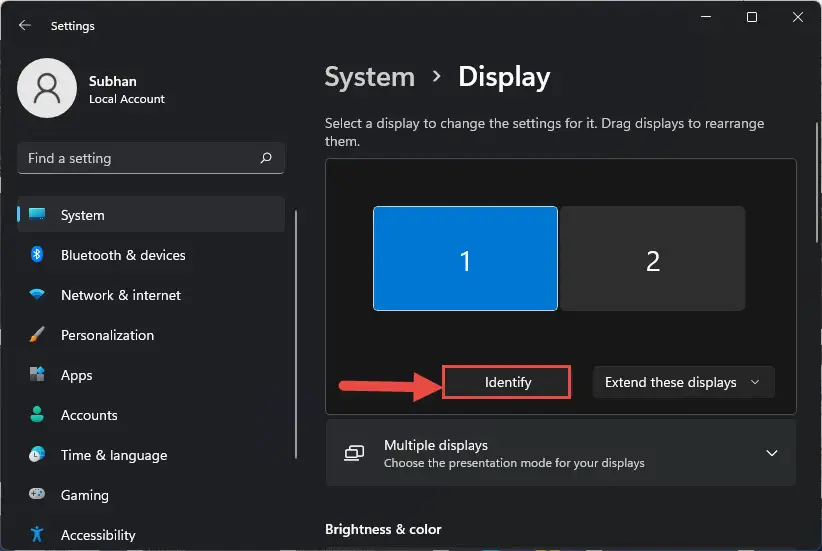
Settings >> System >> Display - If you have multiple displays connected, you will now see a window on the right side of the Settings app illustrating your display monitors with numbering. If you do not know which number is alloted to which display device, then click Identify. Each display device will now display a different number, but only for a few seconds. This will help you identify the selected (highlighted) display monitor and then adjust its screen resolution.
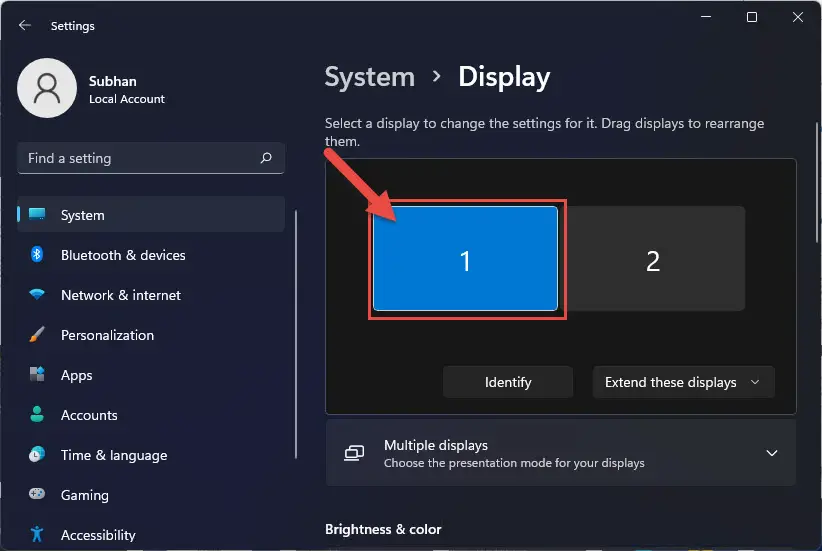
- Once you have identified the number for the display device you wish to change the resolution of, click on the corresponding number in the Display settings.
- Now that the display device has been selected, scroll down and look for Display Resolution. Click on the drop-down menu under it and select the resolution that you want to adjust to.
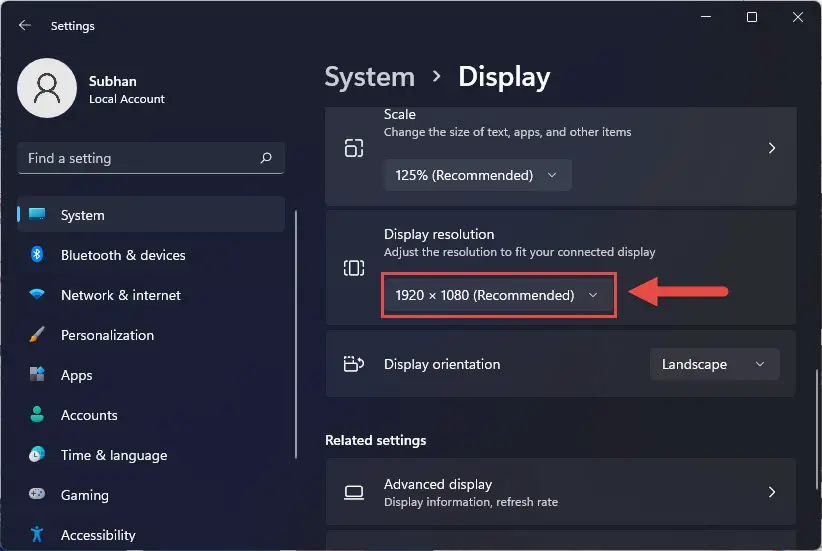
- If you are satisfied with the new resolution, click Keep changes. If not, click Revert and then select another option from the drop-down menu which is more to your liking.
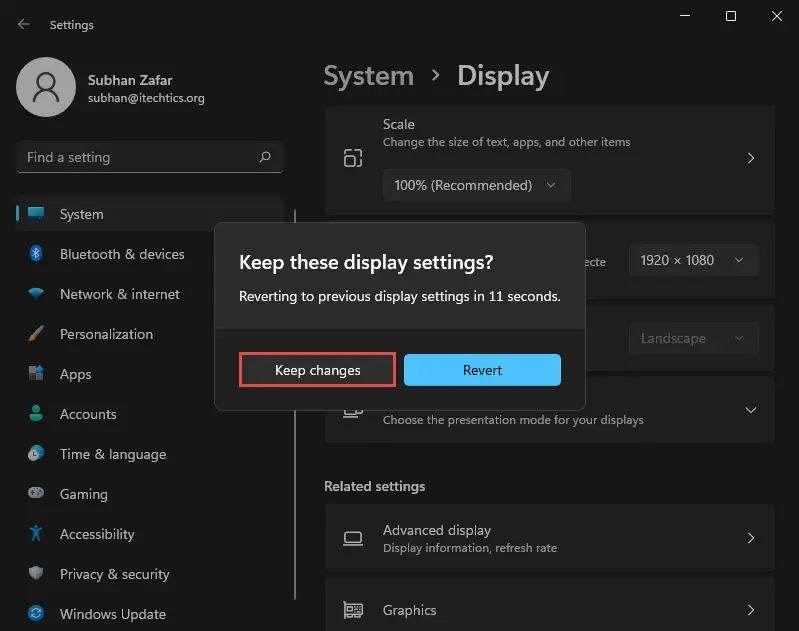
To change the screen resolution of the other display devices, select each one individually (step 3) and then pick a resolution for the drop-down menu (step 4). This will only change the screen resolution for the selected display device.
If your screen goes blank as soon as you select a new resolution, it is probably because the display device does not support that particular resolution. Don’t worry, as Windows has a timer to automatically revert the settings when the user is unable to confirm the new screen resolution.
How to Change Scaling for Specific Display in Windows 11
Scaling does not have much to do with the pixels on the display, but rather the size of it. It is a feature designed to adjust the size of the text, applications, and other elements within Windows for better ease of use.
If you are having trouble reading off of your screen, even if it is placed at a great distance directly from your eyes, here is how you can change its scaling to make the font and other elements bigger. You can change the scaling of each display device individually as well, just as we did for screen resolution.
- Navigate to the following:
Settings app >> System >> <a href="http://ms-settings:display">Display</a> - If you have multiple displays connected, you will now see a window on the right side of the Settings app illustrating your display monitors with numbering. If you do not know which number is alloted to which display device, then click Identify. Each display device will now display a different number, but only for a few seconds. This will help you identify the selected (highlighted) display monitor and then adjust its screen resolution.

- Once you have identified the number for the display device you wish to change the resolution of, click on the corresponding number in the Display settings.

- Now scroll down and select the preconfigured scaling option from the drop-down menu under Scale.

You will now notice that the size of the elements (including the Settings app) has changed.
Note that changing either the resolution or scaling of one display monitor will not affect the other. Therefore, if you wish to change the settings of all your display devices, you will need to select each one and then adjust the display settings.
How to Change Scaling for All Displays in Windows 11 from Settings App
You can also input a custom scaling percentage anywhere between 100% and 500%. However, using this option will change the scaling of all display devices at once, setting them to the same scale factor. It will also require you to sign out and log back into your user account.
If you want to change the display scaling of all the display devices at once, follow these steps:
- Navigate to the following:
Settings app >> System >> <a href="http://ms-settings:display">Display</a> - Now click on Scale and then input the scaling percentage in the text field below Custom Scaling.

- Once entered, click on the “tick” box beside it. You will now be given an option to sign out so the changes can take effect. If you want to proceed with the changes, click Sign out now.
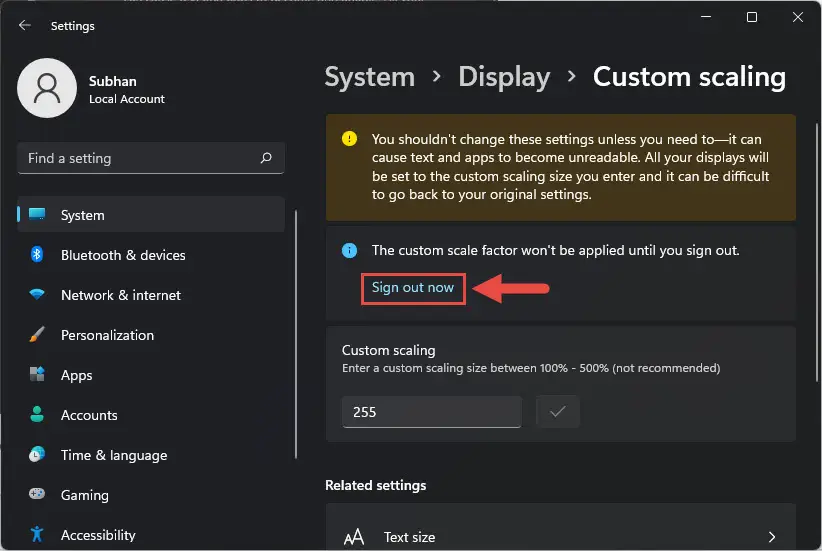
You will now be signed out of your user account and the changes will now take effect. If you are not happy with the results, you can always change the custom scaling percentage.
However, if you have entered a scaling factor but do not want to proceed with the changes, you can still opt-out of it. However, a sign-out would still be required. To discard the custom scaling changes, go back to the Display settings and click Turn off custom scaling and sign out under Scale & layout.
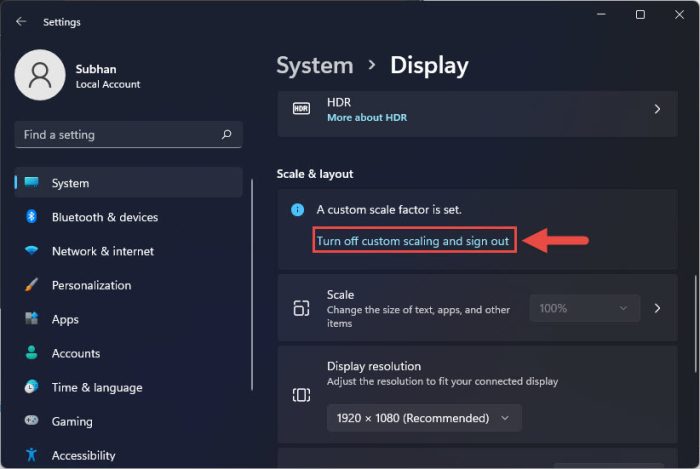
This will sign you out of your user account, but the custom scaling changes will not occur as everything will be as they were.
How to Change Scaling for All Displays in Windows 11 from Windows Registry
The Settings app is the best practice for managing your display settings. However, if you find that the options are greyed out or want to apply the settings on multiple computers, you can always change your display scaling using the Windows Registry Editor.
The method we are about to discuss changes the display scaling factor of all the connected display devices, therefore this method cannot be used to change the setting of any specific display device. It also requires you to sign out of your user account.
Moreover, this method involves changes within the Windows Registry. Before we proceed, we suggest that you create a system restore point since any wrongful manipulation could harm your operating system.
If you want to proceed with changing your scaling factor using the Windows Registry, here is how:
- Open the Registry Editor by typing in regedit in Run.
- Now navigate to the following location from the left pane:
Computer >> HKEY_ CURRENT_USER >> Control Panel >> Desktop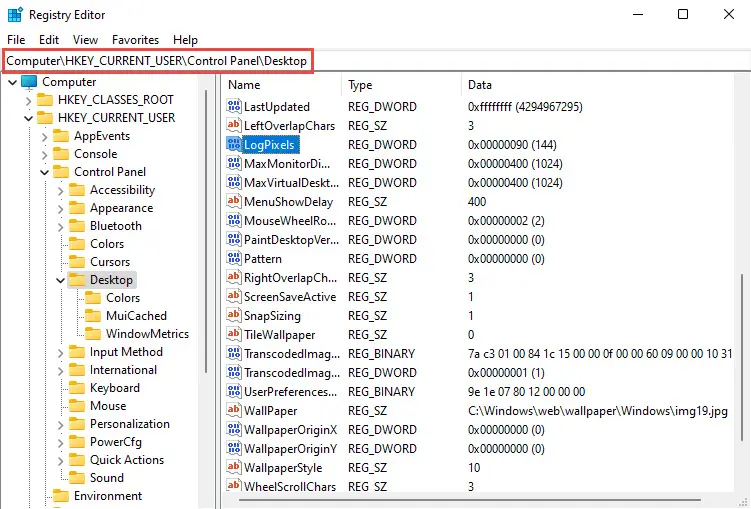
- Now double-click LogPixels in the right pane. If you do not find value in this location, you will have to create it by right-clicking Desktop, then expand New from the context menu and select DWORD (32-Bit) Value. Name this DWORD as LogPixels.
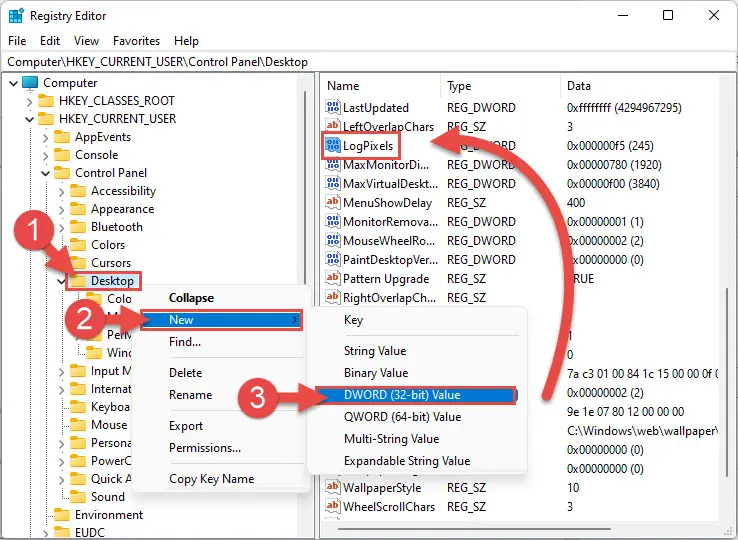
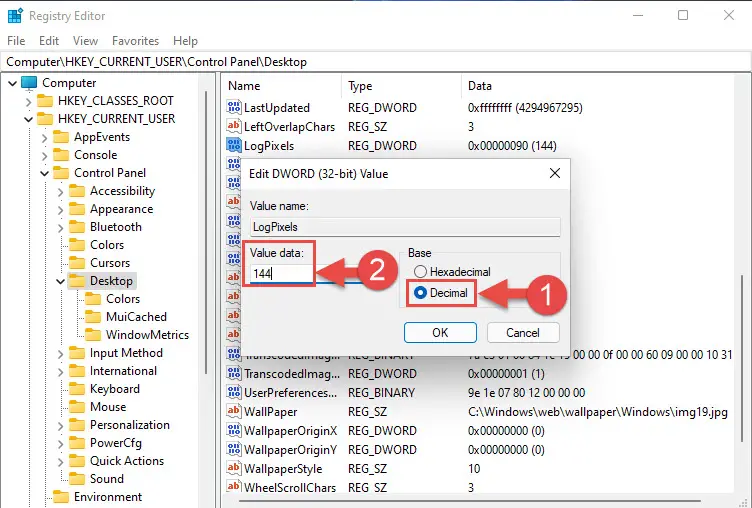
- In the Edit DWORD window, select the Decimal radio button under Base, and then enter one of the following Value Data from the given table in the text field, according to the DPI scaling that you want:
| DPI Scaling Level | Value data |
|---|---|
| 100% | 96 |
| 125% | 120 |
| 150% | 144 |
| 200% | 192 |
| 250% | 240 |
| 300% | 288 |
| 325% | 312 |
| 350% | 336 |
| 400% | 384 |
| 450% | 432 |
| 500% | 480 |
- Click OK to close the Edit DWORD window.
- Now double-click Win8DpiScaling value in the right pane. If you do not find value in this location, you will have to create it by right-clicking Desktop, then expand New from the context menu and select DWORD (32-Bit) Value. Name this DWORD as Win8DpiScaling.

- In the Edit DWORD window, enter the Value Data as 1 to enable custom scaling, and then click OK.

- Now close the Registry Editor and sign out of your account. Then, sign back in and see if the display scaling changes occur.
You can always change the value of LogPixels to change the scaling factor for your display(s) from the given table above. However, a sign-out will be required each time. You can also change the value of Win8DpiScaling to 0 to turn off custom scaling altogether.
How to Restore Default Display Scaling in Windows 11
Once you have messed around with your display scaling settings, it can be tricky to restore the default settings across all of your display devices. For that, here is a shortcut that will restore the value of the Windows Registry to default.
- Paste the following text into Notepad:
Windows Registry Editor Version 5.00
[HKEY_CURRENT_USER\Control Panel\Desktop]
"LogPixels"=dword:00000096
"Win8DpiScaling"=dword:00000000
[-HKEY_CURRENT_USER\Control Panel\Desktop\PerMonitorSettings]
[HKEY_CURRENT_USER\Control Panel\Desktop\WindowMetrics]
"AppliedDPI"=dword:00000096
- Now click File and then click Save as from the top menu.
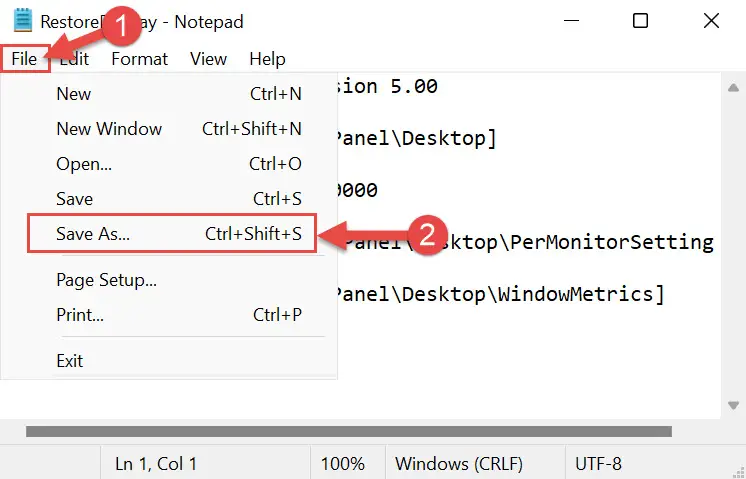
- From the Save as window, select Save as type as All Files, then enter a name for the file ending with .reg. Click Save when done.

- Now double-click the .reg file that you just saved to run it. If prompted with a UAC, click Yes.
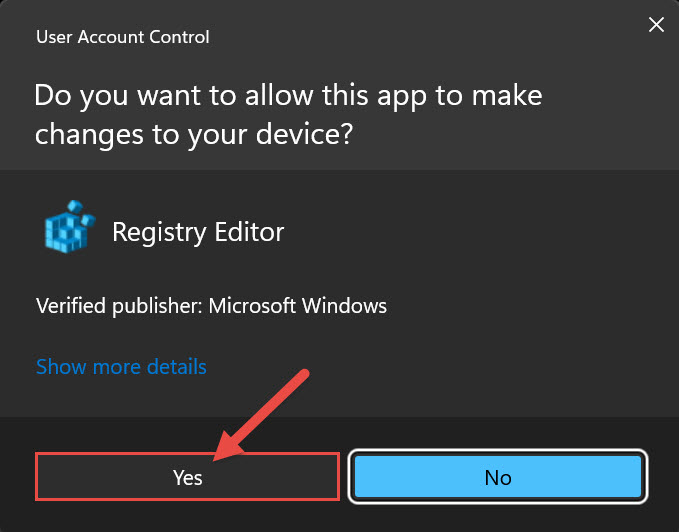
- In the confirmation dialog box, click Yes again.

- Then click OK on the next window to close it.

- Sign out and then sign back in for the changes to occur.
You will now notice that the display scaling across all connected display devices has been restored to their default values.
Conclusion
Although we have discussed adjustments to display resolution and DPI scaling for Windows 11, these methods will also work for Windows 10 as both operating systems share the same core.
Learn how to optimize resolution, scaling, and layout in Windows 10.
Having a comfortable view of the screen is essential for maximum productivity. No one would like the text so little that they have to strain their eyes just to comprehend it. Therefore, we suggest that you tweak your display settings across all display devices so that they are optimized for your eye’s comfort.
If you are facing discomfort in reading text or having difficulty viewing the context, you can reduce the screen resolution, or alternatively, increase the DPI scaling factor. Moreover, you may also have to increase your DPI scaling when the screen’s resolution is increased, to maintain the size of the elements.

