If you are used to working on your laptop in a dark environment, turning on your keyboard light can be a great way to see the keyboard even when there is no light. Backlit keyboard is a special feature that comes in many laptops but not all.
While laptop manufacturers make it easy to turn keyboard light on or off, many users are not even aware of this feature. In this article, we will discuss some easy ways to turn on the keyboard light whenever you need it. We will also discuss what to do if the backlit keyboard does not light up.

Turn on keyboard light on the laptop
Normally, there is a keyboard shortcut for turning on the keyboard light on a backlit enabled keyboard. You may find the keyboard shortcut on the function keys from F1 to F12. Some manufacturers use the spacebar for this purpose. You will find the key with the following sign on it:

Press the button with the backlight symbol to turn on the keyboard light. You might need to press the Fn key and then press the key mentioned above.
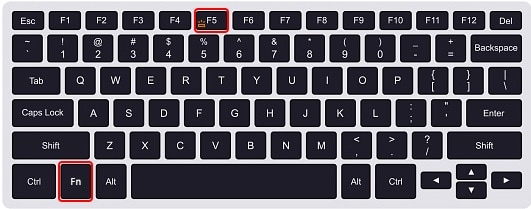
You can also adjust the backlit keyboard’s brightness using the very same keys. Just press it repeatedly to circle between the different preset brightness levels. However, this is only applicable if your laptop supports it. The backlight also turns off after clicking it once after achieving full brightness.
Some laptops might have 2 different buttons to increase and decrease the keyboard light brightness. Press the associated button to increase or decrease its brightness. To turn it off, simply reduce the brightness to the minimum.

Enable backlit keyboard functionality on different laptops
It is not always clear which button on the keyboard is a secondary for keyboard backlight as it varies between the different manufacturers. Here is a list of possible keys that may trigger the keyboard’s backlight according to different manufacturers.
- Dell: Alt+F10, Fn+F10, F10, Fn+F6, Fn+Right Arrow
- HP: Fn+F5, Fn+F9, Fn+F11
- Asus: Fn+F3, Fn+F4, Fn+F5
- Lenovo: Fn+Space Bar
- Mac: F5, F6
- Acer: Fn+F9
Fix keyboard backlight in Windows 10
If your keyboard light is not working, here are some possible reasons and solutions:
Ensure the feature is supported
First, you need to ensure whether your laptop has a backlit feature at all. If you previously had it enabled and can’t use it anymore, that is sufficient to know that your laptop has that feature.
Another way to check whether your laptop has the backlight feature is to look for the associated button on the keyboard itself. If you find an image like the one below on any key on the keyboard, it means that your laptop has the feature.

The image would probably be as a secondary function of the button, such as alongside the arrow key as in the image below.

Another way to check if your laptop has the keyboard backlight feature is to check for the settings in BIOS. Usually, the associated settings can be found in the following path within BIOS:
BIOS -> System Configuration -> Keyboard Illumination
If you do find this setting, it means that your laptop has the feature built-in.
Enable keyboard backlight through BIOS
Now that you know that your laptop does have that feature, you can enable it. We shall start by enabling the feature through the BIOS. Navigate to the following location by accessing BIOS on startup:
BIOS -> System Configuration -> Keyboard Illumination
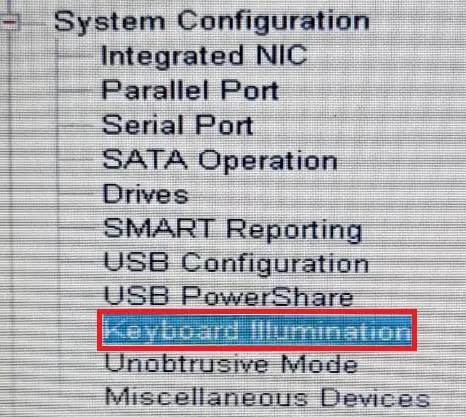
You should now be able to see the settings for Keyboard Illumination on the right side. It also elaborates what each of the settings would do to the backlight, and the secondary method to manage it directly from the keyboard as well.
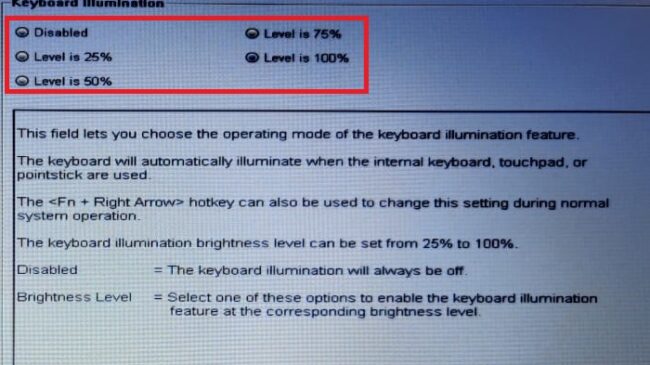
Select your desired brightness level from the radio buttons at the top and click on Apply. Once done, click on Exit and wait for the system to reboot. Notice that the keyboard should now be backlit. If not, continue down the article for further troubleshooting.
Run the keyboard troubleshooter on Windows 10
Thankfully, Windows 10 comes with a built-in troubleshooter that scans the selected item and informs the user if any necessary actions need to be taken in order to fix an issue.
- Navigate to the following location:
Start Menu -> Settings -> Update and security -> Troubleshoot -> Additional troubleshooters - Now click on Keyboard and then click Run the troubleshooter.

- The troubleshooter will now be executed. Wait for it to finish and perform any action recommended.
- Restart the computer.
If you are still unable to get your keyboard’s backlight to turn on, continue to the next step.
Update Keyboard Driver
An outdated keyboard driver can also cause the backlight to not work. A simple solution is to ensure that the latest driver is installed. Follow the steps below to update your driver.
- Type in devmgmt.msc in Run to launch the Device Manager.

- Expand the Keyboard and then right-click on the default keyboard. Click on Update driver from the context menu.

- Click on Search automatically for the driver from the update wizard. Ensure that you have a live internet connection at this point.
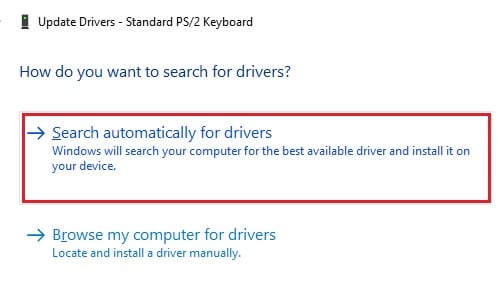
- The wizard will now search for a new driver, if available, and then install it. Reboot the computer once it is finished.
The keyboard should now be backlit. If it is still not, there is a chance that there might be a problem with the hardware. Try getting a new keyboard installed by visiting the manufacturer’s website.
You can also install and update keyboard drivers using third party software.
Closing words
A well-lit keyboard can be enough to get you through the dark times, literally! It is a great feature to have on a laptop, as well as other keyboards. It allows an individual to work in the dark while others around you can fall asleep with the lights off. Moreover, it does not have you havering your fingers over the keys just to see which key is which.
Do you have a backlit keyboard on your laptop? Do you use the keyboard light feature intelligently? Tell us about your usage in the comments below.

