Google’s imaging format, known as WEBP, losslessly compresses an image while maintaining its quality and reducing it in size, making your website faster to load. However, it has been quite a while since Google launched their imaging format but has not picked up on the market quite as much.
Basic applications and tools, like the Windows Photos app, do not support this format. So if you have a WEBP image saved on your computer, it is likely that you must view it in the Chrome browser, download another app that supports this format, or convert it into a standard imaging format, like JPG or PNG.
Several websites explicitly use this format to compress the image to optimize their website, since a WEBP image is 26% smaller than a PNG image, and 25%-34% smaller than a JPG image. If you access such websites on a browser that supports WEBP images, then the image will be saved in WEBP format by default. However, when you try and save the same image using a browser that does not support WEBP format, it will either be saved in PNG or JPG by default.
This is because a website needs to provide an alternative type of image for every WEBP image since all browsers currently do not support the format.
| WEBP Supported Browsers | WEBP Not Supported Browsers |
| Google Chrome | Safari |
| Vivaldi | Mozilla Firefox |
| Opera | Internet Explorer |
| Microsoft Edge |
This article discusses several ways you can save a WEBP image as a JPG or PNG image, or convert any existing WEBP images. Continue along with this post to learn how to do so.
Save WEBP Images as JPG and PNG
Using extension on Google Chrome
If you normally use Google Chrome as your default web browser, then a simple extension can assist to solve your problem.
Save Image As PNG is a Chrome extension that you can add to your browser and save images directly in PNG format. It adds a “Save Image as PNG” button to the context menu when right-clicking on an image in Chrome browser.
Here is how to install Save Image As PNG browser extension in Google Chrome and use it:
- Open the Save Image As PNG page in Chrome Web Store and click Add to Chrome.

- On the confirmation popup, click Add extension.

- The extension will now be installed within a few seconds. You can now begin saving WEBP images as PNG by right-clicking the image and then selecting Save image as PNG.

Manually save the image as PNG or JPG
Another way to save a WEBP image in ONG for JPG format is by manually changing the file type. It’s a simple process but many may consider it an additional hassle that could be avoided. If you still want to learn, here is how to do it.
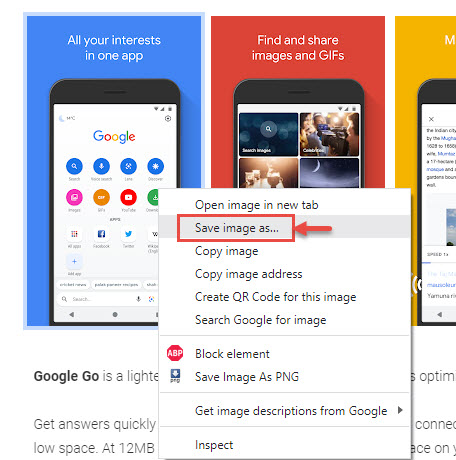
- Right-click on the WEBP image and click Save image as from the context menu.
- In the new pop-up window, select Save as type to All files from the drop-down menu. Next, add either “.png” or “.jpg” file extension at the end of the name of the image you are about to save to save it in PNG or JPG format, respectively. Click Save when you are done.
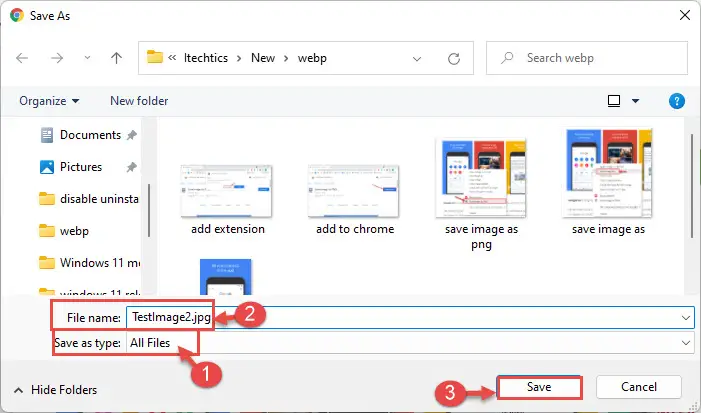
You can now open the image in any tool supporting JPG or PNG file format.
Use browser not supporting WEBP images
As we mentioned earlier, not all web browsers support WEBP image formatting right now. Therefore, the website using the WEBP formats will also have either PNG or JPG images ready to load when it is accessed from a browser that does not support WEBP.
Therefore, saving an image whilst using a browser that does not support WEBP formatting will save the image in either PNG or JPG by default.
Here is a quick tutorial on where you can use Mozilla Firefox as your unsupported web browser:
- Launch a browser that does not support WEBP format and open the website that you wish to save the image from but was available in WEBP format.
- Next, right-click the image and click Save image as.

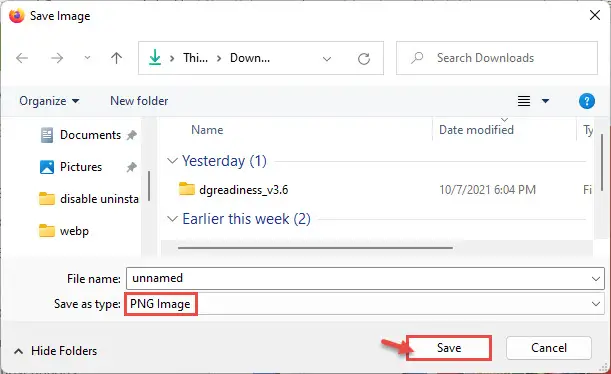
- You will notice that the File type is already in either PNG or JPG format. Select the location where you wish to save the image and click Save.
Through a URL trick
You can also save a WEBP image as either PNG or JPG file (whichever the website provides) through a simple URL manipulation. However, this method involves a few additional steps.
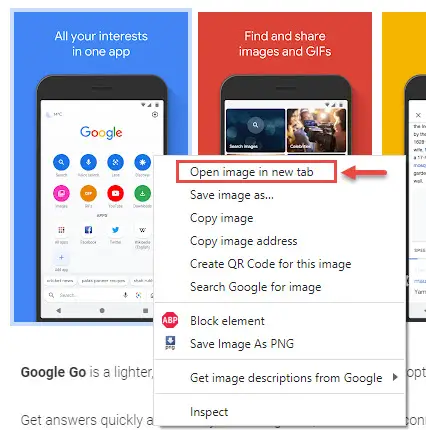
- Right-click on the WEBP image and click Open image in new tab from the context menu.
- The image will now be displayed in a new tab within the browser. You will notice that the URL in this tab is ending with “-rw.” Remove the -rw from the URL and press Enter.
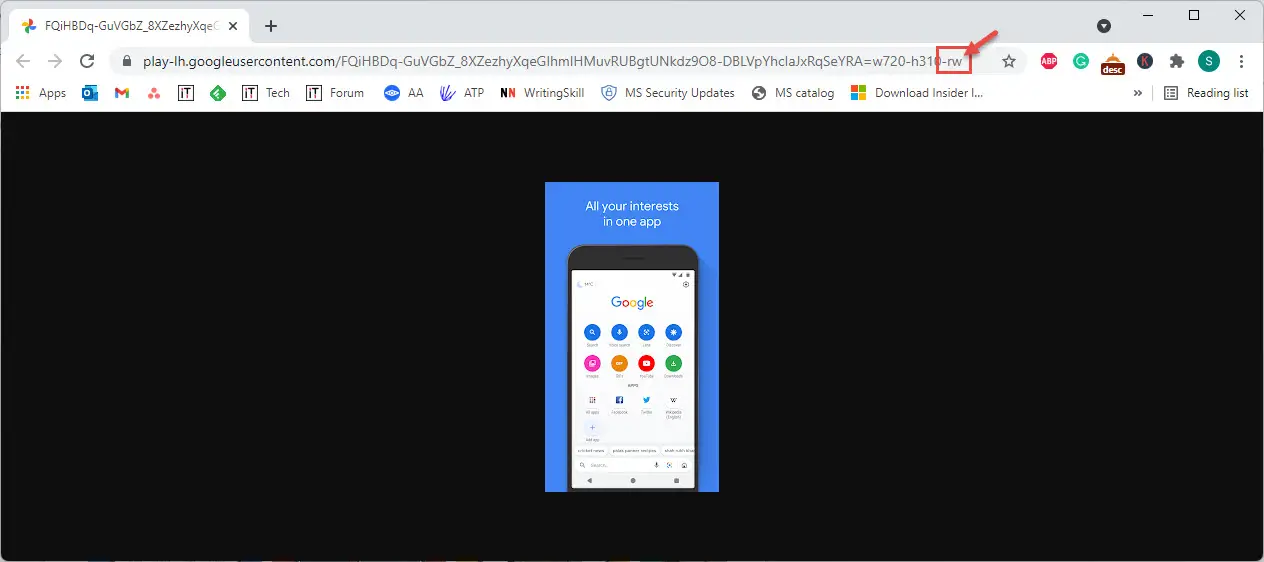
- Now right-click the mage in the new tab and click Save image as from the context menu.
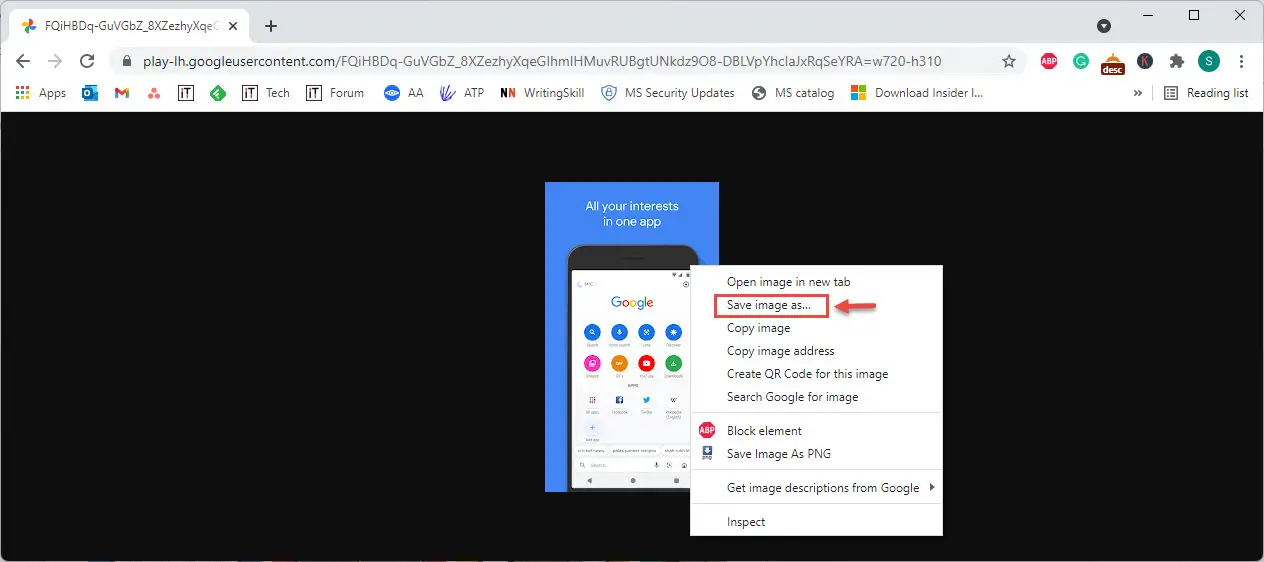
- You will now see that the File type has been changed from WEBP to either PNG or JPG. Browse to a location and click Save.

These are a few methods to save a WEBP image in PNG or JPG formats. Let us now see how you can convert the existing WEBP images to either PNG or JPG format.
Convert WEBP Images to JPG and PNG
Using Microsoft Paint app
Microsoft Windows 10 and 11 both come with a pre-installed Paint app. Since the app can be used to save an image in PNG and JPG formats, it can be used as a simple converter. Here is how:
- Right-click on the saved WEBP image and expand Open with from the context menu.

- On the pop-up screen, select the Paint app and then click Ok.

- When the Paint app opens, click File from the menu at the top, expand Save as, and then choose the format you want to save the image in.
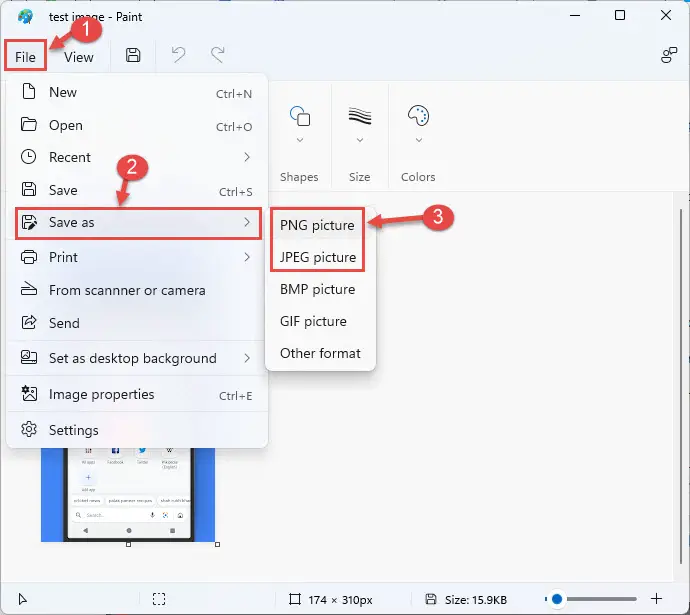
- Next, you will notice that the File type has already been changed. Now browse to the location where you want to save the image and click Save.

Using the Command Line
An advanced way to convert your WEBP images to PNG or JPG formats is by using a Command-line tool by Google.
Yes, Google itself has introduced tools so that users can convert their WEBP images into more standardized ones.
- To begin, download the tool by clicking on your respective operating system below:
- Once downloaded, extract the content to an empty folder.
- Now open Command Prompt with administrative privileges and use the following command to navigate to the “Bin” subfolder within the extracted folder.
cd /d CompletePathToBinExtractedFolder
Replace CompletePathToBinExtractedFolder with the complete path to the “Bin” folder where you have extracted Google’s tool. Here is our example: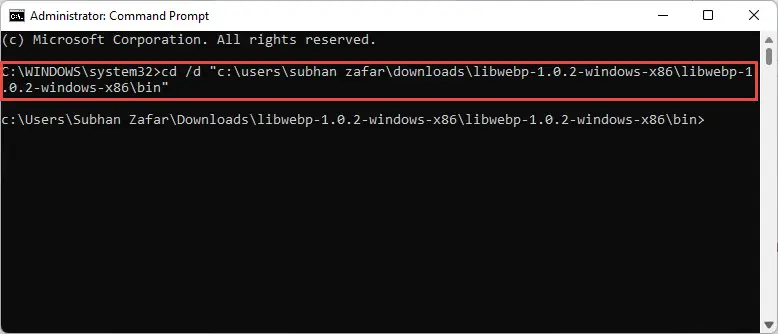
- Now you can convert your existing WEBP image to either PNG or JPG using the command below:
dwebp.exe "<em>PathToWEBPImage</em>" -o <em>NameOfConvertedImage.FileType</em>
You must replace PathToWEBPImage with the complete path to the image that you want to convert, NameOfConvertedImage with the name for the new image that will be created after conversion, and FileType with either PNG or JPG. You can understand the command better with the following example: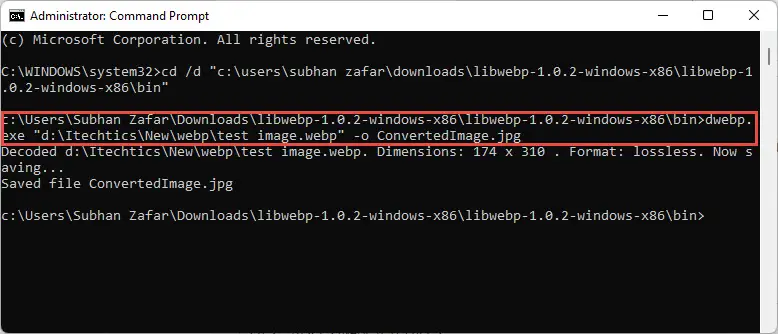
- You can now find the converted image within the Bin subfolder in the extracted folder.
Through online conversion tool
You can also convert your WEBP images into different formats using free online conversion tools. All you need to do is upload the file and choose an output file type, and that’s it! Some websites also offer additional settings such as image quality, compression ratio, DPI, etc.
We have listed down a few top picks where you can upload your WEBP images and convert them into a few easy steps:
Frequently Asked Questions
How do I disable Chrome to save images as WEBP?
Install User-Agent Switcher Chrome extension so a website will think that Chrome is a browser that does not support WEBP images, and you can easily save images as JPG/PNG by clicking Save as by right-clicking the image.
Is WEBP better than JPG and PNG?
Since WEBP can compress an image’s data without compromising its quality, it is considered better than JPG and PNG with faster loading times. However, it has not caught on and many standard imaging tools do not yet support WEBP formatting.
Are online image converters safe?
Most of them usually are. However, it is recommended that you do not upload images containing sensitive data, such as Personal Identification Information, financial details, etc.


