Is your laptop running Windows 10 and want to extend the battery life of the laptop? You can configure a feature called Battery Saver Mode in Windows 10.
Windows 10 battery saver can be helpful when you want to stretch the battery usage for a longer period of time. It is similar to Battery Saver Mode in Android and Low Power Mode on iPhone.
This article will explain how to turn on or turn off the battery saver in Windows 10 to save yourself the trouble of running out of battery unexpectedly.
What is Battery Saver mode?
Battery Saver mode is a feature offered by Windows 10 that will make some adjustments in Windows settings in order to extend its battery life. Windows will limit the background app activity, and some features might get disabled. The screen brightness will also be adjusted accordingly. Windows does this to save precious battery life.
Usually, Battery saver mode is automatically enabled when your battery percentage goes down below a certain level (The default is 20%). But you can enable battery saver mode at any time, and adjust the percentage level after which battery saver turns on. Read further to learn about these settings
Difference between battery saver and power saver modes
It is important to know that “Battery Saver mode” and “Power Saver mode” are NOT the same. These are two distinct features that perform different jobs, and Windows 10 offers both options.
As we have already discussed, the battery saver is a setting that will put different restrictions on the system like reducing the brightness, disabling background apps, etc.
The battery saver, when enabled, will not change any Operating System level setting like change sleep, hibernation and screen time, turn off hard drives, etc.
Power Saver is a power profile that will change Operating System level settings like when to turn off the display, put the computer to sleep or hibernate, and other settings like USB settings, graphics settings, multimedia settings, and change battery level settings (reserve, low, critical, etc.).
Turn ON/OFF Battery Saver mode using Windows 10 Settings
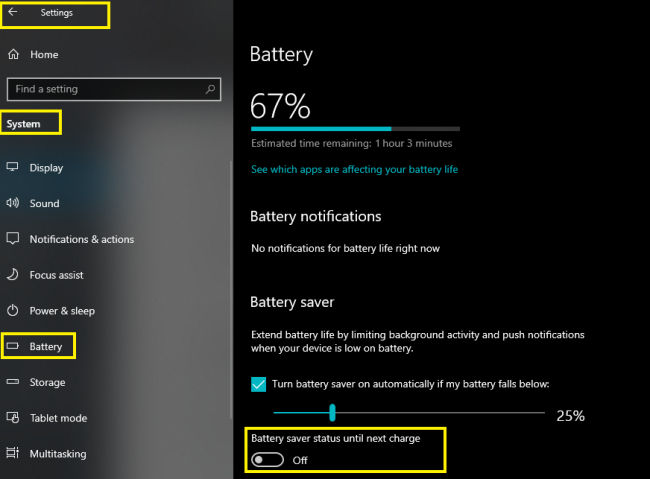
You can use Windows 10 Settings to turn Battery Saver mode ON or OFF and alter the settings for it. Follow these steps:
- Go to Windows Settings (Windows key + i) –> System –> Battery
- In the right-hand pane, find the option “Battery saver status until next recharge” and toggle it ON to enable or turn ON battery saver mode.
- If you want to disable or turn off the battery savings mode, simply toggle Battery saver status until the next change to OFF.

Note: If your Laptop is plugged in with a charger, you will not be able to turn ON battery saver mode and this “Toggle ON” option will be greyed out.
Configure more options in battery saver mode
In the same settings window as mentioned in the above section, you can do the following:
- View a list of apps that affect your battery life.
- You can turn on the battery saver automatically when the battery reaches a certain level. Look for the option Turn battery saver on automatically if my battery falls below: and under the bar shown below, select the percentage level. For example, if you select 25%, then the battery saver mode will always be automatically enabled as soon your Windows reaches 25% battery level.
- If you don’t want to lower screen brightness when the battery saver is activated, simply uncheck Lower screen brightness while in the battery saver setting.
The benefit of using this method is that you can configure a lot of settings of power saver mode in addition to enabling and disabling it.
Quickly Turn ON/OFF Battery Saver mode using Action Center
A quick way to turn ON Battery saver mode is by using Action center. Follow the steps below:
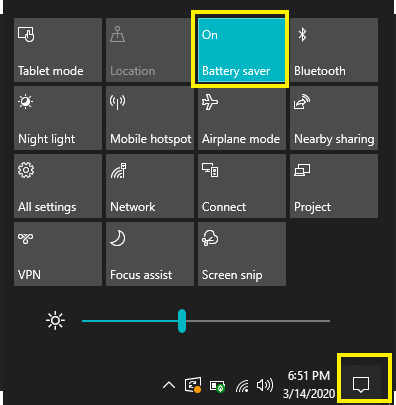
- Open Action Center (Windows key + a) by clicking the right-most icon of the system tray.
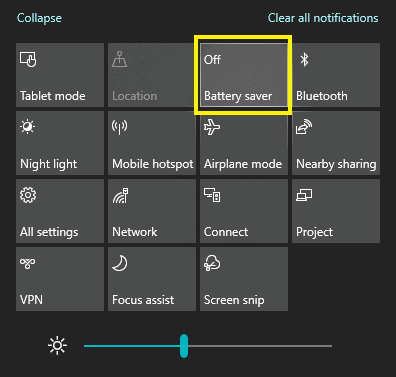
- Click on Expand
- Look for the Battery saver tile
- Click once to turn on the battery saver mode.
- Click again to turn off the battery saver mode.


Note: If your Laptop is plugged in with a charger, you will not be able to turn ON battery saver mode and the battery saver tile will be grayed out even in the action center.
The benefit of this method is that you can quickly enable or disable power saver mode in Windows 10.
Turn ON/OFF Battery Saving Mode using the Battery icon in the system tray
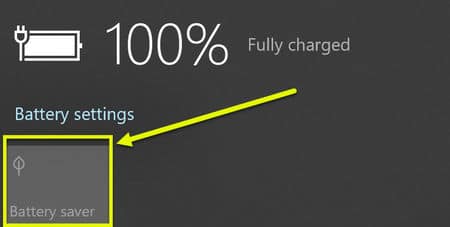
Another quick way to enable or disable the battery saver mode is to use the battery icon in the system tray. Just click on the battery icon and select Battery saver.

Conclusion
I use a mixture of battery saver mode and Power Saver profile. Let me tell you my configuration which gives me at least 2+ hours of additional battery backup. I have set power saver mode to automatically be enabled when the battery reaches 35%. I also make use of a simple Windows application called PowerPlanSwitcher. It will automatically switch to the power plan profile to Power Saver when I disconnect the laptop charger cable.
How do you maximize your battery usage on your Windows 10 laptop?


