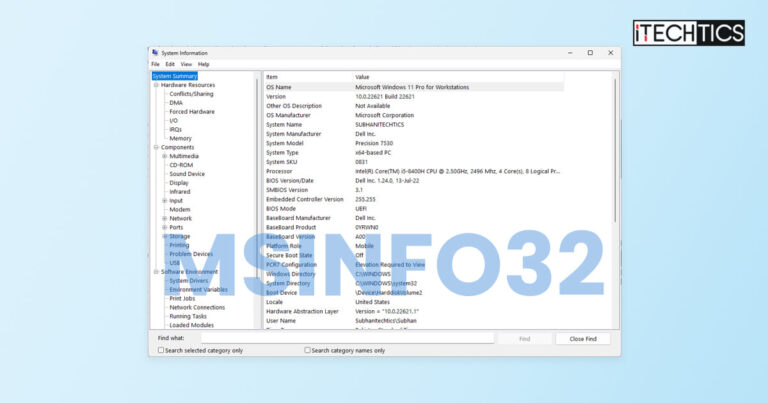
Sometimes you may need immediate information on your computer, its hardware, software, or internet connectivity settings. For that, Microsoft includes a built-in utility called “System Information,” or “MSInfo32” in the Windows operating system.
These tools have been included in the Windows OS since Windows 98, and every Microsoft OS released after that. It performs a fresh scan of your system search time the tool is run and fetches fresh information.
In this post, we are going to discuss what information can be obtained using the System Information tool, and how you can use it to generate readable reports.
SystemInfo.exe VS. MSInfo32
Before we proceed any further, we would like to discuss what SystemInfo is and how is it different from MSInfo32.exe.
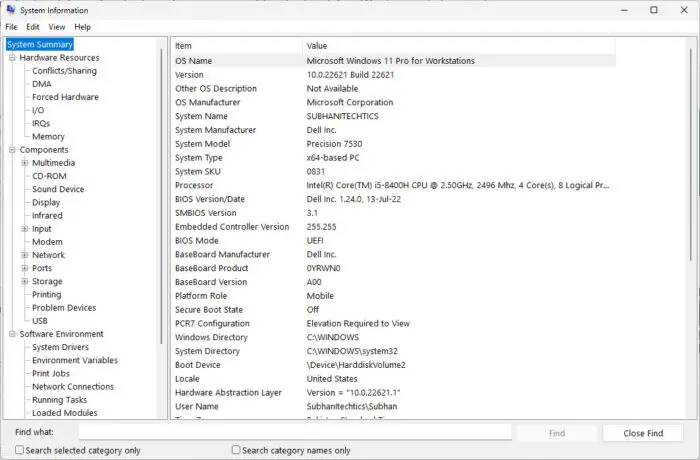
MSInfo32, or MSInfo32.exe is a utility in the Windows OS that opens in a separate window that displays “System Information” in the title bar. Therefore, it is also referred to as the System Information utility.
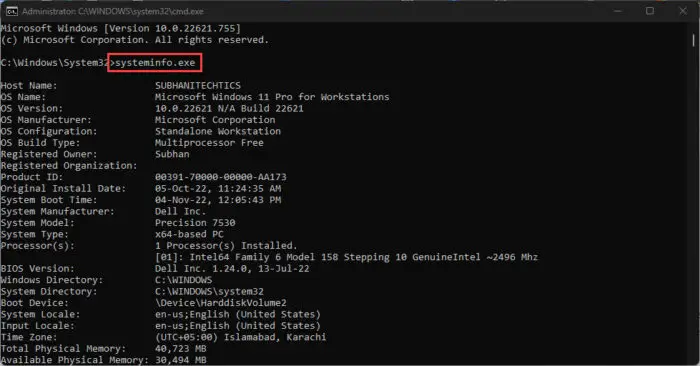
Whereas SystemInfo.exe is a command-line tool that displays a small part of the same information displayed in the MSInfo32 utility.
Having said that, both fetch system information for you to obtain, and both can be used to generate system information reports in plain text and HTML. Not only that, but you can also obtain information on remote devices on your network.
What Information does System Information Give
The list of information the MSInfo32 tool gives is lengthy. Therefore, the list below only highlights the major components on which the MSInfo32.exe tool reports:
- Operating system version, build, and other details
- Details of the hardware inside the computer (CPU, RAM, ROM, CD-ROM, motherboard, graphic and network card, etc.)
- BIOS/UEFI details
- Other system details (Page file, locale, virtualization status, etc.)
- Codec details (Both audio and video)
- Details on sound and display devices (and their drivers)
- Attached peripheral details
- Network adapter, protocol, and socket details
- Details of partitions on the disk
- Details of configured printers and their drivers
- Details of all drivers
- List and details of environmental variables
- Running and halted tasks and processes
- List and details of Windows services
- Windows error reports
Many of these item details are fetched when you attempt to open the respective category inside the MSInfo32 utility. However, Microsoft warns that you should always run this tool as an administrator because certain information needs elevated privileges to obtain accurate information.
Furthermore, MSInfo32 cannot be run in Safe Mode.
Let us now discuss how to run these tools and how to generate reports.
How to Run and Use MSInfo32.exe
You can open the System Information utility in multiple ways in both Windows 10 and 11. The methods shared below to open this utility are with elevated privileges, making sure that the cache is updated and accurate information is displayed.
Open System Information from Command Line
One way to open the System Information window is from the command line. All you need to do is type in the following in either the Run Command box, Command Prompt, or Windows PowerShell.
Note: Make sure to run Command Prompt or PowerShell with administrative privileges. If you are using the Run Command box, then press CTRL + Shift + Enter to execute the cmdlet with elevated rights.
msinfo32.exeOpen System Information from Search
Alternatively, you can also open the System Information utility by searching for it either in the Start Menu or from the search box in the taskbar. Here is how:
-
Search for either “system information” or “msinfo32” in the search area.
-
You will then see the System Information app. Click Run as administrator under it.

Run System Information as admin
The utility will now open with administrative privileges. Once it opens, you can navigate the different categories from the left pane and view the desired information in the right pane.
Now let us show you how to generate reports using the System Information utility.
Generate System Information Report
There are 2 ways you can generate a report using the System Information tool – one is from within the tool itself, and the other is through the command line.
Moreover, you can generate reports in both plain text and HTML. The reports contain information that is already viewable inside the System Information window. However, you may need a report to print or carry it onto another computer.
From MSInfo32 Tool
To generate a report in plain text (.txt) file, follow these steps:
-
Open the System Information utility by typing in msinfo32 in the Run Command box.

Open System Information -
Within the tool, click File from the top menu and then click Export.

Export report -
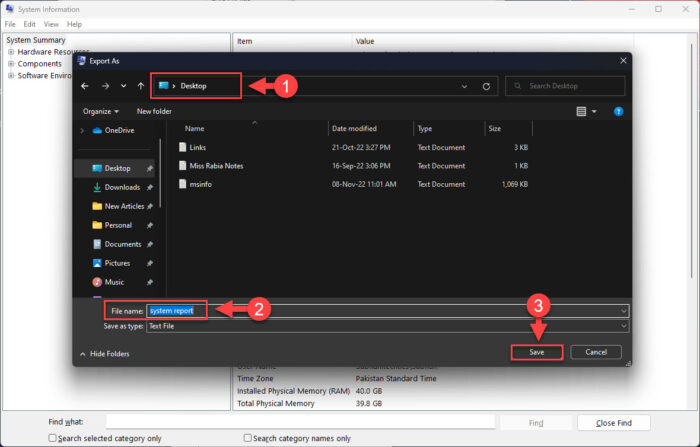
Now set a location and a name for the text file to save it, and then click Save.
Save text file -
You will now see a small window generating a report. This can take a few seconds to complete.

Generating report When the process is complete, you will be able to view the complete system report in a text file on the saved location.
Now if you want to generate an HTML (.nfo) report, then follow these steps:
-
Open the System Information utility by typing in msinfo32 in the Run Command box.
-
Within the tool, click File from the top menu and then click Save.

Save report -
Now set a location and a name for the text file to save it, and then click Save.

Save HTML file -
You will now see a small window generating a report. This can take a few seconds to complete.

Generating report When the process is complete, you will be able to view the complete system report in a .NFO file, which is an HTML file used for system reports.
You can also connect the System Information utility to another computer on the network to generate a report of that particular computer. The process to generate reports and view the information will be the same. However, you must first make a connection to the remote PC. To do that, perform these steps:
-
From inside the System Information tool, click View from the top menu and then click Remote Computer.
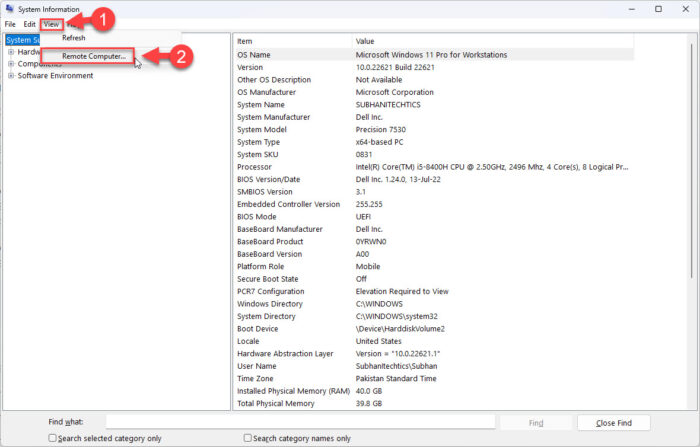
Make a remote connection -
The Remote Computer window will now open. Select the “Remote Computer on the Network” dialog box, then enter the name of the remote PC. When done, click Ok.
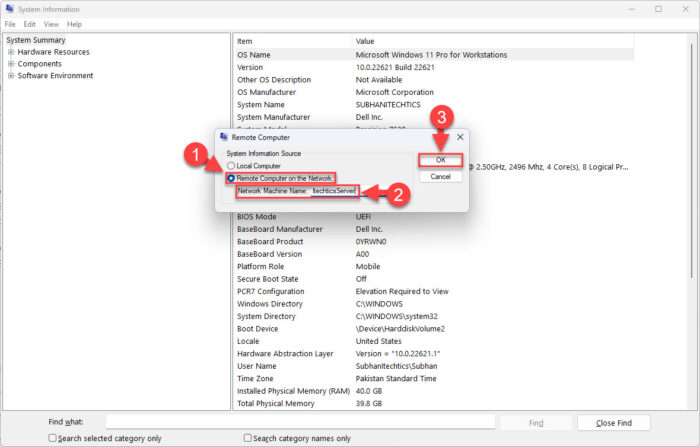
Connect to a remote computer -
The tool will now attempt to connect to the remote computer over the network. You will be asked to provide credentials to the remote computer, and when you do, the connection will be established.
Once done, you will now be able to view the remote computer’s details inside System Information, and even generate reports.
From Command Line
You can also use the “msinfo32.exe” cmdlet in either Command Prompt or PowerShell to generate these reports. Before we show you how, let us discuss the syntax and the switches used with this cmdlet.
msinfo32 /ReportType Path| Switch/Variable | Values | Details |
| ReportType | nfo or report | SWITCH – Specifies if you want to generate an HTML report or a text report |
| Path | C:\Path\FileName.txt | VARIABLE – Complete path to where you want to save the file; includes the file extension |
Note that if you do not include the correct file extension, you will receive an “Access is denied” error.
Moreover, if you used the /nfo switch, then the file extension must be .nfo. If you used the /report switch, then the extension must be .txt. Here is our example:
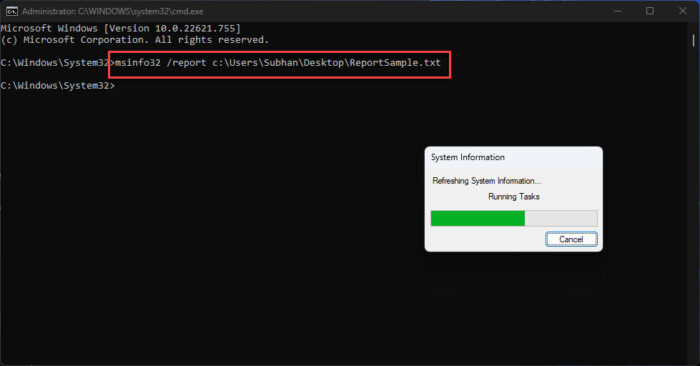
Note that running this cmdlet also opens a progress window. Once the process is complete, the window will close automatically and you will be able to see the generated report.
You can also generate a report using the command line of another remote computer on your network. For that, you must use this syntax:
msinfo32 /ReportType Path /Computer ComputerName| Switch/Variable | Values | Details |
| Computer | Computer | SWITCH – Used when connecting to a remote computer on the network |
| ComputerName | ItechticsServer or 192.168.10.222 | VARIABLE – Specifies the target computer’s name or IP address |
Using this syntax, you can generate a report of a remote PC. This can be very useful for system administrators when working inside a domain.
Up till this point, we have covered all the basics of the “System Information” or “MSInfo32.exe” utility. Let us now discuss the “systeminfo.exe” tool.
How to Run and Use SystemInfo.exe
As we mentioned earlier, the “systeminfo” is a command-line tool and does not have a Graphical User Interface (GUI) to interact with. It displays only a portion of the information you can see inside the System Information tool.
Moreover, you cannot generate a report with the SystemInfo utility. However, you can connect remotely with another PC on the same network and obtain details of it as well.
Run SystemInfo.exe
You can run the “systeminfo.exe” cmdlet in either Command Prompt of Windows PowerShell, but not in the Run Command box. This is because the cmdlet then fetches the system’s information and displays it inside the command line – which it cannot do in a Run Command box.
To view the details of your computer using this tool, simply run the following in the command line tool:
systeminfo.exe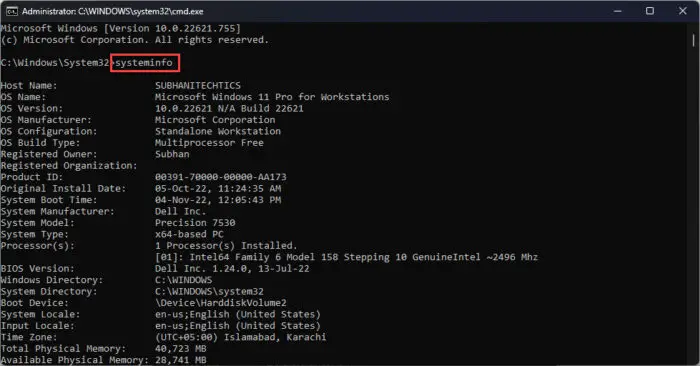
As you can see in the image above, some details regarding the operating system, BIOS, and physical hardware are displayed using the SystemInfo.exe tool. It also displays network and virtualization details, but no more than that.
Get Remote Computer Details using SystemInfo.exe
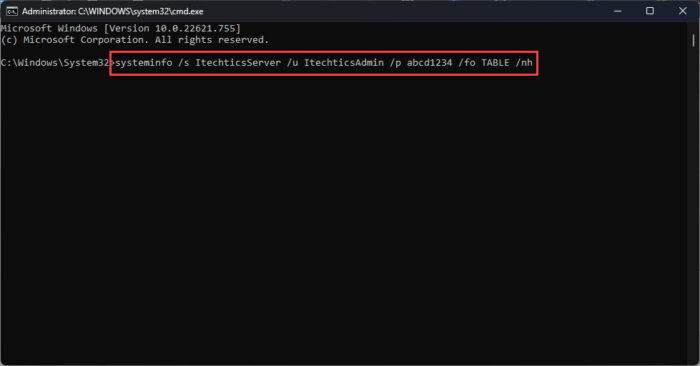
If you want to obtain the details of a remote computer on your network, that can also be done using the SystemInfo tool inside the command line. Here is the syntax of the complete command and below you’ll find a table explaining the different switches and variables:
Systeminfo /s ComputerName /u DomainName\UserName /p Password /fo TypeOfFormat /nh| Switch/Variable | Values | Details |
| /s | /s | SWITCH – Specifies the name or IP address of remote PC |
| /u | /u | SWITCH – Specifies the authenticating username on the remote PC |
| /p | /p | SWITCH – Specifies the password for the username to authenticate on the remote PC |
| /fo | /fo | SWITCH – Specifies the output format of the data |
| /nh | /nh | SWITCH – Suppresses column headers in the output. Valid when the /fo parameter is set to TABLE or CSV. |
| ComputerName | ItechticsServer Or 192.168.10.222 | VARIABLE – Name or IP address of remote PC |
| DomainName | Contoso | VARIABLE – Name of your network domain |
| UserName | ItechticsAdmin | VARIABLE – User account name of remote PC to authenticate |
| Password | xxxxxx | VARIABLE – Password for the user account of the remote PC to authenticate |
| TypeOfFormat | TABLE Or LIST Or CSV | VARIABLE – Specify the format of the output data |
This cmdlet will simply fetch the details of the remote PC and display them inside the command line tool.
Closing Thoughts
To sum up, both the System Information (MSInfo32) tool and the SystemInfo.exe tool are alike – since they both provide details on your computer. However, unlike MSInfo32, SystemInfo.exe cannot generate and save reports and only works in the command line.
Both of these tools are excellent for system and network administrators so they can obtain the details of both local and remote computers in a jiffy, without having to get up from their seats!

