If your system does not seem to detect a USB device connected to your PC, you may see a notification from the corner of the screen that states:
USB device not recognized
If you look further, you will find that the USB device is unrecognized in the Device Manager Console and contains the following:
Unknown USB device (Device Descriptor Request Failed)
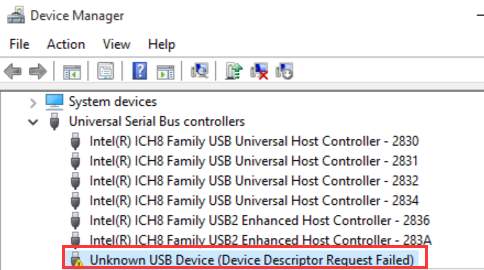
This message is usually displayed when you plug in a USB device, a memory card, or any other thing connected via the USB port and the PC is unable to load it.
This error can occur due to several different reasons. Today we are going to discuss what those reasons could potentially be and how to fix them so that you are able to restore access to your USB device.
What is Device Descriptor?
The Device Descriptor contains information about the USB device. It is the root of the descriptor tree, which contains critical information about the device, such as vendor ID, product ID, etc. These are unique identifiers that help machines identify the type of device connected.
Windows then uses this information to load the right type of driver for the device to use, so that it becomes useful to the user.
When this information fails to load, Windows is unable to load the respective driver, which is why the device goes undetected.
What Causes Device Descriptor to Fail?
There can be several reasons why a USB device may prompt an error “Device Descriptor Request Failed.” Here is a list of possible causes:
- USB or USB port is physically damaged.
- The USB driver is corrupted or outdated.
- The USB device has bad sectors.
let us now show you how you can fix this error so that the USB may begin to function normally again.
How to Fix Device Descriptor Request Failed
Check for hardware issues
The first thing to do is to check if there are hardware issues. This includes the USB device and the USB port on your computer.
First, plug the USB device into another USB port to check if that particular port has an issue. If the USB device works normally on the other port, it means that the first USB port is damaged.
If the USB device does not work on the second port either, try using it on another device entirely. This will rule out the possibility of the USB device being damaged. If the device doesn’t work on another PC wither, it means that the USB device is damaged. However, if it does work, it means that there is some software issue with your initial PC.
In that case, continue to perform the methods given below to fix the issue.
Unplug power from laptop
This may seem unusual, but often a laptop with a power adapter plugged-in causes issues related to connected devices, such as USB flash drives. You can try using a USB device while the laptop is running on battery power and the power adapter is unplugged.
If this does not resolve the issue and the USB device still doesn’t function properly, you can eliminate the possibility of a faulty power supply.
Scan for hardware changes
Manually scanning your PC for hardware changes can detect a USB device if all goes well. Follow the steps below to perform a quick scan:
- Plug in the USB device.
- Now open the Device Manager by typing in devmgmt.msc in Run.

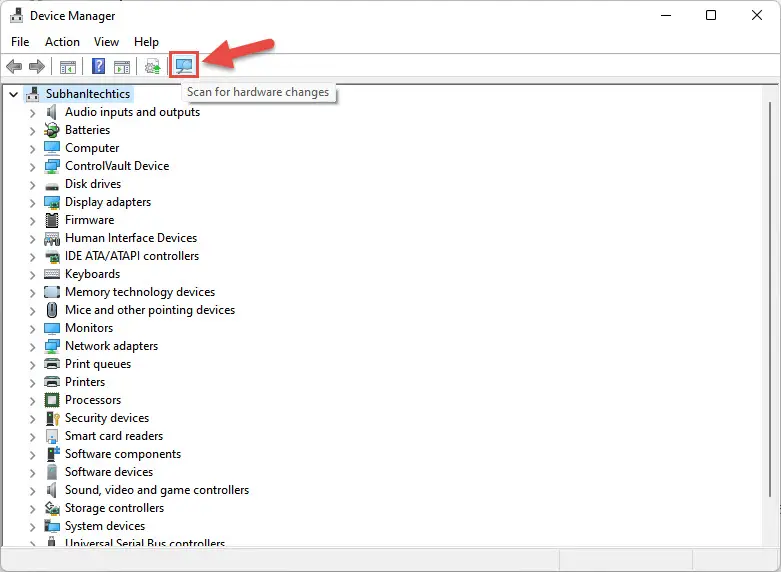
- From the console, click on the “Scan for hardware changes” button.

The computer will now refresh the page and list all detected devices. Check to see if the USB device is now recognized. If not, proceed with the given troubleshooting methods below.
Update Generic USB Hub Driver
The issue may be caused by an outdated USB driver. You can try and update the driver if any are available. Here is how:
- Open the Device Manager by typing in devmgmt.msc in Run.

- From the console, expand the “Universal Serial Bus Controller.”

- Right-click “Generic USB Hub” and then click Update driver from the context menu.
- From the pop-up window, click “Search automatically for drivers.”
- The wizard will now start searching for an update for the driver on the internet. Once found, it will automatically install the update. If not, you will be prompted with “The best drivers for your device are already installed.” Either way, close the wizard.
Reinstall USB Driver
It may be possible that the USB driver is corrupted and needs to be reinstalled. Perform the following steps to reinstall the driver:
- Open the Device Manager console by typing in devmgmt.msc in Run.

- Now expand “Universal Serial Bus controllers.”

- Right-click on the device stating “Unknown USB Device” and then click Uninstall from the context menu.
- In the confirmation dialog box, check the box next to “Attempt to remove the driver for this device” and then click Uninstall.

- Now click on the “Scan for hardware changes” button at the top.
- Now restart your computer. This step is optional and would only reassure the driver re-installation.
After the computer reboots, check to see if this resolves the issue.
Disable Fast Startup
Fast Startup is a feature that controls the behavior of Windows shutdown and startup processes. Fast Startup enables the OS to reload the necessary components while keeping others in the memory, resulting in faster boot times. However, this often negatively affects the different components of the computer and is thus unable to load them properly.
Here’s how to disable the feature in Windows:
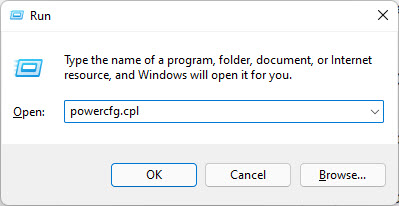
- Open Power Options by typing in powercfg.cpl in Run.
- Now click Choose what power buttons do from the left of the window.

- Now click Change settings that are currently unavailable.

- Next, uncheck the box next to Turn on fast startup (recommended) and then click Save changes.

- Reboot the computer.
Once the computer restarts, check if the USB is now being detected.
Disable USB Selective Suspend Setting
The “USB Selective Suspend” feature allows Windows to shut down/suspend a selected USB port while others remain to function normally.
By default, this feature is enabled in Windows, which may be the reason your USB device is unable to run properly. Follow the steps given below to disable this feature:
- Open the Power Options in the Control Panel by typing in powercfg.cpl in Run.

- Click Change plan settings in front of the Selected plan.
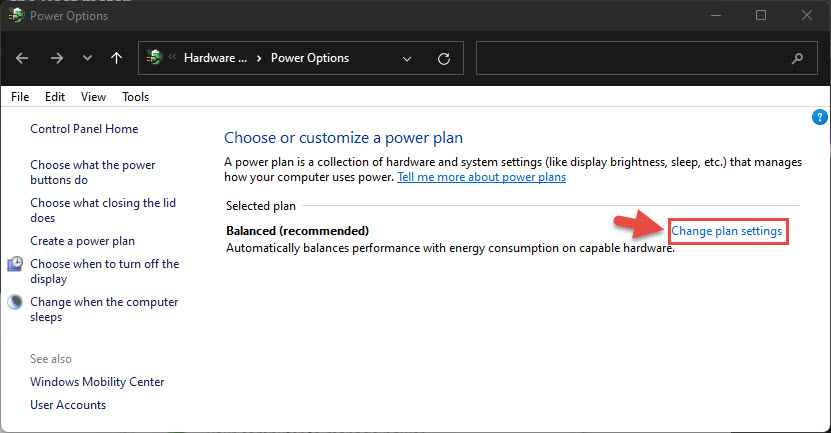
- On the next page, click Change advanced power settings.

- From the popup, expand “USB Settings” and then expand “USB selective suspend setting.”
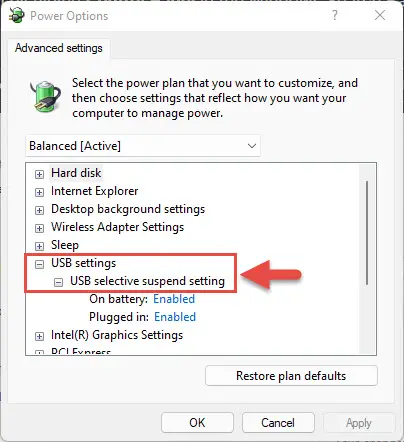
- Now change the settings for “On battery” and “Plugged in” to Disabled. Click Apply and Ok when done.

- Now restart the computer.
When the computer reboots, check if the USB device is now detected.
Closing Words
Previously, Windows 10 came with a hardware troubleshooter, which was a big help for users to resolve issues with their USB devices. However, Microsoft has now removed the said troubleshooter. This is why we must now troubleshoot hardware-related issues, as we have in the post above.
We hope that the “Unknown USB device (Device Descriptor Request Failed)” issue has been resolved after performing the methods discussed above.

