More people are working remotely day after day as the current global pandemic is on the rise again. For that, they need to access their computers and devices in their offices from the comfort of their home.
Rather than using third-party tools and applications to remotely access their machines, such as TeamViewer or Chrome Remote Desktop, you can access your computers directly using the Microsoft Remote Desktop application.
Microsoft Remote Desktop is an excellent, free-to-use application best suited for Windows 10 users through which they can connect to other devices remotely. The app can be downloaded and installed through the Microsoft Store. However, the application is only a pawn in the entire process. Making a successful connection between devices over the internet requires further configurations, which are discussed in this article.
Let us show you how you can access a Windows 10 PC using Remote Desktop.
The process we are about to discuss needs to be performed in the same order. Here are the highlights of the process:
- Target PC:
- Prevent your PC from entering sleep mode
- Enable/allow remote connection
- Set static IP address
- Target router:
- Determine your public IP address
- Configure DDNS (in case of dynamic public IP address)
- Configure port forwarding
- Source PC:
- Install & configure Microsoft Remote Desktop
Continue reading the step-by-step guide to perform all of these tasks.
Prevent your PC from entering sleep mode
When a computer enters sleep mode, it is no longer responsive to network calls. Meaning, if a computer is in sleep mode and you are trying to access it remotely, it will be an unsuccessful attempt. Therefore, it needs to be configured such it does not enter sleep mode. Here are 4 ways you can prevent it from happening.
Enable/allow remote connection on Windows 10 PC
The Windows 10 firewall blocks any remote connections by default. It needs to be enabled and allowed through the firewall for a successful Remote Desktop Protocol (RDP) connection. There are 2 ways to enable remote desktop connection in Windows 10.
Enable remote desktop connection through Control Panel
Open the Control Panel, click System and Security, and then click Allow remote access under System.
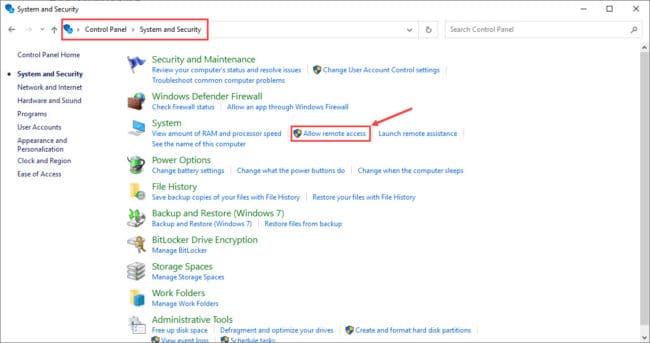
In the System Properties window, select the radio button next to “Allow remote connections to this computer” and then make sure the checkbox under it is checked. Click Apply and Ok.

Enable remote desktop connection through Settings app
The same can be achieved using the Settings application in Windows 10. Open the Remote Desktop setting in the Settings app (Run -> ms-settings:remotedesktop) and toggle the slider under Enable Remote Desktop.
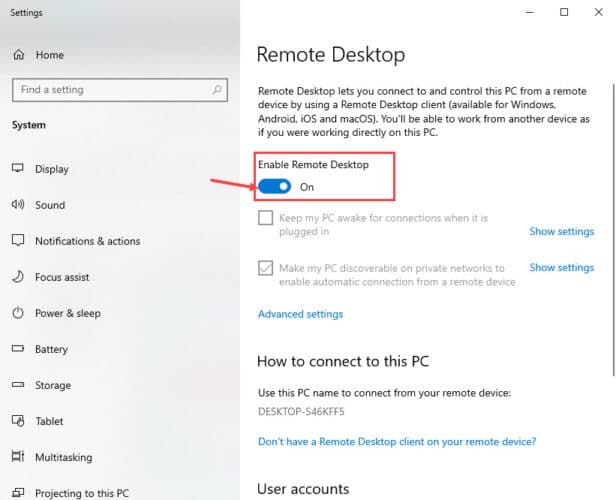
Remote Desktop connection is now successfully enabled on your PC. Let us now proceed with the other configuration steps.
Set static IP address
By default, most routers are set to Dynamic Host Configuration Protocol (DHCP). This protocol automatically allots vacant IP addresses to all connected devices to avoid any IP conflict. However, in a further step down the article, we will require to forward a port onto the IP address of this target PC. For that, we need the IP address of this machine to be static, i.e. not continuously changing.
Therefore, we must set a static IP address for this right now. Before we do that, let us see what the current IP address of the machine is so that we allocate the same static IP address to avoid an IP address conflict with any of the other devices on the network.
Check your current local IP address
To identify the current allotted IP address, open Command Prompt and type in ipconfig /all. This command will display all the IP configurations of all network ports on the PC, including virtual ones.
You need to look for the “IPv4 address” under the network adapter that is connected to the router, it may be wired or wireless. In our case, we are using Wi-Fi to connect to the router:

In the image above, the IP of our target PC is 192.168.100.245. We will be assigning the same IP address manually to make it static.
Configure static IP address
To configure a static IP address on a Windows 10 machine, type in ncpa.cpl in Run to open the Network Connections window. From there, right-click the network adapter connected to the router and click Properties from the context menu.
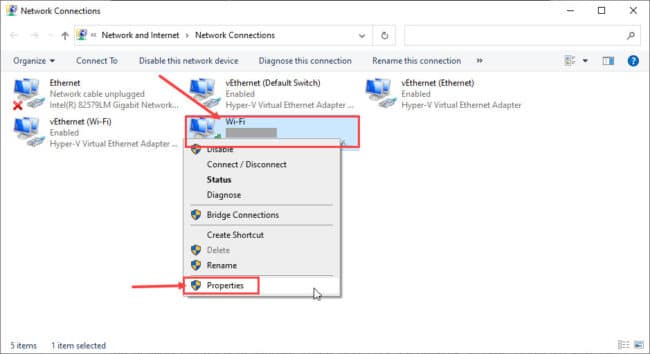
On the Properties window, click Internet Protocol Versions 4 (TCP/IPv4) and then click Properties.
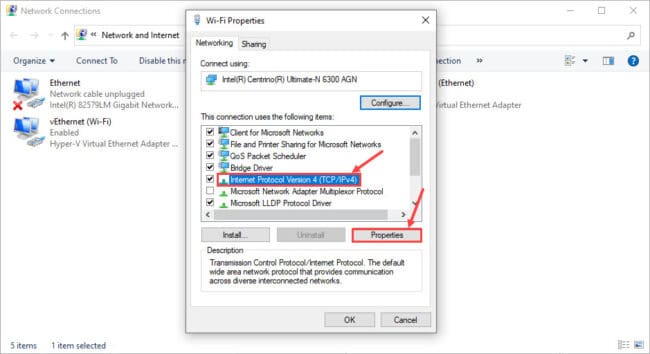
In the next Properties window, select the “Use the following IP address” radio button and then fill in the fields below from the information obtained from the Command Prompt earlier which includes the IP address, subnet mask, default gateway, and DNS server(s). Once done, click OK on all open windows to close them.
Note: You can set the DNS server(s) to Google’s addresses which are 8.8.8.8 and 8.8.4.4.
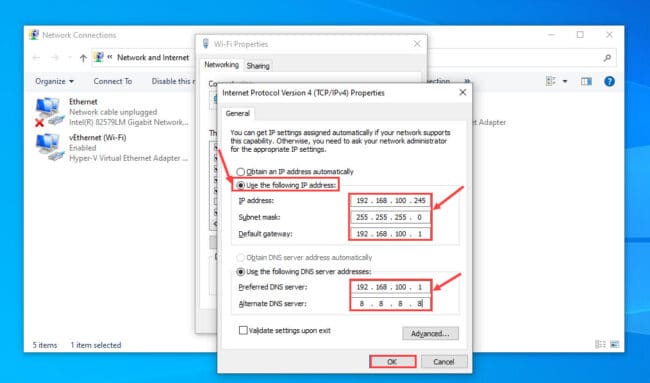
You have now successfully set up a static IP address on your computer. Make sure that you are still connected to the internet to ensure that all configurations are done correctly.
As an alternative, if you are more comfortable with the command line, you can also set a static IP address and DNS server using the command line in Windows 10.
Determine public IP address
The next part of the process is determining your network’s public IP address. This IP address is provided by your Internet Service Provider (ISP). You can check your public IP address via command line, or simply type in “What’s my IP address” on Google’s website to find out.
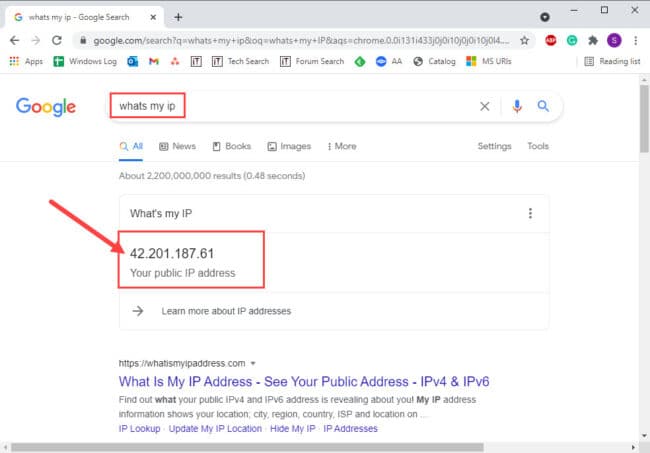
Your public IP address will then be highlighted, as shown in the image above.
Usually, this IP is static. But often ISPs tend to provide dynamic public IP addresses which change from time to time. If that is the case, you need to contact your ISP and ask for a static IP address, which may cause a little extra as these IP addresses are primarily reserved for businesses.
Alternatively, you can also configure the Dynamic Domain Name System (DDNS) on your router to assign your router a name it will track regardless of the change in the public IP address. Note that this only requires to be done if your public IP address keeps changing.
Configure DDNS on router
Dynamic DNS keeps track of your changing public IP address and works like a regular Domain Name Server. The name you set for the domain will keep still while the public IP address keeps changing.
Note: Not all routers have this option. Please check whether the setting is supported on your router via the manufacturer’s website.
First, you need to access the router’s configuration interface via a web browser. Enter the IP address of the router’s interface which can usually be found on the back of the router.
Note: Commercial routers, such as Juniper, Cisco, etc., have a command-line interface that needs to be accessed using the SSH protocol with apps like Putty.
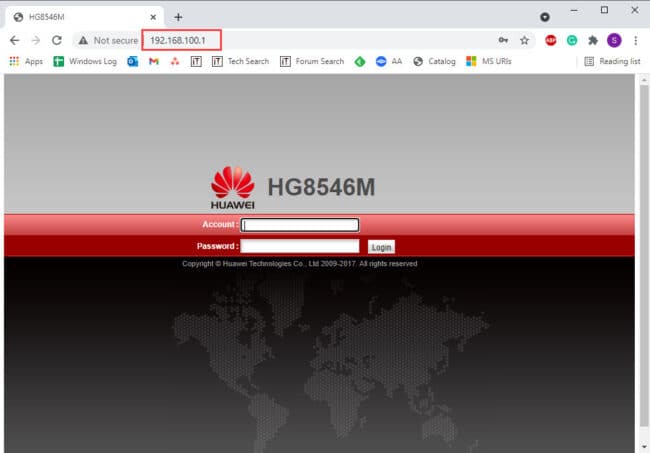
Now log into the interface using the credentials which are usually available on the back of the router, if not changed by a net-admin. After logging in, look for “DDNS configuration” which is usually under Network Application, but each router can have its own different layout.
Configure the DDNS settings according to your requirements and set a name for the domain, as in the example below:
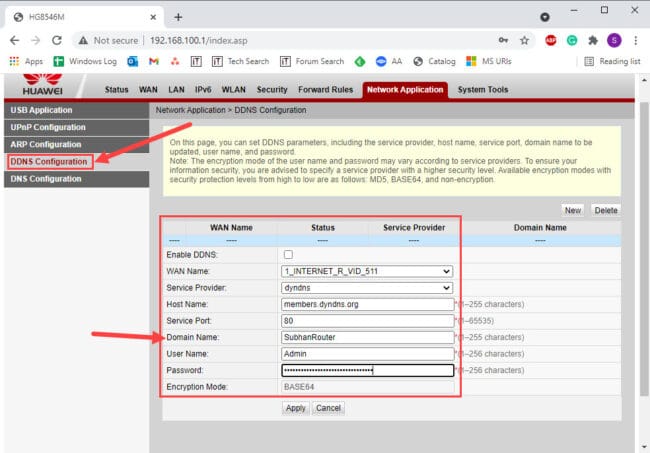
Now that DDNS has been configured, you can proceed to the next step.
Configure port forwarding on router
Network ports are used by Windows services and applications to send and receive data over the network. When accessing a PC over the internet with Remote Desktop, the router needs to understand which port to forward the incoming traffic on, as one router may have many internally connected devices.
To configure port forwarding, access the router’s interface again and log in. Look for “Port forwarding” or “port mapping” settings within the router. These are usually found under Forward Rules. Enter the following configuration:
- Enable port mapping: Check
- Type: Application
- Mapping Name: Enter any name for the rule
- Internal host: IP address of target PC (Static IP that we set earlier)
- Protocol: TCP
- Internal port: 3389
- External port: 3389
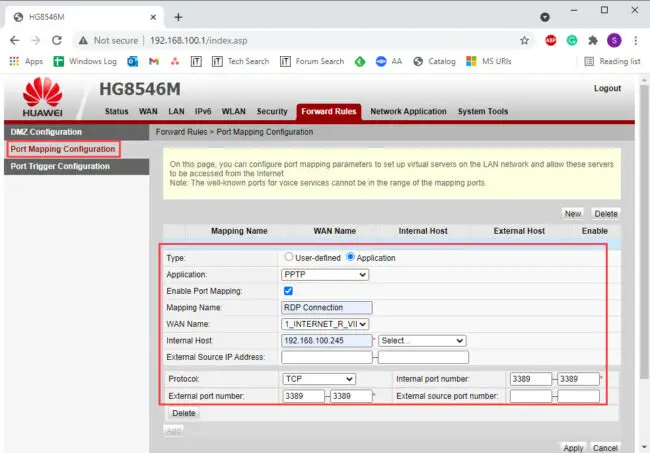
Save all settings and you have now successfully configured port forwarding on your router.
Install & Configure Microsoft Remote Desktop on source PC
We can now begin the setup phase on the source PC from where you will be remotely accessing the other computer. We shall start with installing Microsoft Remote Desktop.
Open the Microsoft Remote Desktop page in the Microsoft Store and click Get.
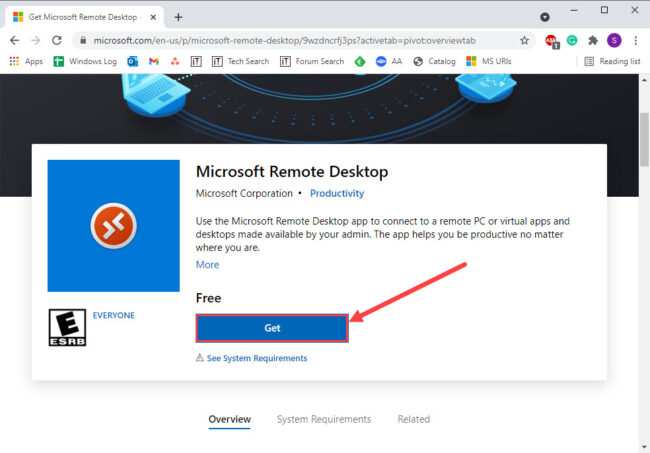
The Microsoft Store will then open and the app will begin downloading and installing. Once installed, click Launch. When the application launches, click Add in the top-right corner, and then click PCs.
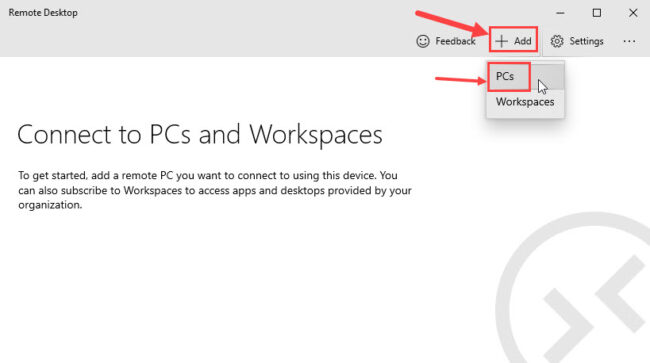
On the next screen, under PC name enter the public IP address or the DDNS (if configured). Then, click on the + sign in front of User Account.

In the Add an account window, enter the login details for the remote PC. If there is a Microsoft account associated, enter your Microsoft account’s credentials. If you have a local account, enter the local account’s credentials. Click Save when done.

Now configure any additional settings (optional) and click Save at the end. You may now connect to a remote PC using the Remote Desktop application from the comfort of your home, or anywhere else with a PC and a stable internet connection.
Closing words
The process may seem lengthy, but it is doable. This needs to be a one-time configuration so you can access your remote PC from anywhere in the world with a stable internet connection, without having to purchase any third-party software.
Microsoft Remote Desktop is a simple yet excellent tool to help you manage various remote devices that you can connect to simultaneously and be productive.


